AI Powered R2D2 | 3D Printed Build Thread

Just to hijack my own thread and ask a bit of advice. I'm new here and I've started build threads for 2 of my most interesting projects but I have like 6 on the go.

Is it worth creating build threads for all my big projects on here, as I give them away after and the feedback I've been getting so far is extremely valuable, or just keep it to one or two so I'm not spamming?

I just finished the base model for this last night to kick off another one, Shatner is coming to town next month and I'd love to build one and get a sig, lifelong fan:

View attachment 1536230
Login • Instagram
It's a full light/sound model for a TOS type 2, I just did a base type 1 first to get started.

What do I have on the go? (all for 3D printing)
Aliens Pulse Rifle, fully electronic and mechanical. I have the mechanical done and working on the code with Spidey74
Mando pistol fully electronic with working trigger and selector, almost done, works awesome
E-11 Light and Sound, also almost done. Stock folds out, bolt works scope lights up with proper display, etc
SE14r, same features as above, working
DC17, convertible prop/rubber band gun
Luke/Vader ESB sabers, fully electronic and battle read. PVC core with collar makes them incredibly strong. Models done, demos done, power holding me up
Lawgiver, mechanical/light sound, voice recognition, oled (that's the other project I have here) modeling done, code a nightmare but mostly done (also working with Spidey74)
5th element stones, light up with animated effects, code done, models done, in paint

ADHD is both a blessing and a curse...
My $.02

Different build threads is the way to go. You're not spamming since every one of your projects is unique and packed with tons of details. Besides, a single thread will just be too difficult to manage and for others to follow since builders and makers will be interested in different projects. Conversely, you don't want too many active build threads if you can't keep up and be responsive to the feedback and interest. Find a balance that works.
 
Is it worth creating build threads for all my big projects on here, as I give them away after and the feedback I've been getting so far is extremely valuable, or just keep it to one or two so I'm not spamming?

Missed this before!

Whilst I'm certainly a relative newcomer here myself, I will say I tend to skip over the "all my stuff!" threads. The titles don't grab me and I feel like when I do have a look, those threads are either really superficial or focus on the sorts of props I'm not interested in. (Like, I get why some folks find exploring the minutia of every lightsabre hilt ever is interesting, but I'm just not into lightsabres at all. As an example.)

So a thread for each project, in the appropriate subforums, would help get you an audience interested in that project specifically.
 
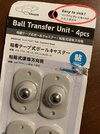
There's 2 that come with the Waveshare Jetbot kit in the back legs, so I just used them verbatim. The front one is the cheapest I could find on Amazon.

Well I know I’m looking forward to trying my new casters out!
 

Attachments

  • 6473F314-85EE-47BE-AFFC-2EF7732F0206.jpeg
    6473F314-85EE-47BE-AFFC-2EF7732F0206.jpeg
    780.9 KB · Views: 71
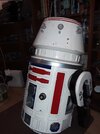
Just a progress update, here's all the versions I have so far, I decided I would get this 100% as a robot, then go through the excellent feedback I've received here and do a V2 that's screen accurate. The versions you see on the table: closest one is for a how-to vid, painted one is the demo, furthest is the hacked together development version (the logo on the back of that one is for the company I work for, wacky toys are my shtick around the office, final isn't watermarked anywhere). I'll release the V1 models hopefully next week along with a 'how to' video, code, and a shopping list so you can get it running. It's about $200 all in, which I think for a real AI drive R2 is a steal.
20220203_181655.jpg
 
Shiny!

Any plans for other dome types? R5-D4 is kinda my jam.

If not your area of interest, I'm sure I can pull this dome and the Baddeley R5 dome into F360 and kludge something together. :)
 

Attachments

  • 20220126_204540.jpg
    20220126_204540.jpg
    1 MB · Views: 64
Shiny!

Any plans for other dome types? R5-D4 is kinda my jam.

If not your area of interest, I'm sure I can pull this dome and the Baddeley R5 dome into F360 and kludge something together. :)
Sure, I can do an R5-D4 head after. When V1 is done I'm handing it off to a machine learning expert to build out other functions like flir/ir cameras, lidar etc and for that I was going to do custom heads, R5 would be perfect :D If you do want to do the R5 head yourself it's just a twist lock to the body, I've attached the STL for R2's head and if you need I can give you the dimensions.
 

Attachments

  • R2D2_Head_V1.stl
    2.4 MB · Views: 96
Oh wow, this looks awesome. I'd love to take a crack at one of these, I just need another four or five hours in every day so I can cram everything in!
haha, tell me about it, it's like a second job sometimes. Let me know if you decide to do the R5 head and if you're willing to make it freely available, if so you can post it as a remix when I post R2 to thingiverse. If not to either of those I'll take a crack at it in a week or two when V1 is finalized and rolling and post it alongside the R2 files.
 
haha, tell me about it, it's like a second job sometimes. Let me know if you decide to do the R5 head and if you're willing to make it freely available, if so you can post it as a remix when I post R2 to thingiverse. If not to either of those I'll take a crack at it in a week or two when V1 is finalized and rolling and post it alongside the R2 files.

I'm in a similar boat when it comes to time pressure, and of course my single printer is fully occupied. So while I'm happy to do the R5-type dome eventually, I'm probably a couple of months away, dead minimum, from hitting the point where I'd even start to think about working on this. Basically, I'm queuing it up as a possiblity for the next time I want a break from my other, major projects.

So I guess where I'm at is:
-anything I'd make I'd certainly share, given that I'd just be mashing your work and Mike Baddeley's together.
-it's something that feels is just barely outside of my current fusion 360 skills so it would make a good learning project.
-it's not on the top of my do-list right now.

From all that, I conclude you could certainly get it done faster than I will, but if making an R5 dome doesn't inspire you and you want to move on to other projects, I will make one in due course. Basically, do the thing that will give you the most pleasure, since this is your hobby!
 
haha, you win, here's the basic shape of R5's head and now working on the details. I did the dimpled and flat plates and around the neck. They're separate swappable pieces so you can add holo tape to them if you want the classic look. Expert advice would be appreciated, no good reference for this so I'm cobbling together from different screens.
R2D2_2022-Feb-05_08-15-57PM-000_CustomizedView36161851529.png
 
There are blueprints for an R5 dome on Astromech.net. And of course there's the Baddeley R5 dome which I'm reasonably sure was based on the Astromech.net blueprints.

If you don't want to register on Astromech, PM me an email address and I'll send you the PDF.

The silver ring at the bottom is exactly the same as the silver ring at the bottom of R2-D2's dome, because it's actually the same part. For the first movie, that's actually the bearing race the dome turns on! There's a thread here somewhere about that, it's pretty cool.

The "dimples" are actually flat; on the original, they're machine-turned aluminium. The biggest thing is that they're overlapping circles, not an array like that. The movie version was done by hand and is pretty irregular; most of the fan built versions have used some form of mass-produced version that ends up looking like this:

engine-turned-stainless-steel.jpg


Of course, that's incredibly hard to reproduce on a smaller scale. My 1:18 and 1:6 Arfives just have silver panels. So your approach is probably as good as it's going to get.
 
There are blueprints for an R5 dome on Astromech.net. And of course there's the Baddeley R5 dome which I'm reasonably sure was based on the Astromech.net blueprints.

If you don't want to register on Astromech, PM me an email address and I'll send you the PDF.

The silver ring at the bottom is exactly the same as the silver ring at the bottom of R2-D2's dome, because it's actually the same part. For the first movie, that's actually the bearing race the dome turns on! There's a thread here somewhere about that, it's pretty cool.

The "dimples" are actually flat; on the original, they're machine-turned aluminium. The biggest thing is that they're overlapping circles, not an array like that. The movie version was done by hand and is pretty irregular; most of the fan built versions have used some form of mass-produced version that ends up looking like this:

Of course, that's incredibly hard to reproduce on a smaller scale. My 1:18 and 1:6 Arfives just have silver panels. So your approach is probably as good as it's going to get.
The circles on the panels on mine aren't to imitate the original, but the version used in the Mandalorian, in there it was a set of 6 circles cut into a plate. The closest I can think of to replicate the original at scale is to use holographic tape, since it should be close to the rainbow effect you get in the reflections in the original film. I made both kinds of panels, shown in the render is the mando panels since the other panels would just look flat.

To model I just used whatever was on the first page of google, I didn't see your post with references until after. I think used a reference pic from Mando, a toy, and shot of the original. I know it's not bang on, but once I get it done to this point it's easy to adjust from better references later. To be honest I time boxed it at 3hrs because I have other stuff to do today but didn't want to lose the idea. There's also some details and elements in there because of the resolution of 3D printing, the nozzles are usually .4mm with a .2mm layer height, so fine knurling etc doesn't show up.

This head is straight swappable with the R2 head so you can choose whatever you'd like when I publish the files.

R2D2_2022-Feb-05_10-17-07PM-000_CustomizedView14691454172.png

R2D2_2022-Feb-06_12-36-18AM-000_CustomizedView12661576541.png
 
Last edited:
Sweet! Not "perfect," inasmuch as anything droid related could ever be perfect - even in the first movie there's two different props plus a costume that portray Arfive and they all have different details - but recognisably my boy! You're wicked fast, mate!

Also, I'm going to have to go back and look at the Mandalorian Arfive again, because I totally did not notice the engine turning being turned into indented circles. Since you didn't grab the Book of Boba Fett one with the really screwed up eyes, I see nothing to gripe about here.
 
It's in the printer and will be done in 20hrs, I also got the main R2 AI done today, if everything fits and drives around well I'll release them in the next few days when I get all the docs on the build together. But all you really need is the Waveshare Jetbot Kit and a 2G Jetson Nano (and the code fix on P1 of this thread) and you're golden. You can do the 4G kit too but it's double the price.
 
Pic of it together before I power it up and it inevitably burns to the ground (I'll add the hoses and finish the paint after it's rolling safely):

20220206_002053.jpg
 
The one that ends in 6541. Seeing the eye shape can be tricky and there's still a bit of debate about the details, but they're definitely a wide cylinder on top of a narrow cylinder. Here's the best photos I could find quickly.

Remember there were only 2 or 3 physical R5 domes in the first movie, and they blew one of them up. So these are all repaints of the same physical object.

Your image ending in 0965 looks more like the simplified art the animated serieses used.
 

Attachments

  • PDVD_308.jpg
    PDVD_308.jpg
    42.4 KB · Views: 72
  • r5_ref.jpg
    r5_ref.jpg
    79.2 KB · Views: 76
  • r5k6_front.jpg
    r5k6_front.jpg
    58.3 KB · Views: 71
  • PDVD_034.jpg
    PDVD_034.jpg
    38 KB · Views: 71
Despite the cold weather - the paint went on pretty well. First time working with white gloss, but after a few coats it's looking pretty sweet.

I had a bit of a setback this weekend with the painting. I used the white gloss as a base coat for the head, to save time of course :| Then I sprayed over it with Tamiya silver, which has worked amazingly in the past. The silver paint cracked and bubbled - so I'm going to have to sand and re-base the head before it's finished. Another few days before that's done I guess, weather permitting.

In the meantime I'm starting on the assembly of the Jetbot parts and get it configured for operation!

Have you done silver over white before? In my experience, silver over white tends to lack depth. Gloss as a base coat also often lacks depth. For good metallic effects I usually go for a satin or matte black or red base coat.

And yes. Always do a test piece when combining new paints - you never know what's going to react!
 

Your message may be considered spam for the following reasons:

If you wish to reply despite these issues, check the box below before replying.
Be aware that malicious compliance may result in more severe penalties.
Back
Top