Advice on Repairing my newly acquired MR AT-AT

shenphong

Sr Member
RPF PREMIUM MEMBER
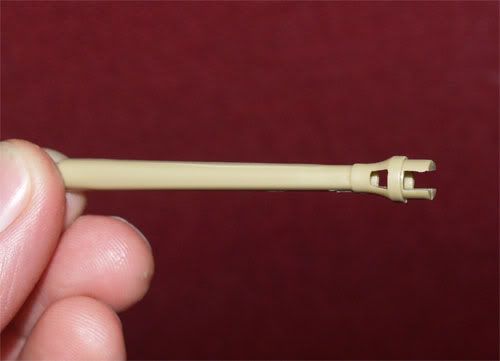
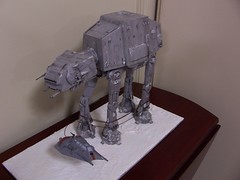
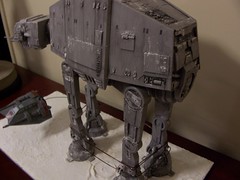
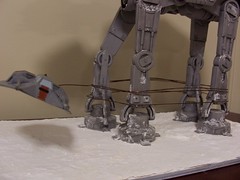
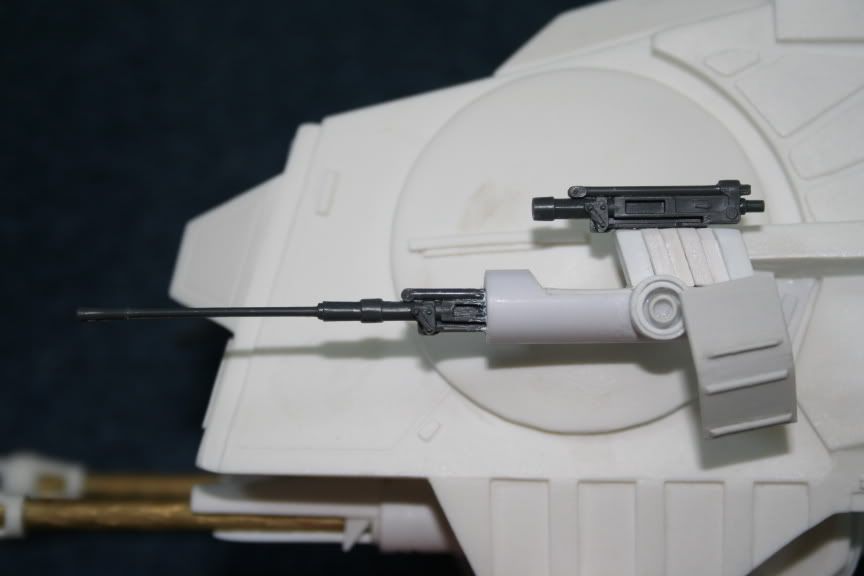
I recently acquired a MR AT-AT that is in need of some work. Picked up this beauty for a measly $150 and plan to dremel out the front guns to repair/replace them as well as finding the other little bits here and there to fix this guy up. I'll also be building a custom base for it but will need some advice as to the bolt size that is needed for the legs (I was unaware that it looks like the MR AT-AT had screws going into the feet). Can anyone tell me the colors/paints used on these guys? I'll be searching along as I go on for the parts to repair him, but wondering if it would be better to try to find casts of the parts, or actually use the donor parts to slap onto him...not exactly sure as I've read in several posts and forums that "studio scale" was a broad term for the AT-AT. Here are some shots to show the beast off as well as to show what work needs to be done...with the repair and replacement parts, I feel like a full "redo" will need to be done on the paint work as it seems weathering was lacking on the LE version compared to the signature.

I wished someone told me how heavy thing thing was too and how odd it was to carry one around...walked around San Jose and Berkeley the entire day with the thing and got nothing but odd stares, questions, and sometimes unwanted attention.:lol

IMG_0292.jpg

IMG_0291.jpg

IMG_0290.jpg

IMG_0289.jpg

IMG_0288.jpg

IMG_0287.jpg

IMG_0286.jpg

IMG_0284.jpg

IMG_0283.jpg
 
Last edited:
I feel terrible for you.... Look as a favor I'll take it off your hands for $300.

Seriously though, should be an easy fix. Kitparts for the guns. And cast up the existing parts for the missing detail. Maybe ask Julien about the guns.
 
lol wth sherry...how did my thread get hit with the spam...basically I will just be making the ladder parts out of styrene, casting the toe and feet sections and planning to try and get the kit parts for the guns while I dremel out what I can for the chin guns and the rear butt plate (although I would not mind it if someone else had a cast of these parts as well as I'm going to try to keep it economical) . Can anyone tell me what size the screws on the bottom of the feet are? Not exactly wanting to bring this thing into a home depot and figuring it out.
 
I'll also be checking today if the seller has anymore. Months back, he did have ones that were near perfect condition for $600-800 with minor paint blemishes apparently.
 
Planning to actually, something for the base anyways. I have an action fleet snowspeeder just ordered as well, so going to try to make a fairly decent display base and get this thing top top shape for under $300.
 
Dunno if this helps..I did this on my ATATron kit..
IMG_0832.jpg


I made it from plastic tubing and tamiya flakveirling guns.
As for the main guns I don't know what kit they were made from, but it looks like it could've been another tamiya tank kit that was used. As said above, Julien might know more, or perhaps you could ask Lee.
You should be able to replace the broken detail on the side of the hull with some plastruct "angle" pieces, and I reckon the toes could be cast fairly easily if you can pop one of them off to throw some rubber on it..

Good luck

Cheers

Phil
 
Replace the guns and the "toe" flap, sure, but personally I wouldn't patch up the chips to the plating and details. Battle damage.
 
I've actually got the mold started for the toe (small piece, but removing a toe was a pain in the butt!) and will be casting 2 of them as one is fairly cracked through. I've got some correct sized bolts for the bottom of the feet too and my action fleet snowspeeder is on delivery. Just need to figure out what to do with the base or go with a similar design to the MR SE base.

There are some chips and knicks on the body of the At-At but really, nothing noticeable, however those missing ladder pieces, I feel like I really need to replace. I went ahead and bought some L shape plastruct pieces at my nearest hobby shop and they seem to fit the bill nicely, although I also was able to pry one of the pieces off with a mini flat head screw driver and was also thinking of casting it for the exact approach. Will post up pictures soon.

Big question is on paint. I have about 34 tabs open in firefox on studio scale and MR At-Ats but not very many of them on "matching" paint to MR's paint. I'm hoping to add some more weathering to it but will probably avoid a full rework on the paint, does anyone have any recommendations on matching the color to the MR AT-AT? Still trying to keep this in budget for a finished project (will need to find a person to make a acrylic case for it too) so will be posting up a wtb ad soon in the junkyard for molds or parts for the replacement at-at guns.
 
Just need to figure out what to do with the base or go with a similar design to the MR SE base. .

Personally i would do something like what i did with the miniatures above. I know there probably half the size but i only used 1.2mm mig wire and it holds up the snowspeeder no worries. If you used a high tensile wire it should work on something bigger. Also not sure if anyone’s done that with a studio scale size AT-AT so would be something different to the MR etc.
 
I once repaired an MR ATAT gun for someone on here, and used tamiya XF19 sky grey. I never had the whole model to match to, just the gun, but it looked ok when I'd done it, and the fella never complained..
If you intend to airbrush it you should be able to blend it in if it's fairly close in shade, and with some weathering over that, it should look ok. Your model looks quite light to me here, so you can always add some white to it...

I have an MR snowspeeder and that colour looks close to humbrol light gull grey. It's sort of a warmer grey shade than the tamiya colour. The humbrol might be too warm a shade though....it's hard to say for certain with either colour, but it's something you could look at..

Cheers

Phil
 
Thanks, its a good start and I even have humbrol light gull grey! Flak gun has been ordered for the cheek guns and a metal barrel 1/35 has been ordered for the chin guns. I'll be casting the chin gun from that metal barrel (cheapest option I could find aside from plunking down $40 for the tank kit just for the gun on this repair job) and will be cutting it down and molding it to what's left of the chin guns. Part of the housing on one of the cheek guns are also snapped away but I have an idea to repair it to replicate it to the other one that is somewhat intact. I even have a template set up for the belly armor on the right side which should match pretty closely.

The last piece of the puzzle is this piece:
mratatv1-025.jpg


I'd like to avoid scratching that piece if it does come from another kit. What kit could that possibly be from?
 
This thread is more than 12 years old.

Your message may be considered spam for the following reasons:

  1. This thread hasn't been active in some time. A new post in this thread might not contribute constructively to this discussion after so long.
If you wish to reply despite these issues, check the box below before replying.
Be aware that malicious compliance may result in more severe penalties.
Back
Top