ADI AvP Queen test casting, repair and modification

Palantirion

Active Member
A couple years ago I purchased this paint test piece from PropStore. It is the queen's "crown", and was made by Studio ADI for AvP and has different finishes (and different sculpts) on each side. The middle was left unfinished. There was the obvious paint damage on its right side, as well as numerous small areas of damage also from its previous life. I planned to 1) Repair the main damage area, 2) Paint the middle portion to resemble how the queen looked in AvP, and 3) Figure out how to hang it as wall art.

I will do my best to update this thread as I make progress, no specific timeline other than to say so far I am making better progress than I expected and it is a primary focus at present.

To begin, I had to know that I could securely hang it. It's a single-sided fiberglass casting, about 8'x4' and weighs 45lbs. Thankfully I don't have to care about the interior side, but there were no areas in which I could drill or tap to make a positive physical connection. So I decided cope a 2x4 to fit under a pair of interior protrusions (back sides of the "ears") and that would act as a lock to support the vertical load. I fiberglassed the 2x4 in place, and wrapped it a little also to reinforce it just a bit more. I drilled holes and test hung it with steel braided wire tied off on nuts with their force distributed with fender washers. It hung for a few weeks on the arm of my lift and didn't budge.

The wood, roughly coped.
22,11-02, wood and 1st layer of fiberglass on Aliens queen crown (3).jpg


Holes drilled so the load will be applied in-line with the strong fiberglass protrusions. Also shortens the span, thus increasing the effective stiffness of the 2x4.
22,11-02, wood and 1st layer of fiberglass on Aliens queen crown (5).jpg


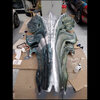
Fiberglassed to bond it. Very, very rough and ugly. I know. I am not skilled with fiberglass matting! Two passes, one to get it held in place and the next day I added more reinforcement, filled voids, etc.
22,11-04, 2nd round of fiberglassing Aliens queen crown (2).jpg


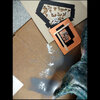
Wired. Also ugly, but effective. I did file the inside of the washers to make sure they are smooth and won't cut into the cable over time.
22,11-07, test mounting Aliens queen crown (9).jpg


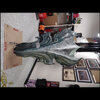
Test hung on my lift. The foam is there to straighten the hang a little and soften the pressure against the end of the arm. For wall mounting I was thinking of using a bike hook. But I'll need to rig up a pulley system to raise it (it will be high in my shop)....Mr. Savage if you are reading this I could really use your input a-la your setup for solo hanging your Han in Carbonite.
22,11-07, test mounting Aliens queen crown (17).jpg


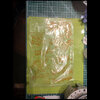
The front, as delivered. Absolutely gorgeous paint work by ADI (the king is dead, long live the king). I really love both sides!
22,11-07, test mounting Aliens queen crown (18).jpg
 

Attachments

  • 22,11-07, test mounting Aliens queen crown (18).jpg
    22,11-07, test mounting Aliens queen crown (18).jpg
    142.9 KB · Views: 63
Last edited:
The next job was determining how to repair the big scar on the right side.
22,12-01 (3)on rack.jpg


I did, thankfully, get some helpful insider info on the production method and materials. The silver is Alumaluster, and all the paint is candy (translucent color over silver base)...so that kinda sucks because it is really hard to seamlessly transition translucent reflective colors! But we'll circle back to that challenge later...

Painting can't happen if I can't first secure the surface. So I set about with a blade and carefully trimmed back the perimeter of the scar to remove all the paint that was lifting off.
22,12-01 (8)cutting off lifted paint.jpg


Then I started sanding and ran into a more serious issue. The paint STILL wanted to lift off! In short, Alumaluster (at least the older formulation) produces a very weak bond. And the high strength of the urethane clear (which is also really thick) combined with the general flexibility of the fiberglass shell, kinda makes it want to shed its skin - little pieces would flake off suddenly as I sanded. That is NOT acceptable, the whole point of this project is to preserve ADI's work. So I tried different sanding options and discovered that a mouse sander, with a micro tip, using 180 grit was strong enough to reduce the harsh lip at the cut line but also fast enough at doing so that it put less stress on the paint bond than hand sanding. Also it was better to jump around so as to not warm up the urethane by staying in one place too long. In the end the repair area expanded quite a bit, but I am confident that the repair will be permanent.
22,12-01 (11)sanding main repair area.jpg


I used torn blue shop towels to create an irregular soft mask (part of my candy feathering solution) and used some good automotive primer.
22,12-01 (17)priming main repair area.jpg


But there were also other, less obvious, areas to repair. 24 others in fact! All of which were marked with little blue tape "flags" so I could keep track of them. Most just needed sanding (the mouse 180 and then 400 grit by hand), but the three "horns" at the top of the crown all had broken tips. Two slightly, and one missing a couple of inches. Instead of inundating you with pics of all the repairs I'll just focus on the horns because the technique was the most involved there.

Broken and flagged:
22,12-01 (19)sanded damaged areas.jpg


I used ProPoxy20 for the first time. It mixes like pretty much all other epoxy putties (I use Apoxie and Magic Sculpt a lot), and you can use water as a barrier for tools/fingers. But PP20 sets really fast, you have maybe 5min of working time. And, as advertised, it was rock hard and strong as hell in 20 minutes. It is much closer to JB Weld than Apoxie Sculpt in properties once cured. I am going to go back later and use it to additionally reinforce my hanging bar on the back.
22,12-01 (30)ProPoxy20 putty.jpg


I also added a little spike extension to better transition from the middle spikes to the longer middle horn. It looked like this one spike was broken off, but examining it further I think it was simply unfinished. So I think this modification is in keeping with the spirit of the piece.
22,12-01 (32)ProPoxy20 putty.jpg


Then I primed all the smaller repairs by brush, using two coats of Mr Surfacer.
22,12-01 (61)priming.jpg


Then I noticed how deep a few of the holes were...unintentionally deep to my eye. So I partially filled them with Magic Sculpt and let them cure overnight. There are a lot of holes and relief textures on the sculpture, so keeping them seemed right. Just toned down to a level similar to the others.
22,12-01 (70)Magic Sculpt.jpg


And that brings us to the end of day three...almost. Jumping ahead in my order of operations I needed to figure out how to replicate the splotches of color ADI made. While I had intel about their process I couldn't use it exactly because I didn't own a laser cutter and, frankly, the quality of the result will be far more dependent on my painting skill "in the moment" than the exact shapes of the masks. So I thought I'd make my own, copied directly from ADI's paint....except I was stupid and didn't consider that what I was looking at were close in value (more different in hue) that I couldn't see them through tracing paper! So I cut up a gallon zip lock baggie and used it instead. Ok, NOW I was done with day three.
22,12-02 (1)splotch tracing.jpg
 

Attachments

  • 22,12-02 (1)splotch tracing.jpg
    22,12-02 (1)splotch tracing.jpg
    135.7 KB · Views: 51
Last edited:
Day 4 started with sanding. Lots and lots of sanding. I went back over all the primed areas and re-sanded them by hand, 220 and 400 grit. Some smaller repairs needed another round of primer and sanding to even out smaller imperfections.
22,12-02 (10)sanding.jpg
22,12-02 (12)sanding.jpg


I also hand sanded the scar area, further easing the transitions across the cut lines.
22,12-02 (46)sanding.jpg


Then I did a paint swatch test. I wanted to see if any paint that I had on hand could be a substitute for Alumaluster. So I put a strip of tape over the top of the crest and brushed on stripes of potential solutions. I chose to brush them on because I wanted less consistency of application so I could get a better sense of the potential range of each swatch. Then I took pics from many different angles because different paints might look like a match in light but not in shadow. I was looking particularly for a match in color tone, then secondarily for reflective value. The winner was Tamiya's X-11 Chrome Silver, which is a near dead-wringer for Alumaluster - at least on this surface. Then I pulled the tape so there was less distraction from its color, and the X-11 pretty much disappeared.

I was very happy with this finding, as X-11 is easy to get, cheaper than Alumaluster, but more importantly it is MUCH easier to work with! X-11 doesn't require a gloss black base coat, can be brushed or thinned and sprayed, and it's acrylic so there is no worry about offgassing or chemical incompatibility with coats that go over it.
22,12-02, silver test swatchs_72.jpg


Then I spent quite a while addressing the bigger Alumaluster problem area: The middle of the crown. Since I couldn't trust the Alumaluster to hold strong I thought I should make it fail now. I first tried a drill with a nylon carpet brush attachment. That did work to a certain extent, but in the end I had to hand sand the whole area and knock it down closer to the black base coat ADI put on over their primer. I didn't need to get every last scrap of silver off, but enough that I could feel confident that my primer would have something good to grab on to.

Then masking. Like before, I used torn blue shop towels to create soft masks. Took freaking forever, because every step of the way I was trying to save as much of ADI's paint work as possible so I was essentially coping my masking to the boundaries of their work.
22,12-02 (59)masking.jpg


I covered the rest of the areas with bubble wrap, because I had it on hand. No other reason.
22,12-02 (67)masking.jpg


Oh, and yes, I was spraying rather close to my two art cars. I hand painted both, but that's a whole 'nother story. What you can't see from the pics is the 1300cfm fan I set up pulling air from the crown and aiming it up to a ceiling mounted 3500cfm exhaust fan. I was also very slow and deliberate in my spray directions and duration, because of the soft masking. So no art cars were harmed in the priming of the queen.

The priming was finished, and I was feeling pretty good about the progress after only two days of work on the paint repairs.
22,12-02 (77)primed.jpg

22,12-02 (78)primed.jpg

22,12-02 (79)primed.jpg

22,12-02 (80)primed.jpg

22,12-02 (81)primed.jpg

22,12-02 (82)primed.jpg


The next day I took a couple of hours to make test masks. I took sections of the tracings and used a glue stick to adhere them to paper and cardboard. This was in part because of the size of the respective patterns, but also because I simply didn't know which would be better to use. Then I cut through the layers with an x-acto knife. That part sucked....very tedious, fraught with peril of tearing, and I kept having to stop to sharpen my blade. But in the end I think they will work well - or well enough to test at least. There are 6 more I need to make if these work out.
p.s. The popsicle sticks were glued on to stiffen the paper so it won't flutter under pressure.
22,12-03, test masks.jpg
 
Last edited:
Today was quite a good day...because it could have been a terrible day (color day :O)...but the queen was playing nice. For now (being time limited tonight) I will post about yesterday. Which also could have gone badly, but didn't. I was quite concerned about being able to feather the silver base irregularly enough around the color blotches to hide the perimeters of the repair areas.

First I wet-sanded all the primer (with a worn-down 400 grit sponge stick) after it had a couple of days to off-gas. Then I pre-shaded all the recesses of the middle (previously unpainted) area with black. Notice how I am not sharing pics of that...because it turned out to be a waste of time. Well, I'll share one:
22,12-05 (28)preshading.jpg


When I airbrushed the X-11 silver over the primer and built it up it pretty much wiped out the pre-shading. Which, on the whole, is fine. That means the X-11 is really opaque, and that means consistency.

Btw, I should point out that a major complication with this project is that because of its size I have to work on it in my shop and not in my home studio. The latter being where all my art supplies and equipment are. So in addition to toting over whatever I need for the day I also had to figure out how to airbrush without my airbrush compressor. Using the shop compressor is a bit like trying to drink from a fire hose, but with a lot of trial and error with the regulator I finally arrived at a pressure that was low enough to give me some degree of control but still holds steady without bleeding out the system.

However before I fiddled with that and got it working I used this POS because I hoped it would be good for a simple application of the pre-shading. IT WAS NOT. Actually, it wasn't completely terrible for a cheap single action. But the pump hanging below it made it very awkward to position it without having to tip it so much as to risk spilling from the cup. It also wouldn't spray consistently unless I thinned the paint a little thinner than I typically would. I presume that is because of the tiny air reservoir it has, and that there is proportionately more pressure bleed than with a regular size compressor.
22,12-05 (23)preshade airbrush.jpg


And then its battery died. So fine, I'll use a good airbrush to do the silver. At that point I already knew that I needed more control than a single action would offer. Fun fact: Did you know that you can use a wood clamp as an airbrush holder - because you forgot to bring your airbrush holder!
22,12-05 (31)improvised airbrush holder.jpg


I loaded the X-11 and did some quick tests with the masks I made, looked pretty good. Not relevant for the silver, but I wanted to know if they sucked because then I'd have to figure out something else for the next day.
22,12-05 (32)mask testing.jpg


Then I sprayed allllllllll the silver. Was easier than I expected (or feared) to blend in and around the existing ADI color splotches.
22,12-05 (33)silver base.jpg

22,12-05 (34)silver base.jpg

22,12-05 (35)silver base.jpg

22,12-05 (36)silver base.jpg

22,12-05 (37)silver base.jpg

22,12-05 (38)silver base.jpg


A couple close-ups showing the way I blended the new silver base around the ADI splotches.
22,12-05 (47)silver base.jpg

22,12-05 (57)silver base.jpg
 

Attachments

  • 22,12-05 (34)silver base.jpg
    22,12-05 (34)silver base.jpg
    203.6 KB · Views: 50
  • 22,12-05 (32)mask testing.jpg
    22,12-05 (32)mask testing.jpg
    139.3 KB · Views: 47
Last edited:
Thanks guys!

Yesterday was a good day...it was color day! Or what I figured would be the first of several color days. Frankly I was just hoping that my order of operations theories would pan out and not end in total disaster.

First things first: I need to have colors! So I made these swatch strips by brushing two coats of X-11 onto a shipping label cut from a box, and two runs of tape-on-cardboard.
22,12-06 (1)swatch strips.jpg


Then, since I had the X-11 out anyway I thought I would try drybrushing it with a makeup brush. I haven't tried drybrushing Tamiya acrylics before, but it went well. I also tried drybrushing the "aqua" (more on colors in a minute) over some silver to the "north" of the main silver area on this small repair area.
22,12-06 (3)drybrushing aqua.jpg

22,12-06 (4)drybrushing aqua.jpg


And here is that "aqua", on the swatch sheet. Sorry but I forgot to take a screen shot of my colors list, I'll do that next time I'm at the shop. For this post I'll have to use more generic color names. Like aqua:
22,12-06 (11)swatch testing after clear.jpg


And here is yellow:
22,12-06 (12)swatch testing after clear.jpg


And a custom mix that is dark green for the blue side...which is different than the dark green on the green side.
22,12-06 (7)dark blue-green swatch.jpg


And a drybrush test of dark green over an existing splotch. Can't see it, so I'm calling that good.
22,12-06 (8)drybrushed dark blue-green.jpg


[pics not shown] I wrote down all the colors for each side and studied ADI's painting to figure out a general order of application. I made it a point to write those numbers by the colors, and as I painted each one I would check them off and take pics. This actually came back to be a blessing, because at one point I forgot whether I had done a green on both sides or just on one (some colors are on both sides, but in different ways) - very glad I had the checklist.

So now it was time to do some real painting. Starting with aqua. For brevity I will not be showing the buildup on every repair area. They were all performed essentially the same way.
22,12-06 (17)aqua.jpg


And some aqua across the top. Unfortunately the green side doesn't have splotches along the top, so it will be a trick later to paint the middle and keep it feeling balanced (but more on that later).
22,12-06 (19)aqua.jpg


Then yellow. There isn't much yellow used, but it adds a critical variety to the overall appearance.
22,12-06 (26)yellow splotches.jpg


And then the brown. In hindsight I hadn't yet realized that I was holding my masks a little too far from the surface, so my splotches are a little fuzzier than the sharpest of ADI's. But there is some variety of sharpness in both so overall I don't think it's a critical error. I see the difference most on this section of browns.
22,12-06 (29)brown splotches.jpg


Medium green, through barely used on the blue side, was next. This color was used more widely on the green side.
22,12-06 (33)medium green.jpg

22,12-06 (36)medium green.jpg
22,12-06 (37)medium green.jpg


Then it was time for the big color: dark (blue)green. This is the prominent tinting color on the blue side, and second behind aqua in the number of splotches.
22,12-06 (44)dark blue-green.jpg


Also used to transition to the spines:
22,12-06 (49)dark blue-green.jpg

22,12-06 (51)dark blue-green.jpg


A different dark green was mixed for the green side's dark tinting color. I'm not showing a lot of the work on the green side, to keep the post smaller. The spot repairs were pretty much like those on the blue side, just with a different mix of colors. And the transitions up to the top and the spines were non-splotched diffuse dithers. I added a little depth to some details here, figuring it will get toned down later by how I paint the middle section.
22,12-06 (65)dark green.jpg


Then, a little late, I realized that NO, the two dark greens are NOT the only primary tinting colors! ADI also used black...and very cleverly! I ran into an issue with the big repair area where by tinting it with increasing levels of dark green to darken it I ended up making a few areas a more fuzzy dark green than a clear dark between splotches. Now that I mentioned it you will see it too - and not be able to unsee it! Very frustrating! Anyways, ADI used black to tone down the reflectivity of the silver base without changing color tone. A very clever effect.

I also (sneak peek on future post) figured out something shockingly hidden in plain sight about how they painted the warriors in AvP and how it was nearly identical to the way the queen was painted even though they appear very different in color on screen. More on that later...

Back to black...I added some in areas where the greens needed to be even darker, or have a little more visual texture. Note that my paint has not been clearcoated, so the black looks dark gray in these pics.
22,12-06 (66)green side black.jpg


And since I had black in my airbrush already, why not pre-shade the whole middle section! Seems like I've been here before, but with a more annoying airbrush.

Half with preshade:
22,12-06 (71)half silver preshaded.jpg

And without:
22,12-06 (72)half silver preshaded.jpg

And with:
22,12-06 (75)silver preshaded.jpg


The camera can't capture the effect the preshading has on the silver because it can't process multiple occurrences of light intensity simlutaneously like our eyes can. So trust me, it makes a bigger difference than you see here.
22,12-06 (76)silver preshaded.jpg


Done for the day, and to my surprise I got basically all the repair painting done in one day! Which is to say that I want to go back and touch up some areas, and I may again after clearing it. But the part I was most nervous about went really smoothly.
22,12-06 (77)silver preshaded.jpg

22,12-06 (78)silver preshaded.jpg

22,12-06 (79)silver preshaded.jpg

22,12-06 (81)silver preshaded.jpg

22,12-06 (82)silver preshaded.jpg


Now I just have to figure out what the hell to do with that middle section.
 
Last edited:
Fantastic paint job/tuto...yep, you're doing extremely well into repairing/refinishing that casting! I'm amazed at the different shades and tricks you're using :cool: :cool: (y) (y) :notworthy::notworthy:
 
Be careful ADI is going to hire you!
- Funny but I toured ADI about 10 years ago with TMPCC. Tom Woodruff JR. was our tour guide and one of the most pleasant and positive people I've ever met. An inspirational day, to be sure! I was very glad that ADI was so far from my house that I couldn't rationally volunteer to sweep floors or do whatever just to be around their talented crew and amazing ideas. I look forward to seeing how Studio Gillis will keep practical effects relevant and evolving in the industry.

p.s. I also got to hang out a little with Frank Ippolito at an event once. He too is a super nice guy, gave me some good tips on polishing clear acrylic. I didn't know then how prolific his prop company Thingery had become or I probably would have geeked out more. At the time I just knew him from youtube vids.
 
Yesterday I did a little test; using an eraser to gently remove airbrushed paint to walk-back potential areas that were covered too heavily. Worked really well. No decent pics to post though.

Today I did some test layups to brainstorm color ideas for the middle section. There are some key considerations:
- I want it to balance the two ADI sides, which means pulling color similarly from both. Or neither.
- It should appear somewhat standalone, in the way the two ADI paint schemes are individually excellent.
- Ideally it would reference a queen's movie color scheme.

That last one is where we run into a problem. The queen in AvP is pretty much painted just like the blue side of my crown. It doesn't look obvious on screen, but I've done a lot of frame-by-frame and I see the same aqua, same splotches, etc. It's just the lighting that makers her look darker and less saturated in most shots. So I thought, what if I paint the middle to look like how she appeared on screen? Cool idea, but it would pull the overall paint balance massively toward blue and I think it would detract from the green side. Then I thought, what about Alien Resurrection? I have long held that while the movie kinda sucked, the practical effects were maybe the best of any Aliens movie (I've seen the mutant Ripleys in person and they look even more horrible and realistic than on screen!). So I did some frame-by-frame through the two scenes with the queen (a young queen, like Aliens, not an old queen like AvP) and her paint scheme was incredible! I think. I can't be completely sure, because of how dark the scenes were. But she definitely appeared to be almost themed after copper: Dark browns with iridescent greens, like a beetle. What if I took the middle in that direction? Keep in mind that however I paint the middle is also how I'm going to...paint another project that will display immediately below the crown.

Enough rambling, pic time. Here are four rough illustrations over a photo of the crown. Please comment about which ones you like most, and WHY. It will help me brainstorm.

22,12-08, color test_brown.jpg

22,12-08, color test_green.jpg

22,12-08, color test_dark blue.jpg

22,12-08, color test_blue mix.jpg
 
Yesterday I did a little test; using an eraser to gently remove airbrushed paint to walk-back potential areas that were covered too heavily. Worked really well. No decent pics to post though.

Today I did some test layups to brainstorm color ideas for the middle section. There are some key considerations:
- I want it to balance the two ADI sides, which means pulling color similarly from both. Or neither.
- It should appear somewhat standalone, in the way the two ADI paint schemes are individually excellent.
- Ideally it would reference a queen's movie color scheme.

That last one is where we run into a problem. The queen in AvP is pretty much painted just like the blue side of my crown. It doesn't look obvious on screen, but I've done a lot of frame-by-frame and I see the same aqua, same splotches, etc. It's just the lighting that makers her look darker and less saturated in most shots. So I thought, what if I paint the middle to look like how she appeared on screen? Cool idea, but it would pull the overall paint balance massively toward blue and I think it would detract from the green side. Then I thought, what about Alien Resurrection? I have long held that while the movie kinda sucked, the practical effects were maybe the best of any Aliens movie (I've seen the mutant Ripleys in person and they look even more horrible and realistic than on screen!). So I did some frame-by-frame through the two scenes with the queen (a young queen, like Aliens, not an old queen like AvP) and her paint scheme was incredible! I think. I can't be completely sure, because of how dark the scenes were. But she definitely appeared to be almost themed after copper: Dark browns with iridescent greens, like a beetle. What if I took the middle in that direction? Keep in mind that however I paint the middle is also how I'm going to...paint another project that will display immediately below the crown.

Enough rambling, pic time. Here are four rough illustrations over a photo of the crown. Please comment about which ones you like most, and WHY. It will help me brainstorm.

View attachment 1646072
View attachment 1646074
View attachment 1646073
View attachment 1646071
I like 4 because it looks the most like it is made of the same materials as the sides but presents its own hues due to differences in lighting angles. I feel I expect it to look like that.
 
Yes, 4 for me too, for the same reasons as greenmachines gives above. For me, 4 also has the best merging of the colours across the whole piece to make a single coherent whole.

I'm SO impressed with your work so far on this beautiful item - it's absolutely gorgeous and your restoration work so far is impeccable. Incredible results. Amazing! :love:
 
Thank you guys, very much, for the brainstorming help. Got a couple more ideas to throw at you...

Let's keep 4 as the front runner from round 1, and I'll post it again with my new ideas.
22,12-08, color test_4.jpg


Idea 1: Paint the middle section as per the brown/green scheme from Alien Resurrection.
Alien Resurrection.jpg

I absolutely love this coloration, but in the context of the existing ADI blue and green schemes it's just too much, and makes the crown too complicated. It would look pretty close to #2 above, but better because #2 is just a rough PShop image.

Idea 2: Pull colors and painting techniques from the blue and green sides, BUT consider each palette like an OSL (Object Source Illumination). Meaning that those colors exist because of the tone of a theoretical light hitting that side. Thus when I bring them across the middle section it would not be in smooth wide transitions but in stepped blends to emulate those lights hitting the same sides of each row of spikes. This would create a color "echo" across the piece from both directions, and maybe balance it more. It would also have an advantage in being more forgiving about blends, as none would have to be seamless to the OG ADI paint.
22,12-07, 5, OSL idea.jpg


Idea 3: Pull colors and painting techniques from the blue and green sides farther toward the middle and basically finish the piece as if that was the original goal. This is visually logical, but I might run into complications seamlessly blending from the existing blue and green edges - like I'm experiencing with the large repair area. A rough PShop of how it might look:
22,12-07, 6, blending.jpg


Remember that regardless of the concept chosen that the "other thing" going below the crown will be painted the same as the crowns middle section. So there will be more "weight" from that color arrangement immediately below the crown's bottom.

I quick thought: A layup of 2, 4, 5 and 6 together. Sometimes our eye prefers things differently at different scale.
4 layup.jpg
 
Last edited:

Your message may be considered spam for the following reasons:

If you wish to reply despite these issues, check the box below before replying.
Be aware that malicious compliance may result in more severe penalties.
Back
Top