A Fools Errand? 3D Printed Blade Runner Blaster

PACKARACK

New Member
Hello all. Let me start by saying that I've been an admirer of the artistry here for many years but have only recently officially signed on. I've always been interested in all things prop related but have mostly kept to myself as far as sharing or contributing to groups such as the RPF, Long story short I'm one of those guys that mostly keeps to himself satisfied with the realization that creating something I am proud of provides me a sense of comfort and escape even if no one else realizes it. Anyhow, recently my local library became the recipient of a Makerbot Replicator 2X and this has all changed.

I am in chase of a "Holy Grail" piece that I've longed for from the first day I laid eyes upon it. Like many, I've been chasing this prop for a long time and personally built numerous incarnations ranging from LEGO to card stock models. I was even a day or two away from purchasing a Sid Kit before the untimely demise of it's creator. I no longer have the funds to purchase a proper replica so I'm resorting to the generosity of a fellow artist who has shared his 3d files. The only rub is that I want to take this build a step further.

The beauty of the printer being offered by the library is that any utilization of the printer is priced at .50 cents. In other words if I sit there for 8 hours printing I'm out .50. There are no other users so I'm not "hogging" the machine. Furthermore, I've become quite proficient and with many hours of research am able to advise them in best practices for maintaining and efficiently using the machine. I feel that this is a fair trade.

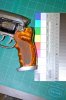
Enough with the background. I've been busy printing parts but am quickly realizing the model I'm using, although very detailed, is missing some basic functionality. I'd like to make this as close to the much more expensive options out there as possible. Although I'm limited in funds I have plenty of time and dedication. Can anyone lead me to a schematic or set of instructions that might clue me in to the inner working of one of the functional blasters. I've searched high and low but can't come up with definitive answers regarding the trigger mechanisms or any "spring" related function. I'd like to give this ABS model all the functionality of a full on replica.

Thank you for any help. I'll have plenty of images very soon.
 
201012_18_42_a0077842_1036178.jpg

Hold on and I will see If i can find something that may help.


The front trigger can have a spring for movement . but it serves no function at all..
 
Last edited by a moderator:
Thank you sean! I'd seen the exploded view but it was not at a resolution that was legible. This is exactly what I needed.
 
Thank you sean! I'd seen the exploded view but it was not at a resolution that was legible. This is exactly what I needed.

Your welcome. and welcome to the RPF also. hope your project goes well. the blade runner blaster Is one of my passions..
 
Thank you. I've been very eager tho get a proper build on since I discovered UHU's pep model. Clearly I've come to the right place. I've built it no less than 10 times.
 
Last edited:
Inner housing of a cast bulldog frame. the small little divot hole on the corner ledge Inside Is were the springs tension works the trigger. I think the tomenosuke spring system my defer a pinch. not sure on that.

IMG_0785.JPG
 
Thanks guys. I've had my head buried in research and thanks to the fine folks on this forum have come across some great stuff. I stumbled upon RAC Props Photobucket. The instructions for his kits have helped a lot. I'm in the process of modifying the .stl files to improve accuracy. I have some doubts as far as the scale of the 3d model I have but won't have a problem re printing. Below is where I am so far and this has cost me a grand total of $3. Loving the Seekonk Public Library!

IMAG1386.jpg

- - - Updated - - -

Thank you Nixon. Really impressed by your work on the Syd Mead Blaster.

- - - Updated - - -

Trigger and hammer for an actual bulldog. the trigger spring function's slightly different from the YouTube demo.


View attachment 465602View attachment 465603

Inner housing of a cast bulldog frame. the small little divot hole on the corner ledge Inside Is were the springs tension works the trigger. I think the tomenosuke spring system my defer a pinch. not sure on that.

View attachment 465607

Thanks so much sean. These are exactly what I've been looking for!
 
Thanks guys. I've had my head buried in research and thanks to the fine folks on this forum have come across some great stuff. I stumbled upon RAC Props Photobucket. The instructions for his kits have helped a lot. I'm in the process of modifying the .stl files to improve accuracy. I have some doubts as far as the scale of the 3d model I have but won't have a problem re printing. Below is where I am so far and this has cost me a grand total of $3. Loving the Seekonk Public Library!

View attachment 466458

- - - Updated - - -

Thank you Nixon. Really impressed by your work on the Syd Mead Blaster.

- - - Updated - - -


Thanks so much sean. These are exactly what I've been looking for!

your very welcome. what ever I can do to help. just ask. i'm In the process of building a ghost right now.
 
Is that all 3D printed? Even the screws?
Yes it is Mike. I'd like the resolution to be a bit better but my only experience in 3d printing is using the MakerBot 2x and since it's at the library I'm a bit limited as to being able to tweak it. Although I have been labled a "Power User" by the staff. I'm sure I'll be able to dial it in shortly.
 
I'm really concerned about the scale of my print. Is there a definitive point of reference for an accurate scale? I'm really getting into re modeling the 3d files for this. I want to make sure it will be worth the time and effort. As always much appreciated!
 
So, why did you print the screws?

THis photo has a scale on it. If you have some image editing software, you can scale it and compare it to your measurements.
 

Attachments

  • 3554657397_23cc00b9b4_o.jpg
    3554657397_23cc00b9b4_o.jpg
    894.2 KB · Views: 325
So, why did you print the screws?

THis photo has a scale on it. If you have some image editing software, you can scale it and compare it to your measurements.

The files I'm using were generously shared on the net. I just dove in when I found out I had access to a 3d printer because I was very excited for the opportunity. The screws were the first thing I ever printed. As all things project related as I continued I began seeing many areas of improvement. Don't get me wrong on the surface the provided files are a godsend but I'm one of those people that just can't leave well enough alone. I'm now in the process of accurizing the cad files and will reprint many if not all of the parts. It literally costs me pennies to print the parts so why not go whole hog. Thank you for this Mike.
 
This is awesome! through Adam Savage and reading the book i wanted a plastic/resin kit (as i'm in Australia and don't particularly need a metal one) that moves - in the sense that it can be field stripped!.

So my idea is you could do a run and split the profits (in a reasonable ratio) with the library (maybe 60% library 40% you or vice versa). Im sure if libraries are like those in Aust. they will appreciate any extra money they can get!!

Just a thought though>

oh also i did find a resin kit that did what i wanted it too apparently (but no longer) made by monster in motion.
http://arniesairsoft.co.uk/news2/265 < is the article which entails the kit.

This is not a bad idea. I'm getting to know the staff pretty well and will run it past them. I've got to correct the cad files first though.
 
This thread is more than 7 years old.

Your message may be considered spam for the following reasons:

  1. This thread hasn't been active in some time. A new post in this thread might not contribute constructively to this discussion after so long.
If you wish to reply despite these issues, check the box below before replying.
Be aware that malicious compliance may result in more severe penalties.
Back
Top