You are using an out of date browser. It may not display this or other websites correctly.
You should upgrade or use an alternative browser.
You should upgrade or use an alternative browser.
90% personnal creation SCI-FI armor
- Thread starter Briciius
- Start date


Humm i feel litle bit alone these days but i keep updating .
So first a simply question. Can i use resine directly on EVA foam because i want to solidify my boots ( i don't want to hit them when i will walk in nature xD )
Maybe somebody know a method to do that.
And second upgrade or new part for futur armor. I want to make a BIG HAND like Vi from League of legend see :


i've sketch that really quicly :
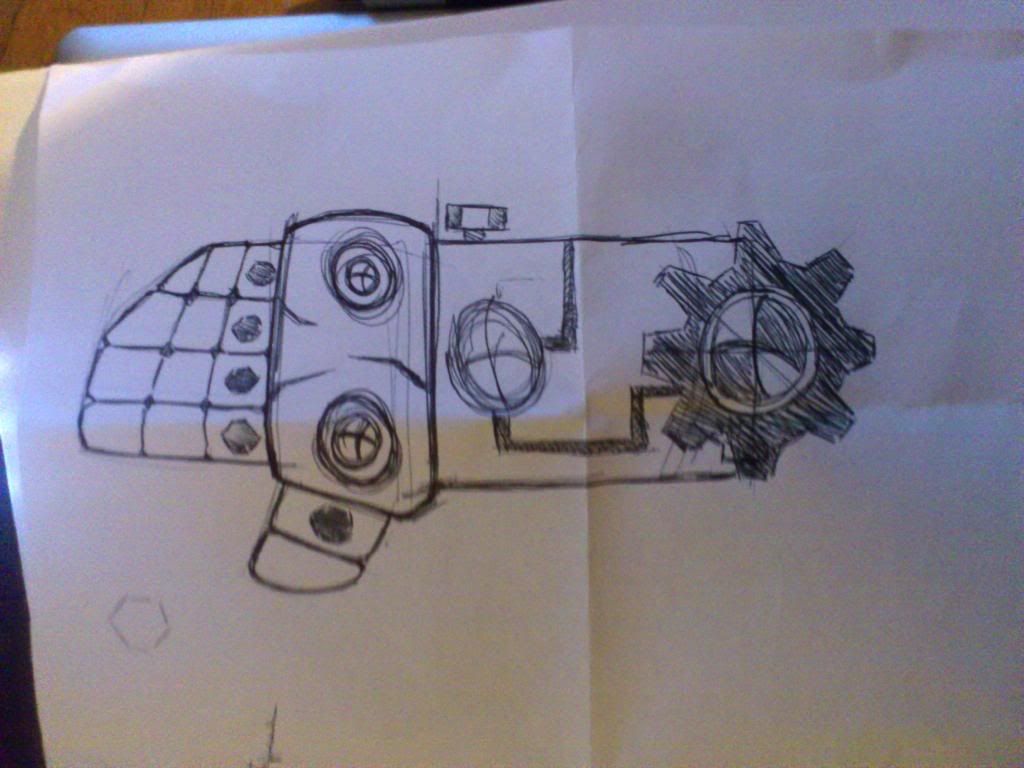
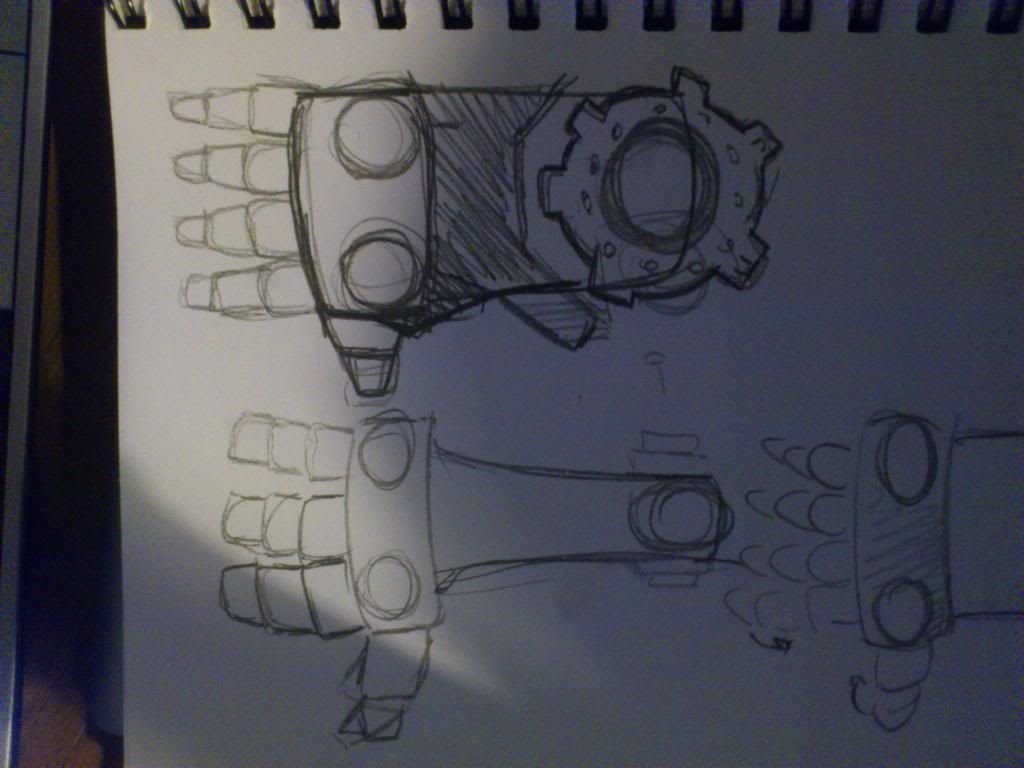
and i am asking how i will articulate the fingers.
Did somebody get idea ??
So first a simply question. Can i use resine directly on EVA foam because i want to solidify my boots ( i don't want to hit them when i will walk in nature xD )
Maybe somebody know a method to do that.
And second upgrade or new part for futur armor. I want to make a BIG HAND like Vi from League of legend see :
i've sketch that really quicly :


and i am asking how i will articulate the fingers.
Did somebody get idea ??
Canobi
Sr Member
Hey bud, not dropped by in a while as I'm tied up with my little project. Your costume just gets better and better, loving all the little hexagons and details you've managed to put in to it, totally awesome 
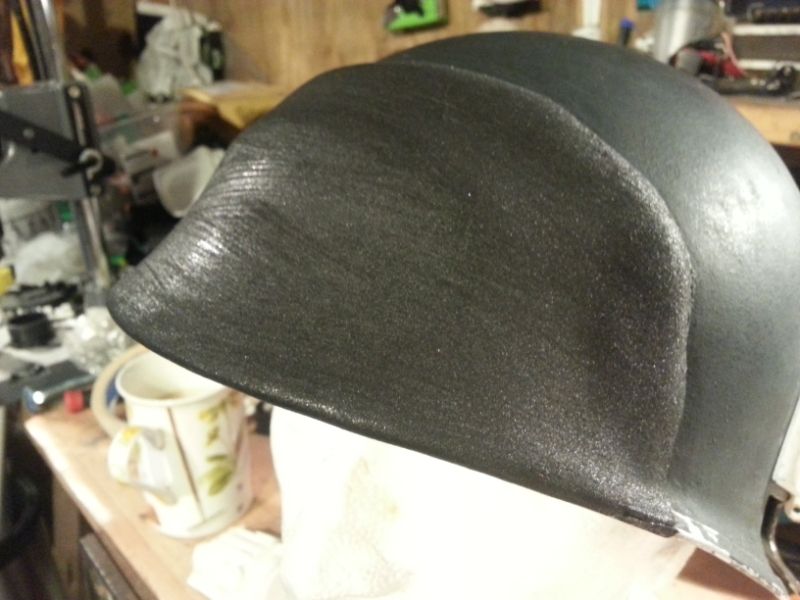
It looks like my timing couldnt be better either, ive just used resin and foam to make the lobe plate on my colonial marine helmet using XRbots technique.
Step 1. Have foam part ready
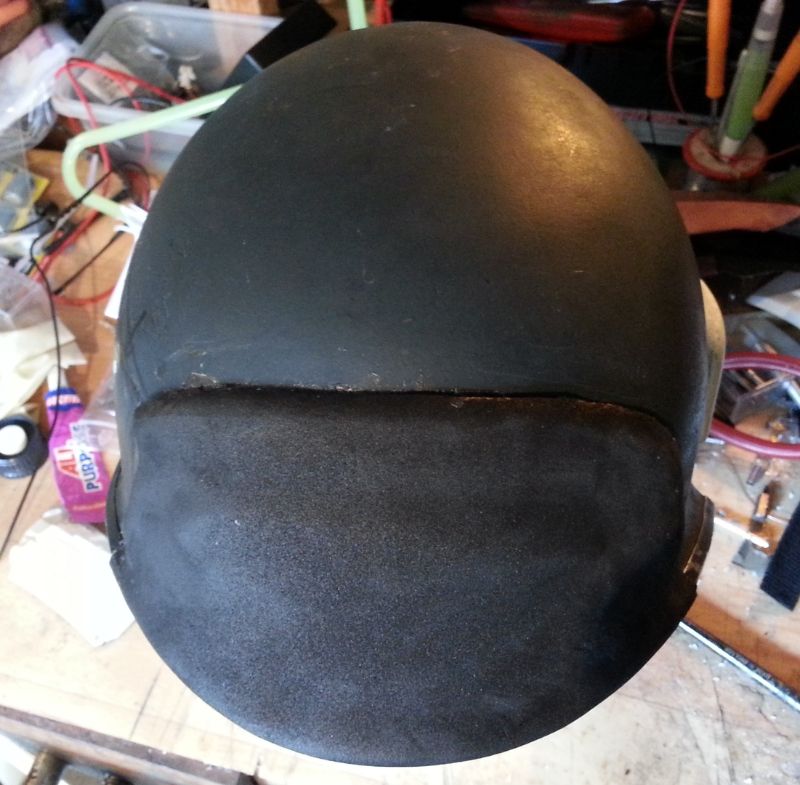
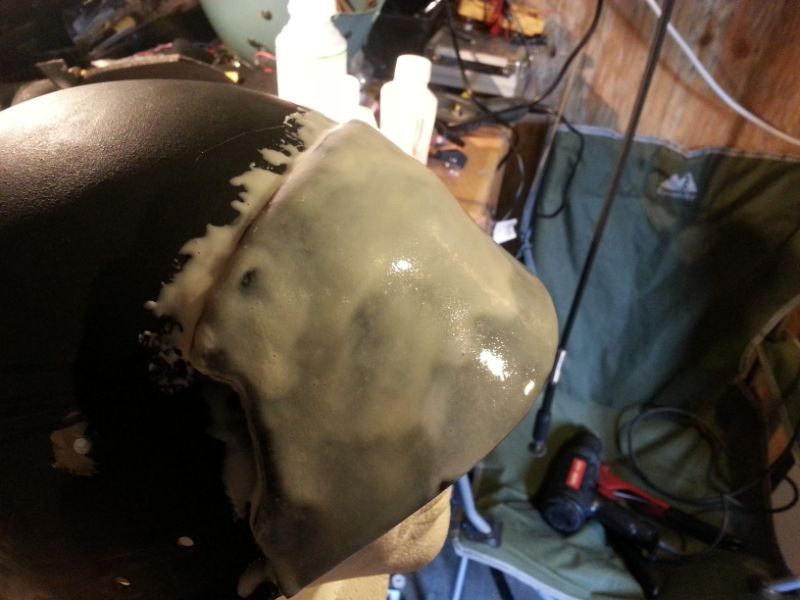
Step 2. Paint on a couple layers of PVA glue (kids glue) over the parts to be coated in resin. Allow each layer to dry fully befor applying the next. The glue acts as a sort of primer that binds the foam to resin.
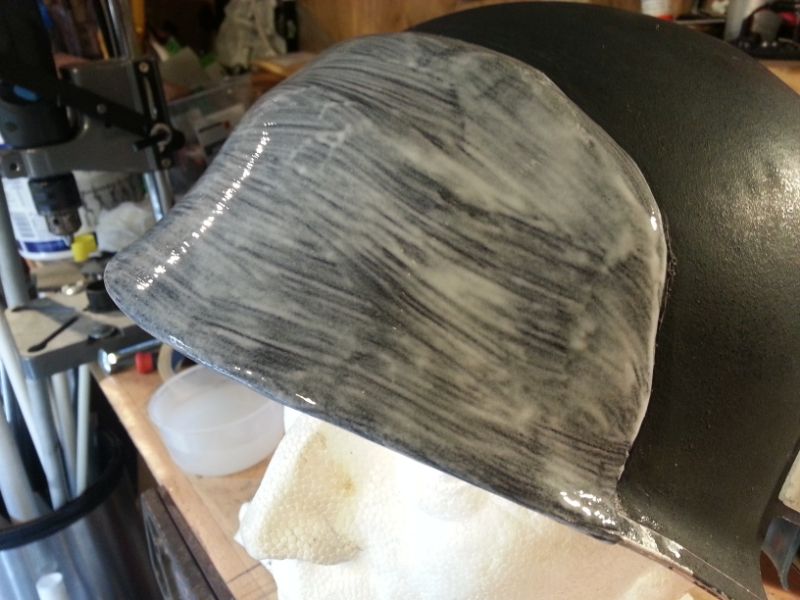
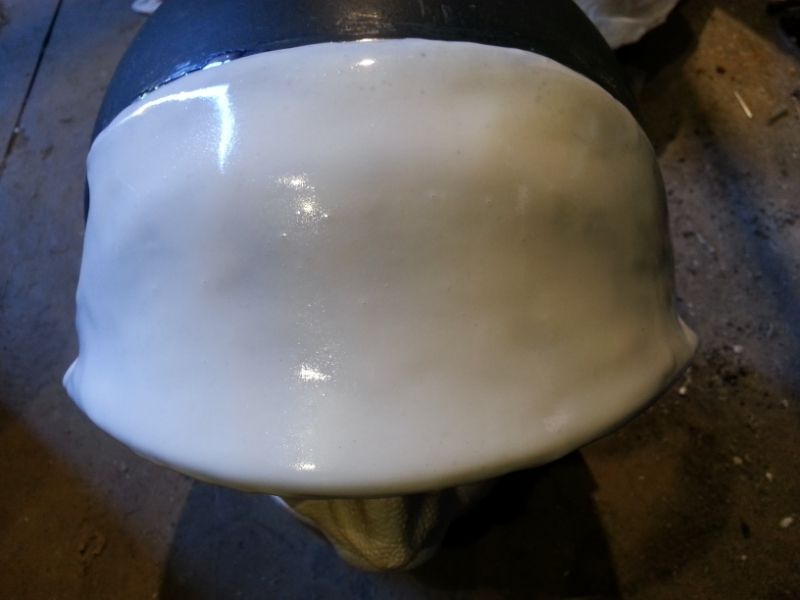
Step 3. Paint on the resin in thin layers, one at a time allowing each layer to almost cure (the resin should be slightly green and pliable as this helps each layer to bond bettet). Rotocasting resin is the one of choice as it has self levelling properties and Smooth-On 65D is the most popular. Mix batches of no more than 20ml as it usually starts to turn before being able to apply it all.

Step 4. Repeat until the desired thickness is achieved
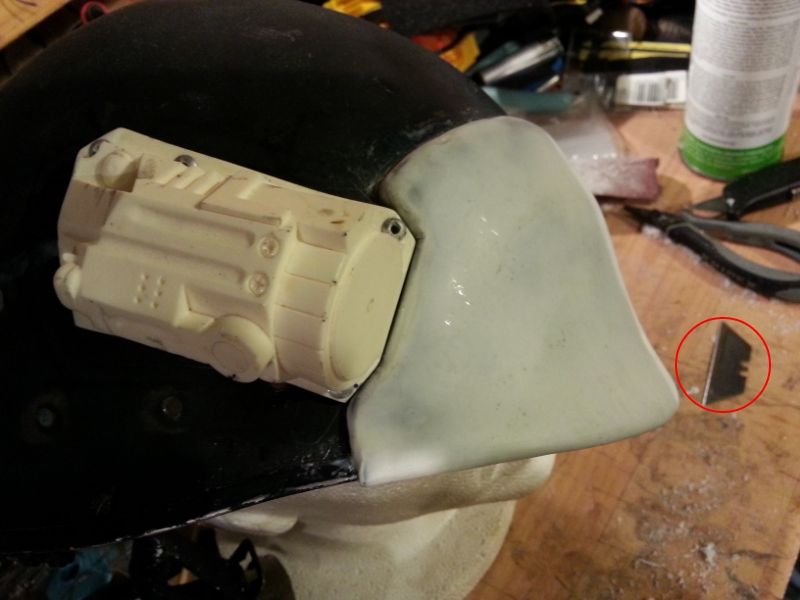
I found sandpaper didn't get me very far at all with the resin I used, but found a fresh Stanly blade a very good tool for both smoothing and shaping :thumbsup
Step 5. Prime and paint

It looks like my timing couldnt be better either, ive just used resin and foam to make the lobe plate on my colonial marine helmet using XRbots technique.
Step 1. Have foam part ready
Step 2. Paint on a couple layers of PVA glue (kids glue) over the parts to be coated in resin. Allow each layer to dry fully befor applying the next. The glue acts as a sort of primer that binds the foam to resin.
Step 3. Paint on the resin in thin layers, one at a time allowing each layer to almost cure (the resin should be slightly green and pliable as this helps each layer to bond bettet). Rotocasting resin is the one of choice as it has self levelling properties and Smooth-On 65D is the most popular. Mix batches of no more than 20ml as it usually starts to turn before being able to apply it all.
Step 4. Repeat until the desired thickness is achieved
I found sandpaper didn't get me very far at all with the resin I used, but found a fresh Stanly blade a very good tool for both smoothing and shaping :thumbsup
Step 5. Prime and paint
Hey bud, not dropped by in a while as I'm tied up with my little project. Your costume just gets better and better, loving all the little hexagons and details you've managed to put in to it, totally awesome
It looks like my timing couldnt be better either, ive just used resin and foam to make the lobe plate on my colonial marine helmet using XRbots technique.
Step 1. Have foam part ready
http://i1225.photobucket.com/albums/ee395/Can-obi/IMG_20130501_124659.jpg
Step 2. Paint on a couple layers of PVA glue (kids glue) over the parts to be coated in resin. Allow each layer to dry fully befor applying the next. The glue acts as a sort of primer that binds the foam to resin.
http://i1225.photobucket.com/albums/ee395/Can-obi/IMG_20130503_102641.jpg
http://i1225.photobucket.com/albums/ee395/Can-obi/IMG_20130503_102622.jpg
Step 3. Paint on the resin in thin layers, one at a time allowing each layer to almost cure (the resin should be slightly green and pliable as this helps each layer to bond bettet). Rotocasting resin is the one of choice as it has self levelling properties and Smooth-On 65D is the most popular. Mix batches of no more than 20ml as it usually starts to turn before being able to apply it all.
http://i1225.photobucket.com/albums/ee395/Can-obi/IMG_20130503_155137.jpg
http://i1225.photobucket.com/albums/ee395/Can-obi/IMG_20130503_155230.jpg
Step 4. Repeat until the desired thickness is achieved
http://i1225.photobucket.com/albums/ee395/Can-obi/IMG_20130507_190836.jpg
I found sandpaper didn't get me very far at all with the resin I used, but found a fresh Stanly blade a very good tool for both smoothing and shaping :thumbsup
http://i1225.photobucket.com/albums/ee395/Can-obi/IMG_20130515_003919.jpg
Step 5. Prime and paint
http://i1225.photobucket.com/albums/ee395/Can-obi/IMG_20130514_114833.jpg
Hum so resin work with eva foam !!! glad to read that. And is the result can resist to impacts and scratches ?? i think i will try your method on some foam remnant.
Thx a lot for kind words
leatherman
New Member
Having a ball reading this build up, thank you so much for taking the time to post it!
Having a ball reading this build up, thank you so much for taking the time to post it!
thx a lot but dont thank me ^^ i think it's natural to post here, we are all a member of RPF "family" we are all sharing the same passion for Science fiction or movies or video game.
If we can help each other or inspiring each other that mean what we do is not in vain !!
I love making cosplay and armor, and i love sharing what i do with all of you.
Each comment i receive make me happy and encourage me to do more so .... THANK YOU to you !!!
Rysjin7717
Well-Known Member
I can't belive i missed this Briciius, great job on an original armor build very inventive i'd like ta see where this goes keep up th' great work:cool
I can't belive i missed this Briciius, great job on an original armor build very inventive i'd like ta see where this goes keep up th' great work:cool
^^ thank you Rysjin
Can you explain what mean this part : "i'd like to see where this goes " xD
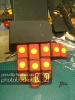
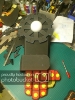
ANd here litle up, i've start my Heavy fist ( only 4 fingers xD )


i think i will try to add the last finger xD
NeoRodimus
New Member
the hand looks similar to hellboys arm, cool build.
the hand looks similar to hellboys arm, cool build.
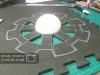
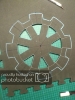
Yeah i've think about Hellboy Hand but i want something different ( for this build ) i think i will add big GEAR with a half sphere etc etc more pics very soon

new pics ^^ starting the detail job :


and only for you a quick video of the fingers :
hope the vidéo will work
and only for you a quick video of the fingers :
hope the vidéo will work
Attachments
-
 DSC_1351_zps2c9d4f93.jpg374.7 KB · Views: 76
 -
 DSC_1351_zps2c9d4f93.jpg374.7 KB · Views: 71
 -
 DSC_1351_zps2c9d4f93.jpg374.7 KB · Views: 72
 -
 DSC_1353_zpsad1d467d.jpg288.4 KB · Views: 86
 -
 DSC_1353_zpsad1d467d.jpg288.4 KB · Views: 83
 -
 DSC_1353_zpsad1d467d.jpg288.4 KB · Views: 78
 -
 DSC_1352_zpse96bb632.jpg334.9 KB · Views: 73
 -
 DSC_1352_zpse96bb632.jpg334.9 KB · Views: 66
 -
 DSC_1352_zpse96bb632.jpg334.9 KB · Views: 71
 -
 DSC_1356_zpseeb5654e.jpg364.4 KB · Views: 69
 -
 DSC_1356_zpseeb5654e.jpg364.4 KB · Views: 77
 -
 DSC_1356_zpseeb5654e.jpg364.4 KB · Views: 80
Last edited by a moderator:
Awesome job. Your first progress pic reminded me of the 80's Centurions toys.


That hand is beastly looking. Good job!
aaahhh thank you so much exactly what i want to do !! a badass hand !!!!
Similar threads
- Replies
- 4
- Views
- 799
- Replies
- 14
- Views
- 2,602
- Replies
- 2
- Views
- 428
- Replies
- 13
- Views
- 12,479