Got the telescoping aerial rod today

Stripped all the Alclad back off the sonic
as I knew I'd be handling it a lot while figuring this bit out so I'm going to leave the paint job 'til last. Besides the weather is once again against me and the howling rain and gale do not make for good painting weather!
The aerial I got turned up to be a bit to deluxe for the task with all manner of wiring and tilt heads attached, but that's ok - more stuff for the junk box - which always comes in handy as it did later today. The way the aerial / antenna was built the thickest was too thick but it was stopped at each end to prevent disassembly. So I cut both the very top and the very bottom off to slide it apart and remove the thickest segment. The second thicker section fit perfectly into the upper sleeve of the sonic

See I have to do this 'upside-down' to a normal telescoping assembly as the upper section must sit tight in the top sleeve to prevent it wobbling about when extended - ergo the telescoping has to work *inside* the top part.
Once I had the aerial inserted as far as it would fit into the upper sleeve I marked and measured the full distance of the shaft covered by the sleeve as I would now have to cut that shaft to the right length. (3cm for anyone who's interested).

See it would actually be *the other end* of the rod that would be going into the sleeve because it needs to be the end with the stopper for the smaller shaft. (confused yet? I know I was. In fact this whole thing took a great deal longer, with more fiddling than I expected due to a few surprises with the manufacturing of the aerial rod, but I shan't bore you with the details here. After all it all came together in the end.)
Suffice it to say I cut the thicker part down. I then took a depth measurement for the lower sleeve of the sonic to see how long the thinner aerial sleeve would need to be for the sonic to be at it's maximum extension without extending past the rim. I cut the inner sleeve to these dims and ended up with a cute little mini telescoping rod that worked perfectly inside the upper sleeve.

As a side note in case anyone wants to attempt this mod - don't bother trying to cut it with a saw. I started that way and the polished stainless steel gives absolutely no purchase to the saw so it's waaaaay too much effort for a sub par result. I broke out the dremel for all remaining cuts and and it cleaved like butter and neat and straight to boot.
The take away here was that as I had to leave the smallest possible amount of *inner* stem on the aerial so that there would be adequate room for it to extend *backward* when the sonic was in 'down' mode. It left a little too much wobble in the join for my liking. Besides - I needed something to affix that tiny stalk to the base inside the lower part of the sonic strong enough not be tugged out with use. With the wobble in mind I wanted something that would also hold the rod at a perfect vertical.
I employed my usual scientific method (rooting around my old junk box) and lo-and-behold I found this plastic disc, just slightly smaller in diameter then the inside of the sonic base with a hole about perfect for the aerial rod!

My idea was I could use this to make a base that (much like a table lamp) would keep the shaft straight at all times as well as provide enough surface to keep the whole assembly solidly adhered to the inside.
My only question now was 'how to ensure a perfect 90 degree angle while glueing the aerial rod into the base as the hole was juuuuuust a smudge bigger then the rod.
More fossicking and I came across a pile of standard rivets which - wouldn't you know it - fit inside the aerial shaft perfectly.

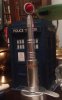
I pulled the rivet off the stand with some pliers and assembled the whole thing into a perfectly respectable telescoping-shaft-with-base

Tested the telescoping mechanism to my satisfaction (a touch of WD-40 helped it glide a little smoother) and now the whole assembly is drying and waiting for the weather to turn for the final paint coat.
Hopefully my next post won't be in 4 weeks time....