3D printing a 1:1 Terminator T-800 endoskeleton

3Days of printing later, and I have the top of the skull. I my only reaction is WOW. The utter sharp detail and the subtle compound curves make this a really nice skull. In addition, there is room for batteries, servos or eye mechanics inside an internal compartment. Thus far, I am impressed with how well this printed.

The few things I will change:
1) The printed teeth with acrylic teeth.
2) I think the bite needs to be narrower, and will grind and putty.

I need to learn how to slice up the models for printing. I wont be able to get the chest or back plate from my build platform. I also have the model for the rest of the arm components. They are drawn as one piece, and I need to split them for printing.
Can you please tell me what 3D printer you bought as I'm looking into buying my first one to start my own printing. Thanks
 
It has been a while since this topic has been updated. Rest assured, my goal is still not met, but I get ever closer.

I thought I would share some wisdom and answer a few questions from this thread.

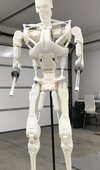
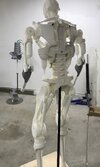
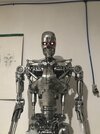
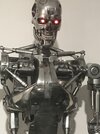
1) since printing out the skeleton parts, they have been polished up and moved to Thorsoli’s gifted hands for molding. That’s right, these parts are being molded and that takes a while.
2) After I sent these parts to be molded for the purpose of rotocasting resin parts, I found that I could, essentially, rotocast the PLA part as if it were a mold. I found this amazing that I have not done this before! I brushed the printed piece with vaseline to prevent the resin from leaking out the printed corners and holes to stick to the outside. These shells have spots where liquid resin will leak thru. Then rotate the print to distribute the resin until it cures. (Anyone who has ever hand-rotated a matrix mold will greatly appreciate the lack of weighty molds for this!). The flip side is the resin leaks thru and drips on you, the floor, or table! Please put down plastic. The cured drips then peel off the exterior and you now have a rotocast part.
3)My new rotocast part was still hollow, and might break in a fall. I made it solid and unbreakable when I added 2lb. Ridged foam. This worked out well. I also recommend drilling 1mm holes in corner areas tolet expanding foam escape and release pressure that might distort the cast. Once again, if the exterior is released with Vaseline, all spillage pops off after the cure. This was very cool. I went from a fragile PLA print, to a sturdy model that can support its own weight.
4) adding metal inserts is easy and with the use of 1/4-20 T-nuts, and fender washers, I made the knee and elbow joints. They bend and pivot.
5) A fellow RPF Member, jediguy, made an offer to RPF members for SLA 3D printing at such a good price, it needs to be mentioned here. I can now give a definite answer to all cost questions and point you in the direction of where to have it printed for you. This is known as problem solving by credit card!


To answer the cost questions, let me see if I ca break this down for everyone’s talent, faith in technology, and budget.

Cost of file purchased from any number of online suppliers $169

Cost of 3D printer: $225 shipped from Amazon.

SLA printed via Corelliacreations.com, a company that has been nothing but pleasant to deal with and provided beautifully strong parts that required NO sanding or touch up, has provided a lovely quote for anyone who would like to have a FULL T-800 delivered to their front door via FedEx 21 days after payment received for <$2000.00

I find this SO Freaking amazing, that I am pulling the trigger on a whole print and am sending the files for printing.

Thus, my next post will in 3 weeks, or when I open the package of parts for a complete review.

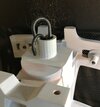
until then, these are some fingers printed on the SLA industrial printer from CorelliaCreations.com
D7958AE4-592D-4331-8A42-386A6CA1A94F.jpeg
D7958AE4-592D-4331-8A42-386A6CA1A94F.jpegA0F44F57-5E64-457D-B1DC-179950138599.jpegFE1581F5-08F3-4F20-9C02-99F97F74D053.jpeg4AC306D0-4CCB-4C9B-8985-57964F6D076A.jpegAA4C1F1F-B758-4562-AE62-0BF617007907.jpeg334F7781-B832-4C3D-8FEE-950F3D52997D.jpeg1328340C-8E00-4AA8-91E2-F3B10B5C2F65.jpegD7958AE4-592D-4331-8A42-386A6CA1A94F.jpegFE1581F5-08F3-4F20-9C02-99F97F74D053.jpeg
 
My 3D printed endoskeleton has just arrived. It is now 51 days And not 21 days since sending files to Corellianexports for printing. This package has been held up in customs (and to be honest, I had believed it gone missing) since August 17th.

I am quite pleased to report the the pieces look beautiful and are printed in one piece, as opposed to the printed sections that come from my personal 3D printer.

I believe this to be much more durable than parts printed from my creality10 printer. As such, these prints can be finished and assembled into a T-800 right out of the box.

77AF4ECD-9994-438E-A3EC-32FECF0BED20.jpeg
 
The printed parts fit together very well, but the issue now is attaching the upper torso to the spine. I could run a piece of PVC thru there and make it ridged, but My goal is to have a flexible joint that will allow him to bend and twist. It has a ball joint but it is too small to let the bungee cord go thru.

My current solution is to not use the ball joint, but to stretch a 36” bungee from top to bottom. This holds well but as you can see from the photo that the temp connection blocks the mounting hole. I ran 3/4” PVC thru him to support his weight on a mannequin stand.

right now, my struggle is to use a bungee Fromm top to bottom and still be able to mount him for standing.

I have added thigh hydraulics and he looks pretty good. I believe he should be able to carry his own weight.


CC858440-5B58-4FC4-AA2D-DC88CD586022.jpeg
 

Attachments

  • 2A285883-73A6-4B7A-A15A-108DC5DFDBD6.jpeg
    2A285883-73A6-4B7A-A15A-108DC5DFDBD6.jpeg
    1 MB · Views: 158
  • 3D6C294A-81DE-44C6-869E-19956FE88850.jpeg
    3D6C294A-81DE-44C6-869E-19956FE88850.jpeg
    1.7 MB · Views: 157
  • 5545156F-C468-4247-8177-99D500B410C6.jpeg
    5545156F-C468-4247-8177-99D500B410C6.jpeg
    1.4 MB · Views: 170
I have finally gotten to a point where I can add the arms to the model.

The bungee cord worked well to attach the torso to the spine. He can bend and twist at the waist a small amount. He is posable, and all the joints are made to move. My concern is that the model is made to be glued together and remain as one, whereas I want to add bolted metal connections so that he can be disassembled and reassembled. That will take some effort, because there are a LOT of connections!


So I am one step closer now!
 

Attachments

  • grailll.jpeg
    grailll.jpeg
    1.2 MB · Views: 202
  • grailE7A.jpeg
    grailE7A.jpeg
    1.2 MB · Views: 199
Two and a half years ago, I started this thread, and six years ago, I tried to make a foamcore endo: Paper + foamcore T-800 Endoskeleton

Well, now I can say that I have a T-800 endoskeleton from a 3D printer. In all honesty, if I had known it would be all this effort, I would have just bought one from Sideshow. I worked with a few different designers and paid out more than I should have. In the end, I bought the file from CGTrader.com for $160 and used that file.

Alas, I will not likely have a walking puppet that I originally planned for. I learned the fragility of PLA prints and felt the pain of seeing parts break easily if overstressed!

My final solution was to take the PLA prints and roto cast resin inside each part for strength and backfill with expanding foam to make them solid and light. This had its drawbacks. The PLA print could be distorted by the heat of a fast-curing resin, or the expanding foam. I had to be careful with each. Then, of course, each piece had to be sanded, primered, and sanded again to get it paint-ready, and painting and chroming was a chore unto itself!

In the end, I can say that I brought a 36 year dream into reality, I built an endoskeleton!

IMG_8211.jpg

IMG_8200.jpgIMG_8211.jpgIMG_8207.jpgIMG_8199.jpgIMG_8198 (1).jpg
 
Amazing brother. You did an awesome job and should be proud. I'm glad the hard work paid off and you didn't give up but stuck with it through the ups and downs...makes the reward that much greater.
 
With some advice from RogueSkynet, I was able to hook up some LEDs to a remote switch and put a sparkle in Termie’s eye. He just didn’t look right without a healthy glow, and so I wanted to post.
 

Attachments

  • C3A16CC6-B834-49FE-8758-F91D6AB2747D.jpeg
    C3A16CC6-B834-49FE-8758-F91D6AB2747D.jpeg
    1.1 MB · Views: 247
  • 9247A643-7FB7-40B0-BDE1-AFDEAFBB8C96.jpeg
    9247A643-7FB7-40B0-BDE1-AFDEAFBB8C96.jpeg
    812.9 KB · Views: 225
  • 8620E2A7-33D1-4C00-A55F-4A21A21E2F44.jpeg
    8620E2A7-33D1-4C00-A55F-4A21A21E2F44.jpeg
    1.6 MB · Views: 228
`
This looks amazing!

I think you've put me off 3D printing one though...

If you don't want to go thru the hassle of printing on your own machine, there is an SLA printing service offered by board member Jediguy that will have the whole thig delivered to your front door in 3 weeks. (It is pictured above in white) at a cost of about $2500.
 

Your message may be considered spam for the following reasons:

If you wish to reply despite these issues, check the box below before replying.
Be aware that malicious compliance may result in more severe penalties.
Back
Top