36" USS Sulaco 3D Print Model Build (Completed!)

skahtul

Sr Member
RPF PREMIUM MEMBER
Now that I have finished by X-Wing and TIE Intecrpter it is time for another 3D Printed build. This will have just a touch of 'scratch' building for the guns and some very minor kitbashing. I have never really added any details to an existing model so this should be an adventure.

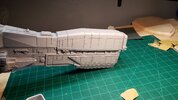
First up, hours and hours of printing has finally been completed!

Also, before I forget thanks to RPF member Kingbob for making this kit, it is awesome!

20201017_130036.jpg
 
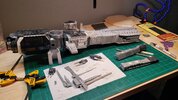
This kit is unique in that you put it together with tons of little screws. It's always amazingly engineered with a cool frame. In places where it's needed, I have been using some new superglues that I got in last week. I sure am glad that I also ordered some de-bonder, when they say "instant" they mean instant! I glued myself to this model at least 10 times...

20201017_185255.jpg
 
Last edited:
I found some pretty sweet add-on's that I will be used to augment the display. I will be making a wall-mounted display for this as I am running out of shelving and other options to mount my models...


20201031_144845.jpg
 
Putty time. Like I said this kit was well-engineered and really did not require that much putty to fill in all the gaps.

20201031_002451.jpg
 
This model has a lot of flat surface areas so sanding is actually not a bad option. However, my hands/joints just don't hold up to that so I have found an alternative way to finish 3D kits which has worked very, very well for some of my past builds.

This finishing resin goes on super thin and self-levels very well. Sometimes you have to sand, but it's not much.

On these test side panels, I coated the right side of the parts with resin and left the left side of both panels alone. It sometimes takes two coats or a tiny bit of sanding to get it 100% smooth.

Filler primer is always an option and depending on the prop or model I have used it. The only issue I have is that it really 'fills' in everything which is great on some builds and too much on others. You also really need to be able to sand everywhere as in my experience it leaves behind 'grit'.


20201031_145846.jpg


20201031_132127.jpg


Bye-Bye print lines!

20201031_135742.jpg


-Eric
 
Last edited:
That resin trick is the bomb...how do you apply it? Model is looking very good and seems easy to put together.(y)(y)

Thanks. It's actually really easy. Since the resin has a 20 minute working time you have plenty of time to get it applied. Also, because of that working time, it's not crazy sticky and super easy to clean up.

I find that a flat wide brush (between 1/2" and 1") is the best way. You want to finish only one side at a time as the resin is self-leveling (which I think is why it works so well), so you want whatever part you are working on the point straight up and be level.

Then you just brush it on! Once it's applied you do want to keep a close eye on it and have a small brush on hand to clean up any areas where it pools. The only other issue is that if you have a ton of small details on a part, this will 'soften' the edges (much like using too much primer) so it's not ideal for all parts of the print.

I am wet sanding it now so I should be priming the front half today.
 
Here is the front after sanding and a second pass with primer. Other than getting the panel lines cleaned up the front is ready for paint.

20201101_230349.jpg

Almost ready for final assembly. Still trying to work out final paint and assembly as the side guns are in the way.

20201102_003127.jpg
 
Excellent work so far and thanks for the tuto. Are you using an airbrush to spray the paint or your normal spray-can?
 
Excellent work so far and thanks for the tuto. Are you using an airbrush to spray the paint or your normal spray-can?

I am using Tamiya surface primer for the main parts that are easy to get to, and then priming the hard to reach parts with the airbrush. Everything will be painted with an airbrush though.
 
I also received a tip that in Alien 3 the Sulaco does in fact have lights. I fired it up and sure enough, in the first minute or so (luckily...) it does have some 'running' lights on the side so I decided to break out the fiber optics.

20201105_103840.jpg


20201105_134926.jpg
 
Last edited:
fantastic work going on here. That's a great tip regarding the resin to remove print line too - thanks for that
I, for one, will be watching this (I only found it this morning)
 
This thread is more than 3 years old.

Your message may be considered spam for the following reasons:

  1. This thread hasn't been active in some time. A new post in this thread might not contribute constructively to this discussion after so long.
If you wish to reply despite these issues, check the box below before replying.
Be aware that malicious compliance may result in more severe penalties.
Back
Top