Greetings RPF,
This morning I began working on a new project, a U.S. Aeronautics Agency (USAA) EVA suite from 2001: A Space Odyssey; I won’t be referencing the suit created for (and worn by) Bowman in 2010, the details are very different. As I always I have too many project going on at once, this one will be used to distract me from my more urgent projects (when I need a break). this considered, I’m not in any rush to get it done, I just want to do it properly. The only difference might be in the materials I use, for instance most of the items will be 3D printed and augmented with traditional modeling/crafting techniques. I do have the LIMITED ability to work with soft metals, but my experience working with them (the tools) is very limited. Anyway, as most 2001 fans know, there were actually 3 variants of the EVA suit see on screen:
[picture of suits]
Okay, so getting started, I’m not ready to allocate any hard cash to this just yet (my other projects don’t like to share), so I’ve decided to start with the function controls embedded in/on the wearer’s left forearm.

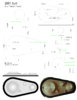
Even though I don’t have any actual measurements, I decided to go ahead and draw the basic shape in Illustrator. I’m not 100% sure what font was used to label the buttons, but I know Eurostile was used on other equipment, so I'll use that as a place holder for now.
I couldn't fined an EPS versions of the era-specific IBM logo that was used, so using City Medium as the base, I drew the correct 1956-1972 logo in Illustrator. Now that the basic shape has been completed, I need to figure out actual mesurments. I’m studying several photos tin hopes of making an education guess, but I’d really like to know for sure.


I also need to keep studying the mechanical functions of the buttons, in some images they appear to go straight into the housing. There also seems to be two bars/rails running parallel down both sides of the button recess...


Also, I’ll be continually working on the follow goals:
This morning I began working on a new project, a U.S. Aeronautics Agency (USAA) EVA suite from 2001: A Space Odyssey; I won’t be referencing the suit created for (and worn by) Bowman in 2010, the details are very different. As I always I have too many project going on at once, this one will be used to distract me from my more urgent projects (when I need a break). this considered, I’m not in any rush to get it done, I just want to do it properly. The only difference might be in the materials I use, for instance most of the items will be 3D printed and augmented with traditional modeling/crafting techniques. I do have the LIMITED ability to work with soft metals, but my experience working with them (the tools) is very limited. Anyway, as most 2001 fans know, there were actually 3 variants of the EVA suit see on screen:
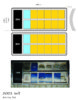
v1, worn by Floyd and his companions onboard the moon bus and while visiting Tycho Crater — silver suit (without arm controls), white helmet (no hose).
v2 worn by Bowman and Poole on board the Discovery — yellow, red, and yellow.
v3 worn by unidentified ground crew outside Clavius Base — these appear to be repurposed (and painted) v2 suits in order to match the v1.
[picture of suits]
Okay, so getting started, I’m not ready to allocate any hard cash to this just yet (my other projects don’t like to share), so I’ve decided to start with the function controls embedded in/on the wearer’s left forearm.
Even though I don’t have any actual measurements, I decided to go ahead and draw the basic shape in Illustrator. I’m not 100% sure what font was used to label the buttons, but I know Eurostile was used on other equipment, so I'll use that as a place holder for now.
I couldn't fined an EPS versions of the era-specific IBM logo that was used, so using City Medium as the base, I drew the correct 1956-1972 logo in Illustrator. Now that the basic shape has been completed, I need to figure out actual mesurments. I’m studying several photos tin hopes of making an education guess, but I’d really like to know for sure.
I also need to keep studying the mechanical functions of the buttons, in some images they appear to go straight into the housing. There also seems to be two bars/rails running parallel down both sides of the button recess...
Also, I’ll be continually working on the follow goals:
- Expand my collection of references (photos and details)
- Identify any new tools/materials I need
- Breakdown the project into assemblies and subassemblies (something like gloves, boots, helmet, and so forth)
- Establish a realistic budget (and possibly construction timeline)
")
