Techne
New Member
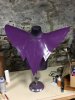
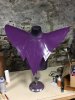
I made this Molecule Man costume earlier this year (it's the second costume I've posted here, the first was a Jawa for my son). I’ve been trooping with the 501st for years in some armor, but this was my first build completely from scratch, and required a lot of different materials and skills, which I learned (more or less) along the way.
I chose to create a version of the Molecule Man from Avengers 115-116, which granted is a pretty random, not-often-recognized version of the character. I picked it because I didn’t want to wear a wig, which meant choosing a version with a helmet, and this is my favorite helmet of his. (Molecule Man is one of my favorite characters. I’m currently writing a history and visual analysis of all his different costumes, which I’ll post elsewhere, hopefully in a couple months. I’ll share a link here after I’m done.) It is different from many versions of his costume in a number of details that I’ll point out below.

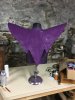
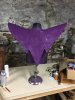
The costume consists of several parts: fabric pants; fabric jacket; foam and fabric boots; fabric gloves; foam and fabric belt; foam pauldron; wood wand; a headpiece made of fabric and other materials; a foam helmet; and facial scarring make-up.
Starting with the simplest:
The pants were sewn from “forest green” cotton fabric, using the Burda 6873 pattern (I mixed parts of the A and B versions). I’ve done some sewing before, but sewing pants, with front and back pockets and belt loops, was way beyond my past experience. But, by following the pattern, I ended up with results that I was pretty happy with. There was nothing particularly unusual about the pants, they were pretty much straight out of the pattern. I skipped the zipper and used velcro instead.
The jacket uses the same green fabric as well as some “magenta” cotton fabric (although it looks purple to me). The jacket was largely based off a Burda 7291A sweater pattern, but I tweaked it in a few spots. The collar is different, and I made the coat a little longer on the bottom. It’s also closed through velcro instead of buttons. The magenta is sewn on top of the green on the bottom of the front and back, so it just appears below the belt when worn. (This detail is different from Molecule Man’s normal costume.) The green is a bit see-through around the chest, so you can see the velcro through the front of the fabric, but luckily the pauldron covers it up.


The gloves were one of the biggest pains. Again, I am not a mega-experienced sewer. I know you can sew gloves by just tracing around your splayed hands, if you use spandex. However, I was using cotton, with no stretch, so I wasn’t sure if it would work. I did a muslin version, and I botched a real fabric version, before finally getting them to work—and only barely. I thought I was going to need to sew gussets in around all the fingers, and tried that in the first version with terrible results. In the end I just needed to sew one gusset in, which if you look closely does not look amazing, but is OK from a distance:

I ended up sewing the hand separately from the part that goes around the arm, I think because I was running out of fabric and couldn’t fit them on the fabric if I made them out of one piece. The end of the gloves has a folded-over thicker part to emphasize the lightning shape, which is OK but if I was doing them over again I would definitely re-do. Right now it is made of lots of smaller pieces sewn together, and where they overlap it does not look great, and more importantly the parts that open into the end have no hem. I’d optimally redo them with less overlap, and hemmed ends. Such are the compromises we make when sewing late into the night days right before a con! (This costume is, incidentally, the only version of the Molecule Man that has gloves.)
In the end, I’m not massively in love with the gloves’ results, but I am happy about them as a learning experience, and as an example of overcoming a challenge that took multiple versions to get to a passable state.

The boots are fitted over water shoes. The water shoes are just regular. The boots are made of a few pieces of foam: one around the back of the leg, one that goes on the front of the leg and bends over the top of the foot, and a a little square on the front, to cover up a shallow space over the toe where the main foam piece is folded over.


They’re made of multiple layers, so the fabric over them can’t be perfectly tight; it needs to be loose so it doesn’t show the lumps made by the different layers of foam. The fabric was a bit of a pain to figure out how to cut and sew, and could certainly be done in a more refined manner, but it works. I used a liquid latex-based fabric glue to attach it to the foam. The back of the boots are slit, and come together with velcro, although usually I don’t need to open the velcro to get them on.


The boots also have two lightning shaped pieces that are attached with velcro to the outside, one in the front and one in the back (where it covers over the back opening of the boot). I was originally going to put straps underneath the covers to hold them in place on the shoes but that ended up being unnecessary. I recently added a tab of velcro on the tip of the shoes to help keep the covers in place, but it hasn’t been a big problem—they tend to swivel off the front of the foot a little when I’m walking long distances with big strides, but not if I’m just walking casually around.


The wand is a wood dowel that I sanded down to more of a point on one end, using rasps and sandpaper. Then I painted it black. (Molecule Man’s wand has been portrayed in several forms; the wand this version of the character uses is by far the simplest form.)

The belt is foam, wrapped in fabric. I wanted a foam core to give it some dimensionality; often his belt has some real thickness to it, and the cotton fabric I has was definitely not stiff enough to act as a belt on its own.

The buckle is a piece of thicker foam, backed with a very thin sheet of wood to give it some strength, spray painted purple. It attaches to the other end using velcro, hook and eyes, and magnets. Which is a bit of overkill, I know. I have tried several options: an all-velcro attachment wasn’t strong enough, it just peeled off under the pressure from my powerful gut. If I sewed it on, it would be stronger, but I already have the foam behind it so sewing it would be hard. The hook and eyes are a bit wobbly, and allow the buckle to peel away from the belt on the open side, so it doesn’t lay flat. I just recently added the magnets to add some more solidity and to keep the edge of the buckle laying flat, but they aren’t as strong as I would wish, given the layers they have to go through. Overall it’s OK but I wish it was better. It would have been better to engineer it with a prong that went all the way through to a hard connector on the other end.


TO BE CONTINUED IN THE NEXT POST!
I chose to create a version of the Molecule Man from Avengers 115-116, which granted is a pretty random, not-often-recognized version of the character. I picked it because I didn’t want to wear a wig, which meant choosing a version with a helmet, and this is my favorite helmet of his. (Molecule Man is one of my favorite characters. I’m currently writing a history and visual analysis of all his different costumes, which I’ll post elsewhere, hopefully in a couple months. I’ll share a link here after I’m done.) It is different from many versions of his costume in a number of details that I’ll point out below.
The costume consists of several parts: fabric pants; fabric jacket; foam and fabric boots; fabric gloves; foam and fabric belt; foam pauldron; wood wand; a headpiece made of fabric and other materials; a foam helmet; and facial scarring make-up.
Starting with the simplest:
The pants were sewn from “forest green” cotton fabric, using the Burda 6873 pattern (I mixed parts of the A and B versions). I’ve done some sewing before, but sewing pants, with front and back pockets and belt loops, was way beyond my past experience. But, by following the pattern, I ended up with results that I was pretty happy with. There was nothing particularly unusual about the pants, they were pretty much straight out of the pattern. I skipped the zipper and used velcro instead.
The jacket uses the same green fabric as well as some “magenta” cotton fabric (although it looks purple to me). The jacket was largely based off a Burda 7291A sweater pattern, but I tweaked it in a few spots. The collar is different, and I made the coat a little longer on the bottom. It’s also closed through velcro instead of buttons. The magenta is sewn on top of the green on the bottom of the front and back, so it just appears below the belt when worn. (This detail is different from Molecule Man’s normal costume.) The green is a bit see-through around the chest, so you can see the velcro through the front of the fabric, but luckily the pauldron covers it up.
The gloves were one of the biggest pains. Again, I am not a mega-experienced sewer. I know you can sew gloves by just tracing around your splayed hands, if you use spandex. However, I was using cotton, with no stretch, so I wasn’t sure if it would work. I did a muslin version, and I botched a real fabric version, before finally getting them to work—and only barely. I thought I was going to need to sew gussets in around all the fingers, and tried that in the first version with terrible results. In the end I just needed to sew one gusset in, which if you look closely does not look amazing, but is OK from a distance:
I ended up sewing the hand separately from the part that goes around the arm, I think because I was running out of fabric and couldn’t fit them on the fabric if I made them out of one piece. The end of the gloves has a folded-over thicker part to emphasize the lightning shape, which is OK but if I was doing them over again I would definitely re-do. Right now it is made of lots of smaller pieces sewn together, and where they overlap it does not look great, and more importantly the parts that open into the end have no hem. I’d optimally redo them with less overlap, and hemmed ends. Such are the compromises we make when sewing late into the night days right before a con! (This costume is, incidentally, the only version of the Molecule Man that has gloves.)
In the end, I’m not massively in love with the gloves’ results, but I am happy about them as a learning experience, and as an example of overcoming a challenge that took multiple versions to get to a passable state.
The boots are fitted over water shoes. The water shoes are just regular. The boots are made of a few pieces of foam: one around the back of the leg, one that goes on the front of the leg and bends over the top of the foot, and a a little square on the front, to cover up a shallow space over the toe where the main foam piece is folded over.
They’re made of multiple layers, so the fabric over them can’t be perfectly tight; it needs to be loose so it doesn’t show the lumps made by the different layers of foam. The fabric was a bit of a pain to figure out how to cut and sew, and could certainly be done in a more refined manner, but it works. I used a liquid latex-based fabric glue to attach it to the foam. The back of the boots are slit, and come together with velcro, although usually I don’t need to open the velcro to get them on.
The boots also have two lightning shaped pieces that are attached with velcro to the outside, one in the front and one in the back (where it covers over the back opening of the boot). I was originally going to put straps underneath the covers to hold them in place on the shoes but that ended up being unnecessary. I recently added a tab of velcro on the tip of the shoes to help keep the covers in place, but it hasn’t been a big problem—they tend to swivel off the front of the foot a little when I’m walking long distances with big strides, but not if I’m just walking casually around.
The wand is a wood dowel that I sanded down to more of a point on one end, using rasps and sandpaper. Then I painted it black. (Molecule Man’s wand has been portrayed in several forms; the wand this version of the character uses is by far the simplest form.)
The belt is foam, wrapped in fabric. I wanted a foam core to give it some dimensionality; often his belt has some real thickness to it, and the cotton fabric I has was definitely not stiff enough to act as a belt on its own.
The buckle is a piece of thicker foam, backed with a very thin sheet of wood to give it some strength, spray painted purple. It attaches to the other end using velcro, hook and eyes, and magnets. Which is a bit of overkill, I know. I have tried several options: an all-velcro attachment wasn’t strong enough, it just peeled off under the pressure from my powerful gut. If I sewed it on, it would be stronger, but I already have the foam behind it so sewing it would be hard. The hook and eyes are a bit wobbly, and allow the buckle to peel away from the belt on the open side, so it doesn’t lay flat. I just recently added the magnets to add some more solidity and to keep the edge of the buckle laying flat, but they aren’t as strong as I would wish, given the layers they have to go through. Overall it’s OK but I wish it was better. It would have been better to engineer it with a prong that went all the way through to a hard connector on the other end.
TO BE CONTINUED IN THE NEXT POST!