1/88 Revel Slave 1

Toadmeister

Sr Member
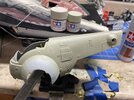
I completed the Bandai 1/144 kit about a year back detailed here. Lovely kit but it only made me itch for a larger scale. The 1/72 Fine Molds is ridiculous money now, so doing the roughly 1/88 Revel kit.

5043B51F-2CA7-4142-82BD-78070EF28A9F.jpeg


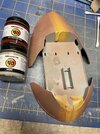
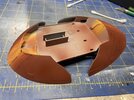
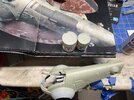
Lining up my paint jars, I’ll mostly be reusing what worked before. The only color I wasn’t satisfied with previously is the darker grey-green mottled on the fuselage sides. My Bandai is too grey and not enough green. So searching for that magic hue.

BEF2CF24-59B9-410C-967E-8FE69FF5358B.jpeg


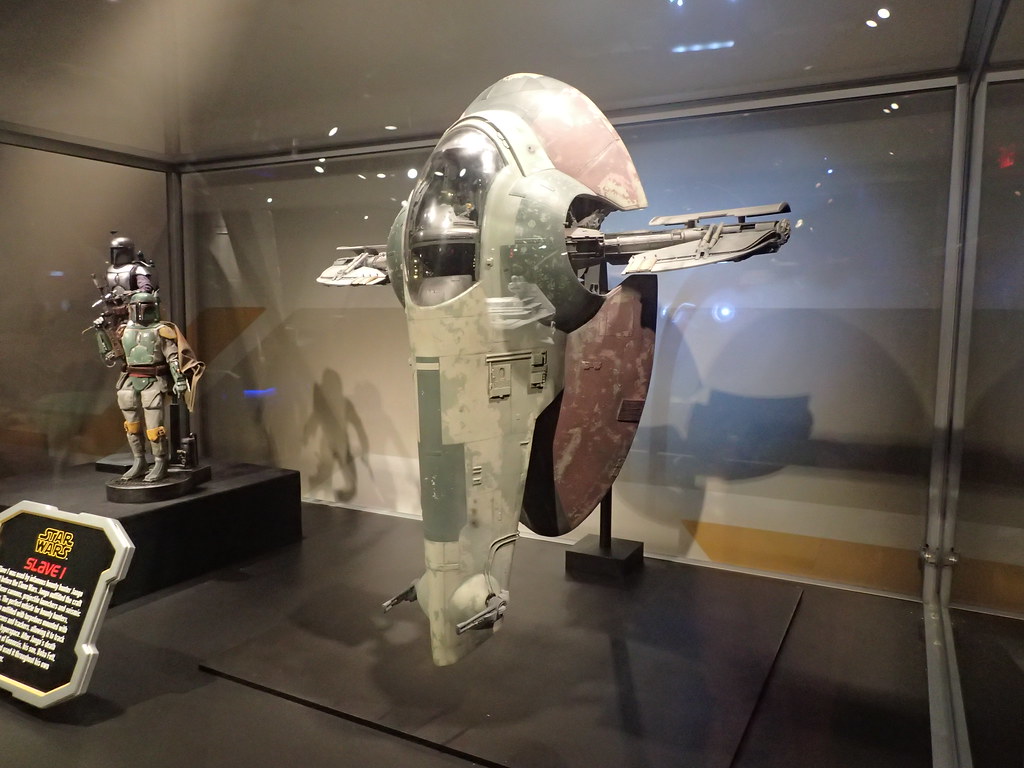
I visited Disneys Galaxy Edge before Christmas and also stopped at the Launch Bay where studio models and some props are displayed. I took LOTS of reference photos of the Slave 1 I’ll try posting some.
 
Maybe start with something like this for the green?

I don't remember exactly now, but I think I started with that color and then adjusted a bit with some grey/black
1641835268929.png


possibly mix that with the XF-65?
 
Just making sure we are talking about the same grey-green. I'm talking about the mottled/patchy one on the side illustrated below:

View attachment 1532552

Yes, although looking at that picture now, you would probably have to mix with Deck Tan and/or Buff in?

but based on the suggestions in the picture XF-81 does seem a good starting point but still seems dark, maybe mix with Deck Tan or Buff?
1641844900116.png


The XF-65 as you mentioned feels just a bit too gray

s-l300.jpg
 
Yes, although looking at that picture now, you would probably have to mix with Deck Tan and/or Buff in?

but based on the suggestions in the picture XF-81 does seem a good starting point but still seems dark, maybe mix with Deck Tan or Buff?
View attachment 1532570

The XF-65 as you mentioned feels just a bit too gray

View attachment 1532572
Appreciate your feedback. Grey-greens (and Blue Greys) are some of the most difficult shades to match. Most everyone sees them differently I and I seriously question my own color-blindness. Been modeling for about 40 years and it's always a struggle. Often I can see blue huhes when others cannot and vice-versa with greens!

Naturally I will experiment on some color swatches before laying down too much paint.
 
I also was mistaken and thought you were talking about the green on the "porsche fender" parts

Now I see you mean the chipping paint on the hull labelled "Grey-Green" in that picture
For mine, I started with XF-71 and might have added a little bit of white or grey to lighten/fade it
417ZFARNupL._AC_SY350_.jpg


might have actually mixed in some XF-14 JA Grey.

Although the XF-71 with the XF-25 you have along with a bit of white may do it as well
3e5b-8131-5f81-a388-3e0f8c5157d6__51975.1536359883.jpg
 
I also was mistaken and thought you were talking about the green on the "porsche fender" parts

Now I see you mean the chipping paint on the hull labelled "Grey-Green" in that picture
For mine, I started with XF-71 and might have added a little bit of white or grey to lighten/fade it
View attachment 1532593

might have actually mixed in some XF-14 JA Grey.

Although the XF-71 with the XF-25 you have along with a bit of white may do it as well
View attachment 1532594
Now we’re on the same page!

Yes, greying out XF-71 a bit might be a good approach.
 
Last edited:
Well heck my XF71 bottle had dried up in me. So I tried mixing XF25 (Light Sea Grey) with XF76 (IJN Grey Green) about 1:1 and I liked the result, still needs a little fine tuning.

I dabbed some on my Bandai kit for evaluation. The green hue doesn’t show up well on the below photo.
80F478BB-6141-46B0-874C-5091076682A6.jpeg
 
Dug up my pictures from the Star Wars Launch Bay at Disney Hollywood Studios from vacation a couple weeks back. Disclaimer: I don't know if this is the original Studio Scale model or a replica. Also there is weird lighting and I'm using an iPhone camera so take these for what you will as color reference. Assuming it is the OG Studio Scale model, paint colors can also fade after 40 years!

One of my biggest take-aways is that the Red skirt is very de-saturated. NOT bright red.

IMG-0350.jpg


IMG-0355.jpg

IMG-0370.jpg
 
Color looks good

Dug up my pictures from the Star Wars Launch Bay at Disney Hollywood Studios from vacation a couple weeks back. Disclaimer: I don't know if this is the original Studio Scale model or a replica. Also there is weird lighting and I'm using an iPhone camera so take these for what you will as color reference. Assuming it is the OG Studio Scale model, paint colors can also fade after 40 years!

One of my biggest take-aways is that the Red skirt is very de-saturated. NOT bright red.

View attachment 1532716

View attachment 1532717

View attachment 1532718
I was at the one in Disneyland, CA a few years ago. They are impressive, but they are all replicas. I believe most, if not all, were provided by Steve Neisen and crew? I remember seeing a thread on here for it by some of the people working on them, but it may have been removed because of some NDA type of stuff and it being Disney

At any rate, I got some pics. This one appears to have a different paint job than the one you saw, but very similar in tone, I like the chipping effects on the one you have seen better

40906352991_17ab5c06f8_o.jpg

26033675217_6e0fc1d9e9_o.jpg


Here is the rest of the album if anyone is interested
 
Color looks good


I was at the one in Disneyland, CA a few years ago. They are impressive, but they are all replicas. I believe most, if not all, were provided by Steve Neisen and crew? I remember seeing a thread on here for it by some of the people working on them, but it may have been removed because of some NDA type of stuff and it being Disney

At any rate, I got some pics. This one appears to have a different paint job than the one you saw, but very similar in tone, I like the chipping effects on the one you have seen better

View attachment 1532730
View attachment 1532731


Here is the rest of the album if anyone is interested
Awesome thanks for sharing. I also like the chipping on the Florida Launch Bay one better! Yes, color tone and saturation seems consistent.
 
Dug up my pictures from the Star Wars Launch Bay at Disney Hollywood Studios from vacation a couple weeks back. Disclaimer: I don't know if this is the original Studio Scale model or a replica. Also there is weird lighting and I'm using an iPhone camera so take these for what you will as color reference. Assuming it is the OG Studio Scale model, paint colors can also fade after 40 years!
It’s a replica, I believe built by Mike Salzo. I was at a painting class he put on at Jerseyfest several years ago, and he had it on display for the class.

Spectacular model, and I’m not a huge fan of Slave1.
 
Last edited:
Doing a little homework on the Green shoulders (Porsche Fenders) where the “wings” attach. Heard on. Facebook page that Pullman Green was used for these. So happens I have a Jar and did a comparison with some like color jars.

DCCC239A-4DDD-4518-959E-E8530C629B99.jpeg


I did a little study. 3 greens here that look similar in the bottle.

Pullman green on the left (Pollyscale)
Tamiya XF-65 Field Grey upper right. Very close a little lighter and greyer. Might be a good “scale” color out of the jar.

Tamiya XF-81 lower right also close a little browner

Not shown, Gunze H64 (RLM 71) almost dead on to Pullman green

A reminder these are base colors and weathering over them can change their appearance a bit.
 
Last edited:
It’s cold and froze over outside so I worked on the skirt this weekend.

First I started with a base coat of Lt Grime, than used a laytex liquid mask for chipped areas. Second, I mixed the Llt Grime and Boxcar Red to get a Salmon color and put down a light coat.

Third I added more Latex chipping and applied a light topcoat of Boxcar Red. After a few hours drying time, I simply rubbed off the laytex masked areas.

The layered chipped affect performed beautifully but I was unhappy with the “polka dot” like pattern I got from dabbing on the laytex with a old round brush. In hindsight I should have used a toothpick to get a more jagged and random application.

But I can fix this with a little light 1500 grit wet sanding and touch ups.

With some lt grime overspray and additional weathering I’ll get the more subtle and desaturated look. The pictures make the Boxcar Red look very bright! In person the color is much more of a terra-cotta color.
 

Attachments

  • 3F26069E-C49A-4693-8CD6-71F429BAA86F.jpeg
    3F26069E-C49A-4693-8CD6-71F429BAA86F.jpeg
    2.1 MB · Views: 135
  • 618DF721-0F60-4E11-B4D2-44721FEBFA89.jpeg
    618DF721-0F60-4E11-B4D2-44721FEBFA89.jpeg
    3.6 MB · Views: 131
  • DAE0FD8A-A34B-4786-93A9-78C5608572D1.jpeg
    DAE0FD8A-A34B-4786-93A9-78C5608572D1.jpeg
    2.2 MB · Views: 185
Last edited:
Been doing more research on paint and colors than actually building and painting. But got back to the painting this week.

So Archive X has excellent paint matches for the colors used by ILM, no question there. It is a little mystery of what is used where however.

So, the question is, do I:
1) Follow the original ILM colors and paint processes to get the desired outcome

2) Just match (and mix) colors to what I see in reference photos of the original studio scale props?

Since this is a scale model I opted moreso for #2 but really I’m doing a bit of both depending on the need and changing my mind when needed qw

The side Grey-greens are a huge puzzle. These were painted brighter colors but toned down with misty oversprays of probably Gime. John Simmons Scale Modeling on Facebook illustrates some of this in his older post archives, I did some deep dive into that.

Decided to mix and match my base Grey-green paint app using about a 50/50 mix of Tamiya XF-76 and XF-55. The result is something like greenish oatmeal but actually matches references good. Maybe a little intense on the base coat but it will get toned down with grime overcoats yet.
 

Attachments

  • 2FA9ED88-971F-4C77-898A-9F2376F7583D.jpeg
    2FA9ED88-971F-4C77-898A-9F2376F7583D.jpeg
    3.6 MB · Views: 103
  • D62BB981-55CB-48DB-9CA3-7D48AF7C3AA4.jpeg
    D62BB981-55CB-48DB-9CA3-7D48AF7C3AA4.jpeg
    4.1 MB · Views: 101
While it is great to know the exact colors, sometimes I prefer to go for the on screen look or feel

It really comes to to whether you are trying to make a model of a model, or a model of something as it might really look if it was real

For example, we might know the exact paint match for a studio scale tie fighter is a certain blue grey paint color, but when watching A New Hope the tie fighter color looks more grey

In addition models like this are smaller, so that studio scale matched paint may look too dark on a 1/72 scale kit as well

As you mentioned I kind of lean towards #2, but still do a bit of both. It is very useful to know the starting color ILM used and work from there, but the end result of what you want to capture may wind up being different

On the other hand if your goal is to photograph the model in similar movie style lighting then you probably want to stick closer to studio scale colors, just remember that the way things are painted to show up on film a certain way sometimes may not be the best in person look

A great example is Vader's helmet. To make it match the filming model you have to paint some parts silver and some black, even though it looks all black on screen and is meant to be all black in reality and looks a bit odd when you see it how it really was painted

If you do this with a Bandai 1/12 kit it may look a bit funny unless you tone down the contrast


NgSE8NE.jpg


1645038909138.jpeg
 

Your message may be considered spam for the following reasons:

If you wish to reply despite these issues, check the box below before replying.
Be aware that malicious compliance may result in more severe penalties.
Back
Top