jusdrewit
Sr Member
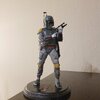
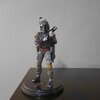
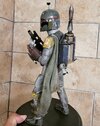
I've had this kit since the early 2000's, I'm leaning towards '06 so in college. I've worked on it off on, trimming the vinyl or test fitting some parts but I've never gotten very far for some reason, perhaps it due to my unfamiliarity with vinyl. Anyways, last year I finally got around to strengthening the vinyl by pouring some hardening substance in the hollow holes like the arms and legs and torso so it wouldn't collapse later. I then finally got around to priming it and finally, perhaps due to being stuck at home due to covvid, I've pretty much finished.
Upon researching this kit I've become aware of the numerous recasts and honestly I don't know what I have as it was 14 years ago. However the rifle, stock, rangefinder and other little bits were a soft metal like material - not vinyl like I've seen on others reviews, so who knows.
I decided to base the paint scheme on ROTJ's SE Boba Fett costume. I initially wasn't going to do the Rotj jetpack as I was lazy and ESB's pack seemed easier lol, but I changed my mind later.
All in all I'm pretty happy with it, the CRL's on the 501st website state Boba's armor and helmet are a 'satin' finish which is what I used, (body was dull coated) however it still looks a little shiny to me even days later so I might change work on that still. The left, right arms and the rifle were so aggravating to get in the right position, I had to eventually cut the thumb and snapped the rifle a few times too make it work.
Unfortunately the model didn't come with any decals so I had to print them myself on decal paper after getting the right size determined. Also, I'm well aware certain proportions on this kit are way off; the ears, rocket on jetpack, etc but I decided to just leave it as is. I was also able to make the head rotate side to side as well which I'm happy about. Hope you all enjoy! Cross another off the list")


Upon researching this kit I've become aware of the numerous recasts and honestly I don't know what I have as it was 14 years ago. However the rifle, stock, rangefinder and other little bits were a soft metal like material - not vinyl like I've seen on others reviews, so who knows.
I decided to base the paint scheme on ROTJ's SE Boba Fett costume. I initially wasn't going to do the Rotj jetpack as I was lazy and ESB's pack seemed easier lol, but I changed my mind later.
All in all I'm pretty happy with it, the CRL's on the 501st website state Boba's armor and helmet are a 'satin' finish which is what I used, (body was dull coated) however it still looks a little shiny to me even days later so I might change work on that still. The left, right arms and the rifle were so aggravating to get in the right position, I had to eventually cut the thumb and snapped the rifle a few times too make it work.
Unfortunately the model didn't come with any decals so I had to print them myself on decal paper after getting the right size determined. Also, I'm well aware certain proportions on this kit are way off; the ears, rocket on jetpack, etc but I decided to just leave it as is. I was also able to make the head rotate side to side as well which I'm happy about. Hope you all enjoy! Cross another off the list
Last edited: