1/48 TIE Bomber Weekend Build (WIP)

skahtul

Sr Member
RPF PREMIUM MEMBER
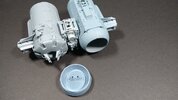
I have been trying to print this set of Bomber files all week and I finally got what I think are some good prints. Search for NerdMakerEngineer on cgtrader if you want to get a copy of the files. This will be a combination of Resin and PLA prints.


IMG_20211203_204841090.jpg


IMG_20211203_204844799.jpg


IMG_20211203_204850587.jpg


I am not going to go super crazy on this version of the 1/48 Bomber, there will not be any cockpit and I will probably not even print the back. My plan is for this to be a fast one weekend build so we will see how that goes. I do plan to scale up these files to 1/34 or 1/24 and do full lights including the cockpit. This build will mostly be about testing some paint colors and a few weathering techniques which will focus on what the Archive X paints will hold up to.

Here are the three paints I am testing, I know some have used these for TIE builds so I thought I would put it here as a comparison. I used the pictured Satin Slate Blue on my 1/24 TIE Interceptor. I will get a picture of all three colors next to each other. I think the Slate Blue is a closer match to the Stormy Sea as it has just a bit more blue to it.

IMG_20211203_203524516.jpg


Here is the TS-32 Haze Grey next to the Archive-X Stormy Sea. Archive X is on the top, and the Haze Grey is on the bottom. In person, the contract is not so stark. The Haze does have less blue in it, but not as much as the picture might suggest. Archive-X of course looks spot on :)

IMG_20211203_203338751.jpg
 
Last edited:
It’s a wonderful file set. I wish I could help you more on your print as I had no issues at all feel free to pm me
Thanks for the offer!

I finally got it. The files are amazing I just had some issues finding the right orientation to get everything to turn out right.
 
Okay, I forgot there was a set of 'bonus' files included with this kit. Between that and having issues with getting my FDP printer to output the last 'wing', this will be a bit longer than this weekend...

Having said that, I still plan to finish this up as quickly as possible.

The maker of these files really did an amazing job with the detail and the engineering of the files. They are set up to make not only building an armature super easy but the wings are keyed so that they line up perfectly to make gluing them together so easy! This really is an amazing touch... Also, the ends of the wings are keyed so that they only go on one way.

IMG_20211204_211828349.jpg


Not too bad for FDM.

IMG_20211204_212406936.jpg
 
It took me some time but I finally stumbled on an easy way to make a threaded mount for this. I really like that you can see the armature inside the kit.

IMG_20211204_193418187_HDR.jpg


Used a bit of epoxy to hold the threaded mount onto the aluminum tube:

IMG_20211204_194416411.jpg


IMG_20211204_195147578.jpg


The first coat of printer is down and the mount works perfectly.

IMG_20211204_211913744.jpg


IMG_20211204_211927988.jpg
 
Great looking build! I'll probably take the poor-man's approach and do mine TS-32. Great solution for the mounting nut as well!

SB
 
Great looking build! I'll probably take the poor-man's approach and do mine TS-32. Great solution for the mounting nut as well!

SB

Actually, I went with Haze for this build, I am saving the Archive paints for when I scale this up a bit and do the lights. Here it is with the first wing almost done, I went with Tamiya Flat Black for the panels.

IMG_20211205_113746521.jpg


IMG_20211205_113801057.jpg
 
Thanks for that comparison shot between Archive-X and Haze Grey. I was always curious how they looked next to each other

Here is the other color I have used next to the Archive X and Haze, Slate Blue.

So, Haze on the left, Archive on the right, and Slate Blue on the bottom. I actually like the color of the Slate Blue better than the Tamiya, but most of the large rattle cans throw down too much paint. I think the Tamiyas go on so nicely that they are hard to beat. Plus, I needed a reason to use up the Haze Gray as it will be a very long time until I get to my 38" Super Star Destroyer kit.

IMG_20211205_130451457.jpg


Extra-large image attached.
 

Attachments

  • IMG_20211205_130451457.jpg
    IMG_20211205_130451457.jpg
    2.8 MB · Views: 70
Last edited:
Well, this is where I leave it for the weekend. I am going to try to get the other wing done during the week. I am still debating if it's easier to paint the panels black before or after the base coat. I think on this next one I am going to try the black first and see how it goes.

I have some cool ideas for the base to add to what was already included.

IMG_20211205_224522709.jpg


This was my first attempt at printing these files, now this part will be used as a testbed for weathering and patining. You can see a bit of chrome work already with my Molotow chrome pen, those things lay down amazing chrome.

IMG_20211205_224537804_HDR.jpg
 
I am going to try to get the other wing done during the week. I am still debating if it's easier to paint the panels black before or after the base coat.


Personally, I have ben priming black, so I prefer painting the wing panels first and then painting the body color

but now that I consider it, it may actually be easier doing the opposite?
 
Personally, I have ben priming black, so I prefer painting the wing panels first and then painting the body color

but now that I consider it, it may actually be easier doing the opposite?

I am going to be finishing my other wing this week, finally got a good print. I am going to try it with putting down the black first, I will let you know my opinion on the subject, for what it's worth :)
 
I found myself needing to do a bit of touch-up on the model today and I only have the two cans of Haze Grey so I did not want to break them out as I need what is left for the second wing.

After looking around online and doing a bit of testing, I found that to my eye a 1:1 mixture of XF-82 Ocean Gray2 and XF-2 Flate White are a perfect match for the Tamiya Haze Grey. This is great if you are putting down a base coat and then need to dust it or any other type of touch-up. I know this is common knowledge but wanted to throw my 2 cents in anyway :)

IMG_20211206_121651753.jpg


IMG_20211206_121926617.jpg


The highlighted area was painted with a brush on my test print, it's literally a perfect match.

IMG_20211206_122506208.jpg
 
I found myself needing to do a bit of touch-up on the model today and I only have the two cans of Haze Grey so I did not want to break them out as I need what is left for the second wing.

After looking around online and doing a bit of testing, I found that to my eye a 1:1 mixture of XF-82 Ocean Gray2 and XF-2 Flate White are a perfect match for the Tamiya Haze Grey. This is great if you are putting down a base coat and then need to dust it or any other type of touch-up. I know this is common knowledge but wanted to throw my 2 cents in anyway :)

View attachment 1518779


View attachment 1518780

The highlighted area was painted with a brush on my test print, it's literally a perfect match.

View attachment 1518781
That is the mix I used. I think I may have added in just a hint of XF-23 to get a bit more "blue" but it was so small it probably made no significant difference

Here is Tamiya Haze Grey straight from the rattle can on the Fine Molds (smaller on the left) compared to the Tamiya XF-82 and White mix Bandai (larger on the right)
Both over black primer

I think that mix might actually be closer to the Archive-X color?

IMG_2681 (2).JPG
 
although depending on lighting they are also closer than the picture above would suggest

Here, like in person, it is harder to tell the difference. The picture in the previous post had a much brighter light source
IMG_2676 (3).JPG
 
Agreed, from what I can see in your pictures, mixing with some additional blue is a closer match if you are trying to replicate the Archive X color. In-person, the Stormy Sea is actually bluer than my photos lead one to believe.
 
A fun small bit of trivia/common knowledge (as I understand it) that I found when I was doing some research on the original studio bomber is that the wings and cockpit window, in typical ILM fashion, were pulled from the kit pictured below, which I happen to be working on also.

IMG_20211206_223628406.jpg


Whoever the author of this kit is got the wings 100% accurate according to the reference kit I have. The parts like the cockpit window and wing match 100% in size also.

IMG_20211206_223646872.jpg

It seems that they literally took this wing and then 'extended' it with something and added a bit of extra detail to make it larger.

IMG_20211206_223737160.jpg


IMG_20211206_223758056.jpg
 

Your message may be considered spam for the following reasons:

If you wish to reply despite these issues, check the box below before replying.
Be aware that malicious compliance may result in more severe penalties.
Back
Top