I wanted to say hi to all and sorry for the being away for a while. The area I was using for building went away. We had a 20x30 deck that we don't use that often. So I talked with my wife about making that a man cave/media room in exchange for moving all my stuff out of her way. She finally agreed. So I started on the journey of designing my man cave. I will post some pictures and a new post showing progress. I have spent all my free time and money making this media room.
You are using an out of date browser. It may not display this or other websites correctly.
You should upgrade or use an alternative browser.
You should upgrade or use an alternative browser.
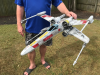
1/12 X-wing Build
- Thread starter bartrman
- Start date
I am not sure If I should post this here or start a new post. I wanted to share some of my progress and dreams with others. Like my post earlier tis is a long term dream of mine as I am sure with most men out there is to have there own man cave. After my wife gave me the ok. to turn our 20x30 deck into a man cave I started doing a lot of research and looking at other ideas. There are some great builds out there. I came across many designs I loved, but I had to look at what I could afford to do and my skill set as to what I could build. I took 3 major designs and came up with my own design. I started with making some drawings of what I hopped my final would look like. I divided the room into three sections. Main hallway that leads fro main house to room. Room is then divided into two sections small L shaped and main viewing area. The first set of drawing deal with small L shaped room.


Next couple are pictures of ceiling


Next couple are pictures of ceiling
yaris
Sr Member
I don't get it??
3 years ago you started scratch building an X Wing 1/12 scale and now you're building a man cave........??
You started out very well......I praise your intention and work thus far.
I wish you luck with your X Wing/Cave building something......whatever you decide to build.......:confused
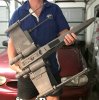
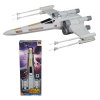
Here's my 1/18 scale X Wing converted toy into open wings....maybe some inspiration...I tossed out most of the toy and scratch built everything else.
Good luck with your building!!.....
3 years ago you started scratch building an X Wing 1/12 scale and now you're building a man cave........??
You started out very well......I praise your intention and work thus far.
I wish you luck with your X Wing/Cave building something......whatever you decide to build.......:confused
Here's my 1/18 scale X Wing converted toy into open wings....maybe some inspiration...I tossed out most of the toy and scratch built everything else.
Good luck with your building!!.....
Attachments
-
 a2.png490.4 KB · Views: 338
 -
 IMG_1382.JPG553.3 KB · Views: 326
 -
 IMG_1079.JPG1.7 MB · Views: 321
 -
 IMG_1051.JPG1.8 MB · Views: 288
 -
 IMG_1074.JPG1.8 MB · Views: 274
 -
 IMG_0603.JPG1.3 MB · Views: 319
 -
 IMG_0493.JPG2.3 MB · Views: 289
 -
 xw5.jpg45.9 KB · Views: 308
 -
 IMG_0857.JPG3.3 MB · Views: 323
 -
 hero x wing.jpg25.2 KB · Views: 297
 -
 IMG_0784.JPG2.1 MB · Views: 315
Last edited:
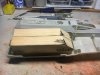
I started this project about 3 yrs ago when I stopped working on my x-wing. I had the chance to convert a 20x30 deck into a Media Room. I choose the Star Wars décor. I wanted to share my passion and build with others. My Dad helped me with the framing process. Framing is not my skill set. Her are a few pictures of the early process.


I will upload some more pictures of progress soon. Thanks and God Bless.
I will upload some more pictures of progress soon. Thanks and God Bless.
Last edited:
Here are a few pictures after the roof was put on.


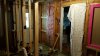
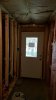
Here I have taken the two windows out and made pocket windows on the other side.
I also took out my sons two windows and put a big pocket window on the other side. Started putting inner walls up.


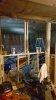
Here putting closet in at the end of hallway.

Here I am starting on the pocket doors in hallway. The little room to the side is my new model room.


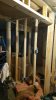
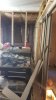
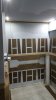
Here there is more farming


Here I have taken the two windows out and made pocket windows on the other side.
I also took out my sons two windows and put a big pocket window on the other side. Started putting inner walls up.
Here putting closet in at the end of hallway.
Here I am starting on the pocket doors in hallway. The little room to the side is my new model room.
Here there is more farming
Attachments
-
 19691231_180000_-869567016.jpg2.2 MB · Views: 273
 -
 19691231_180000_520369420.jpg2 MB · Views: 268
 -
 19691231_180000_928697043.jpg2.1 MB · Views: 245
 -
 19691231_180000_-1034983301.jpg2.2 MB · Views: 274
 -
 19691231_180000_-1284120447.jpg2.1 MB · Views: 264
 -
 20160920_130500.jpg2.6 MB · Views: 256
 -
 20161005_081407.jpg1.9 MB · Views: 258
Last edited:


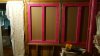
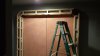
These next group of pictures are of the pocket door I had to build form scratch. The frames were made out of 1x6. Then I took a 6 panel door and split it in half to make doors facing the hallway.


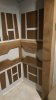
Here is the other side of the pocket doors facing media room. I started working on the framing of the doors facing media room.


In the next few pictures I started skinning the frame and adding detail to the doors.


Here is the other side of the pocket doors facing media room. I started working on the framing of the doors facing media room.
In the next few pictures I started skinning the frame and adding detail to the doors.
Attachments
Last edited:
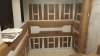
These next few pictures show construction of middle frame work and panel work. There is fake window in the middle of one wall.


Here I started panel boards top and bottom.


Here I started panel boards top and bottom.
Attachments
Last edited:


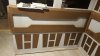
A few more updates. Started adding detail to upper part of wall.


Here getting the wall ready for paint.


Started adding some paint to see how it will work.


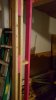
Here I started putting lights on bottom to give it more of a Star Wars look. The door frame I painted a black metallic steel. Blue glow wire in place. The black inserts is carbon fiber vinyl.


Here getting the wall ready for paint.
Started adding some paint to see how it will work.
Here I started putting lights on bottom to give it more of a Star Wars look. The door frame I painted a black metallic steel. Blue glow wire in place. The black inserts is carbon fiber vinyl.
Last edited:
Similar threads
- Replies
- 6
- Views
- 867
- Replies
- 5
- Views
- 858