1/12 Black Series First Order Tie Fighter Conversion!

Dave Vader

Active Member
Ok, massive project and WIP so will post up progress.The model itself is very big but lacks many details. I will redo the internals, add full lighting, convert pilot, straighten the frankly awful wings (bent to hell), add full lighting and completely repaint/weather.So off we go:-
 

Attachments

  • IMG_2697.JPG
    IMG_2697.JPG
    1.7 MB · Views: 531
  • IMG_2694.JPG
    IMG_2694.JPG
    1.6 MB · Views: 433
  • IMG_2683.JPG
    IMG_2683.JPG
    1.9 MB · Views: 387
  • IMG_2680.JPG
    IMG_2680.JPG
    1.9 MB · Views: 413
  • IMG_2676.JPG
    IMG_2676.JPG
    2.2 MB · Views: 405
  • IMG_2677.JPG
    IMG_2677.JPG
    2 MB · Views: 542
  • IMG_2673.JPG
    IMG_2673.JPG
    2.2 MB · Views: 610
Last edited:
Detailing continues with stuff added to cockpit. Please note that this is NOT studio accurate as I do not know the exact internals of the FO Tie, however with the effort I think it should look pretty cool:-
 

Attachments

  • IMG_2722.JPG
    IMG_2722.JPG
    1.5 MB · Views: 348
  • IMG_2720.JPG
    IMG_2720.JPG
    2 MB · Views: 347
  • IMG_2707.JPG
    IMG_2707.JPG
    2.1 MB · Views: 367
  • IMG_2699.JPG
    IMG_2699.JPG
    2 MB · Views: 353
Cockpit pretty much done so it was time to test fit to make sure everything fitted together again. The window is not as snug a fit as I want so I will make sure this is widened a bit. The internal lighting network is prepared so now need to think the positioning through. Battery compartment will be hidden behind one of the panels as shown with the switch located on one of the wings.

I will now concentrate on sculpting over some of the joints for the pilot as well as reworking parts of the cast. This is a very big model so all the more impressive if you can put a lot of effort in!

I will be back soon with more updates.
 

Attachments

  • IMG_2749.JPG
    IMG_2749.JPG
    1.9 MB · Views: 334
  • IMG_2747.JPG
    IMG_2747.JPG
    2.4 MB · Views: 272
  • IMG_2737.JPG
    IMG_2737.JPG
    2 MB · Views: 327
  • IMG_2740.JPG
    IMG_2740.JPG
    1.7 MB · Views: 278
  • IMG_2739.JPG
    IMG_2739.JPG
    1.5 MB · Views: 317
Right, had to chop up our pilot as the figure provided does not sit in the seat, but rather stands and leans which is a poor design from Hasbro, but a knife, wire and sculpting clay will correct. Before sculpting I needed to get the position right so made the adjustments and then test fitted. Really happy with the test shot of the pilot in position:-
 

Attachments

  • IMG_2757.JPG
    IMG_2757.JPG
    1.9 MB · Views: 585
  • IMG_2753.JPG
    IMG_2753.JPG
    2.2 MB · Views: 440
  • IMG_2752.JPG
    IMG_2752.JPG
    2 MB · Views: 390
I saw the box for this in Walmart the other day. It is HUGE!

I was hard to tell how it looked though assembled though since you can't actually see the contents. I was concerned the wings seemed a little stunted height wise. I could be wrong, but it seemed to have to proportions more akin to the Kenner tie

Your doing some amazing mods to it. Looking forward to more
 
I would definitely pick one of these up, except the solar panel wings don't look right in proportion to the TIE cockpit ball. It's really a shame, but that discrepancy is enough to keep me uninterested. The detail otherwise looks absolutely fantastic.
 
It all looks proportional to me, the wings in hand are huge, It looks pretty much in scale to my eyes but we have always had a problem getting the exact scale for sci fi anyway. The biggest issue is the warped wings but I can sort that our when I get to modding them. In the meantime here are some film stills/reference and comparative 1/12 BS dio shots, not perfect but pretty darn close IMO.

If need be I could always extend the wings when I mod them but we will see later on:-
 

Attachments

  • starwars55df5d92ce79a.jpg
    starwars55df5d92ce79a.jpg
    101.4 KB · Views: 404
  • tie_fighter_6.0.jpg
    tie_fighter_6.0.jpg
    318.5 KB · Views: 587
  • QSM95j6.jpg
    QSM95j6.jpg
    285.2 KB · Views: 429
  • fo5.png
    fo5.png
    893.9 KB · Views: 448
  • A1CDbXBhHkL.jpg
    A1CDbXBhHkL.jpg
    1 MB · Views: 514
Last edited:
as soon as i saw this thing came out i hoped someone on here would fix one up to a more accurate standard.
great job, loving this build!

Thanks for your interest.
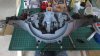
Main mods are:-

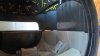
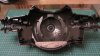
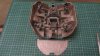
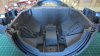
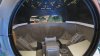
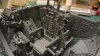
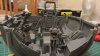
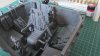
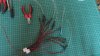
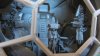
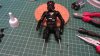
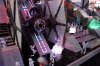
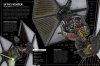
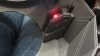
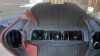
Full cockpit detail with lighting
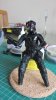
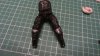
Corrected pilot in proper positioning, complete with seat belts and clip
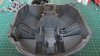
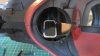
Thinned out upper hatch so it does not sit proud
New hinge and removal of clip on upper hatch
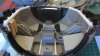
New (clear) glass for front and back
Greater detail on the front windscreen
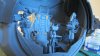
Reworked upper and lower guns
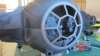
Removal of fuselage seam lines
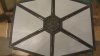
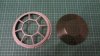
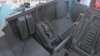
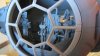
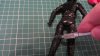
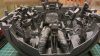
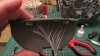
Increased cog detail for both wings
Increase size of wings (TBC)
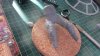
Complete re-spray with weathering

Long job and no doubt I will come across stuff that will have to be considered but enjoying it so far. The wings are well detailed but they are warped and I need to do a tad more research on the sizes.
 
This is going to look fantastic when it's completed!

BTW, what color are the wings' 'Koolshades'(white panels) supposed to be?

Are they actually white, silver or light gray?

I haven't seen the movie yet so I'm not sure of the correct coloring.
 
I would definitely pick one of these up, except the solar panel wings don't look right in proportion to the TIE cockpit ball. It's really a shame, but that discrepancy is enough to keep me uninterested. The detail otherwise looks absolutely fantastic.


That's correct, the wings are too small, the main reason I've avoided getting it.
 
The wings are a sort of, light silver/grey colour with good detail.A small update on our modified pilot.His anatomical position is now correct, I have sculpted over joints and improved the nozzle fixings, painted the under clothing in a flatter black and glossed up the armour. I need to add the colours back in to the chamber pack but will do that later on.
 

Attachments

  • PILOT4.jpg
    PILOT4.jpg
    1.4 MB · Views: 302
  • PILOT3.jpg
    PILOT3.jpg
    1.4 MB · Views: 388
  • PILOT2.jpg
    PILOT2.jpg
    1.5 MB · Views: 244
  • PILOT1.jpg
    PILOT1.jpg
    1.5 MB · Views: 230
Quick update :I have finished the detail mods for the cockpit and now installed the lighting. I have red lights in the ceiling area to shine down, to create that nice red effect. I have also installed some fibre optics, some of which flash different colours on the rear dashboard. There are also red/blu and white lights dotted around the sides and upper cockpit. It is now primed and ready to paint.Once painted I will install the pilot and fit the top and bottom together. This will allow me to get a good finish on the joints around the whole body of the Tie.
 

Attachments

  • Light4.jpg
    Light4.jpg
    1.3 MB · Views: 282
  • Light3.jpg
    Light3.jpg
    1.1 MB · Views: 379
  • Light2.jpg
    Light2.jpg
    1.4 MB · Views: 290
  • Light1.jpg
    Light1.jpg
    1.5 MB · Views: 290

Your message may be considered spam for the following reasons:

If you wish to reply despite these issues, check the box below before replying.
Be aware that malicious compliance may result in more severe penalties.
Back
Top