Pip-Boy 3000 Build-up (pic heavy)

Hi I saw this link from an Indy Mogul video and I absolutely love Fallout. I have been trying to find a way to create my own version of it without emptying my bank with buying the survival edition on ebay for over $400. I am very much interested in buying one but do you sell them already made or a kit because I am not too savy with machinery and such. I am just looking for an already resin base made. After that I can take care of the rest. If you can please tell me where I can put myself on the list for a pipboy that will be great. Thanks again and I hope to hear back from you soon.
 
Not sure if anyone is interested and/or needs this, but I coded this up quickly for tonight...

Link: PIP Boy

feel free to use the code and modify images to suit your needs! I'm running that link on Portal, a full screen browser for iPhone that lets you lock the orientation.

pip-320.jpg
 
Last edited:
Hey, FTC LTL, just wondering if or when you'll do another run of these. Didn't see anything about it in the JY. I'm looking for the cast at least and got directed here from Indy Mogul, just looking to find out if there will be another run I can catch.
 
Hey, FTC LTL, just wondering if or when you'll do another run of these. Didn't see anything about it in the JY. I'm looking for the cast at least and got directed here from Indy Mogul, just looking to find out if there will be another run I can catch.

Yeah same with me. Please let us know when the next ones are coming out
 
How much for a mold? I can't junkyard post and i want to buy something fast, so, i would like to know how much a mold would be.
 
I was also wondering where I could get this kit/mold.
You did an amazing job on it.
It looks awesome!
 
Hey skruffy the LED back light screen i got is different from the one shown. Can i cut this new one to fit or will it mess it up?

Just as a point of clarification, the screens I've shipped with my kits for the longest time are electroluminescent (EL) and not LED. I'm sure you got an EL sheet exactly the same as the one I used in my most recent build (see post #263 above).

Yes, you can absolutely cut it to shape! Just make sure to preserve the 2 wire leads on one side to solder on to the wire from the EL inverter and you should be fine. There are pics above of how I cut mine down. Also note that you can bend the EL sheet to better orient the leads within the cast, but be careful not to crease the sheet. A crease will break the sheet and prevent the illumination from spreading beyond where the crease is.

Hope that helps!
 
For anyone new at sanding, I have a tip to hep you get over one of the more potentially time consuming aspects. First, though, let me apologize for the crappy photos. Still putting the studio back together, so I'm shooting in bad lighting.

6979367969_073544551a.jpg

When you get your Pip the bottom edges will have some extra resin.

6979367843_dd2245da28.jpg

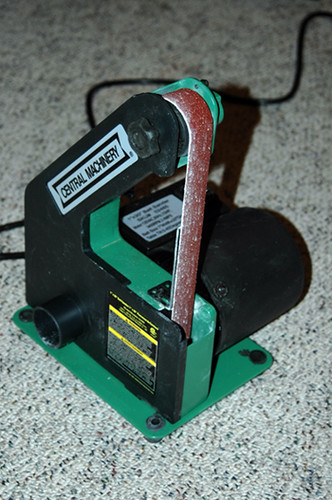
Head to a generic tool depot (like Harbor Freight) and get a belt sander. This one was $40 and has a 1" x 30" belt. Carefully (and I do mean CAREFULLY) run the edges you want to knock down against the sander's belt. Work in extremely small increments—otherwise you'll have a whole bunch of things to fix later. You've got all the time in the world...so don't rush it. I THINK the belt was 120 grit, so I was done rather quickly.

6979368241_13a317e172_z.jpg

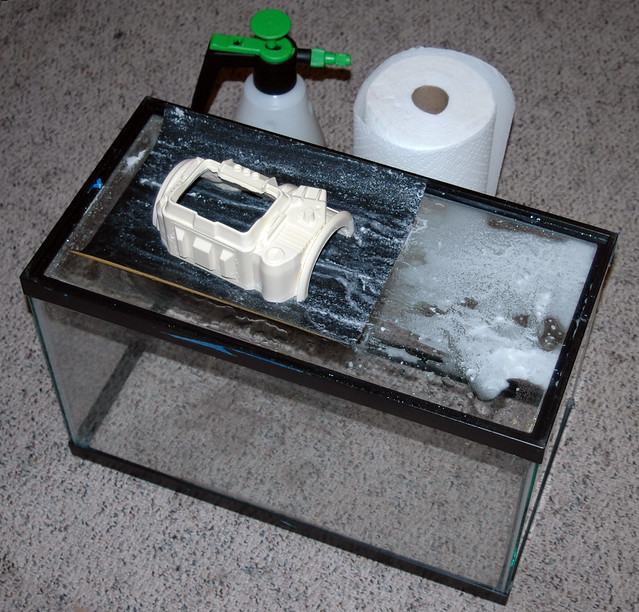
After getting some of the excess resin removed, I switched to wet sanding with 220. There are a lot of advantages to wet sanding. My favorite is that it keeps dust from getting everywhere. I actually have a 10-gal aquarium ($10 at Petsmart on special) I keep for just this purpose. When placed upside down, the glass surface is nearly frictionless and allows the piece your sanding to slip right off the paper as you go. I feel I get better results (when edge sanding) than doing it by hand or on a hard surface.

Wet the paper and the glass, sand in one direction (probably not a requirement in this case) and keep everything damp. Don't worry about the mess...the aquarium also keeps it from running all over the place. Put as little pressure on the object your sanding as possible. Pushing hard on it as your sanding could make it lopsided. Let the object's weight work for you. This piece only took 20-30 quick passes. That's like...1-2 minutes of work.

6833240844_8c82b02673_b.jpg

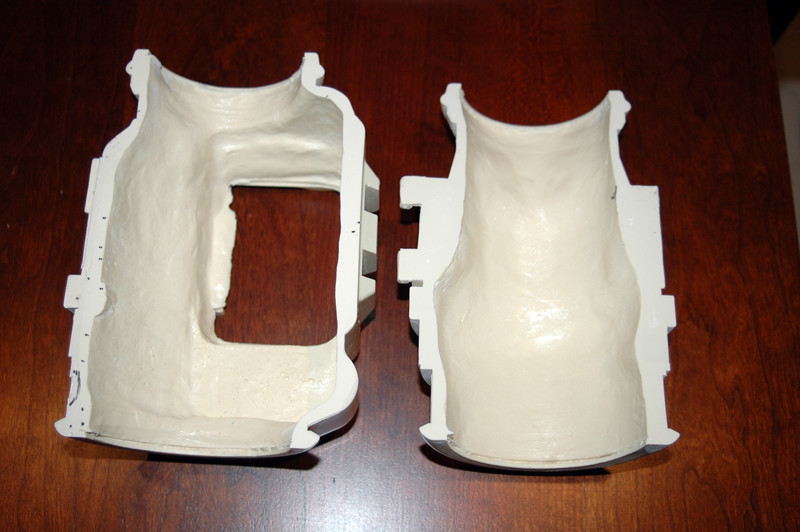
The end result is 2 halves that will fit together perfectly with no high spots.

Hope this helps someone!
 
Amazing build. Im finally getting around to building the one i got back in May 2011. Anyone know where I can find the El Inverter used for this build? I dont think mine came with one. :( Any helps appreciated! Thanks! :D


EDIT: NVM! I got it! Thanks!
 
Last edited:
This thread is more than 10 years old.

Your message may be considered spam for the following reasons:

  1. This thread hasn't been active in some time. A new post in this thread might not contribute constructively to this discussion after so long.
If you wish to reply despite these issues, check the box below before replying.
Be aware that malicious compliance may result in more severe penalties.
Back
Top