My Hero M41A Pulse Rifle - Moving on to the Build... finally!

Re: My Hero M41A Pulse Rifle - Gathering parts

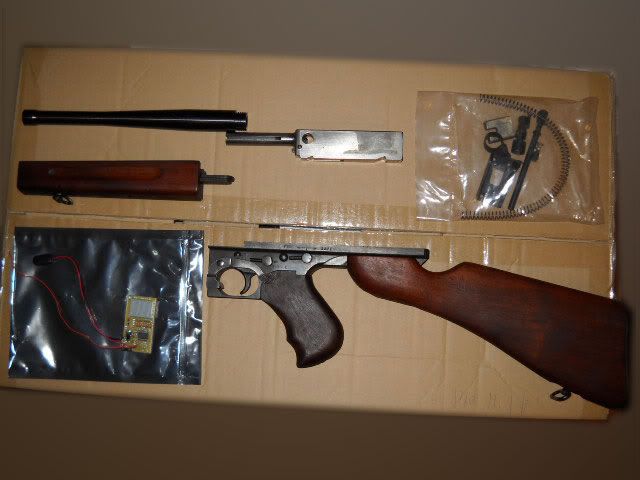
You know what's really sad? I've had these parts for over a year and still haven't begun the build. Sigh... I have made the decision to go all real steel, though. I just ordered a real Thompson parts kit and a dummy receiver from SD STudios, so when I do get around to building this thing, it's going to kick some serious ass.

I'm opting to stay with the resin shrouds, though, as I couldn't bring myself to destroy an HCG pulse rifle just for the shrouds. I'll post pics when I get the real steel thompson parts.
 
Re: My Hero M41A Pulse Rifle - Gathering parts

O.K. Finally something new to report. Here's what the big brown truck brought me today:

DSCN0114.jpg


Real Steel Thompson parts kit. Everything except the upper receiver. And damn this thing is heavy. It's in remarkably good shape for being WWII surplus, though (except for the barrel, that is new).

I also got a Hyperdyne Labs counter.

I have the upper receiver and various other miscellaneous parts on order from SD Studios. They should be here soon and then I can test fit everything.
 
Re: My Hero M41A Pulse Rifle - Gathering parts

Got a box of Aluminum Awesomeness from SD Studios yesterday. Had to play around some.

DSCN0123.jpg


Some parts thrown together to see how they fit. Spas cage is absent because I haven't finished cutting it yet and can't get the shotgun in until I do. Initially the thompson bolt handle wouldn't slide in the slot (walls were too thick), but about 5 minutes with the dremel on the inside and now it slides like butter. Also, as can be seen in the picture, I've got some work to do on the inside of the resin shrouds to make some stuff fit. Overall, I am extremely happy. The quality of the SD Studios receiver is top notch and it fits the thompson lower like a glove.

I should also mention that the deact shotgun came from Matsuo pre-drilled for the SD Studios block and it matched perfectly. Once again proving that Matt is a master of his craft.
 
Re: My Hero M41A Pulse Rifle - Gathering parts

BTW: You didn't have to grind the receiver. The wall thickness isn't too thick...it is that SOME Thompson bolt handles have some extra material on the inside "step". If you cut away a teensy bit, it will work fine.

Most bolt handles work without any modification at all...just drop right into place. Not sure why only some have the wider step area. I have only seen 2 or 3 in the 40 to 50 rifles I have worked on in the last 16 years.

Of course, it is done now...

Got a box of Aluminum Awesomeness from SD Studios yesterday. Had to play around some.

DSCN0123.jpg


Some parts thrown together to see how they fit. Spas cage is absent because I haven't finished cutting it yet and can't get the shotgun in until I do. Initially the thompson bolt handle wouldn't slide in the slot (walls were too thick), but about 5 minutes with the dremel on the inside and now it slides like butter. Also, as can be seen in the picture, I've got some work to do on the inside of the resin shrouds to make some stuff fit. Overall, I am extremely happy. The quality of the SD Studios receiver is top notch and it fits the thompson lower like a glove.

I should also mention that the deact shotgun came from Matsuo pre-drilled for the SD Studios block and it matched perfectly. Once again proving that Matt is a master of his craft.
 
I got the thompson kit from IMA (www.ima-usa.com). Not cheap, but they are getting hard to find. It was a complete kit minus the upper.

That is interesting about the bolt. I didn't really have to take much off and I did it on the inside, so it will never be seen. I figured it would be easier than trying to make the cut on the bolt (softer material). I am limited as to the tools I have to work with.

A word of caution for those considering building a real steel PR, be careful about assembling parts like I did above with the bolt and trigger group (minus a few parts). The bolt can lock up, making it impossible to get the upper and lower apart. I just spent about 2 hours trying to get them apart and everything I tried made things worse. I figured pulling the pins would cause the trigger parts to drop and thus allow the bolt to move free and the upper and lower to separate. No such luck. I ended up getting the parts jumbled inside and more hopelessly jammed. Ultimately I had to take a hammer and pound the lower off. It worked, but I bent the magazine rails, so I am going to have to fix that in order to get a magazine to slide into place. Luckily, the ugliness will be hid by the shrouds. I feel like a complete dolt.

Edit to Add:

It seems that the reason I got the bolt jammed and could not separate the two halves is due to the parts of the trigger group that I took out (see above post). Basically, without the disconnector, I wasn't able to "decock" (for lack of a better word) it and allow the bolt to slide over the other parts. I knew I was in trouble when I pulled the bolt back all the way and heard it "click". Damn open bolt machine guns... Lesson learned.
 
Last edited:
Well, I finally got off my butt and started working on my pulse rifle. I am not as talented as most of the members here and have little to no experience with building props, so this is a learning process. You will see the grievous mistakes I make along the way (as evidenced with the Thompson receiver I banged up pretty bad and wrote about in the post above, no pic, though).

The parts list in the first post is what I'm working with, except that I went with a Lightbenders counter because of the smaller form factor.

Anyway, on to what I've done:

Got the SPAS cage cut. Used a dremel and managed to scrape it up pretty good. Overall, the cuts came out decent. I will clean up the dings and stuff and it will all be covered with a coat of paint.
My_Pulse_08.jpg

My_Pulse_09.jpg

My_Pulse_10.jpg

My_Pulse_11.jpg

My_Pulse_12.jpg


Here is the assembled grenade launcher. Deactivated Remington 870 fits very tight in the SPAS cage, but not so tight that it caused any kind of bulge. If you look closely at the front block attachment screw in the third pic, you will see another of my mistakes. I had the cage marked perfectly, but when I was drilling the hole, the drill slipped and I didn't notice, so the hole was off and I had to open it up in order to get the screw to work. Now I am left with a hole that is not covered by the screw head. Only way I know of to fix this is to weld the hole, sand it down and then redrill. I don't even know if this is a possibility, though as I am not a welder. I will have to talk to a friend who is to find out.
My_Pulse_05.jpg

My_Pulse_06.jpg

My_Pulse_07.jpg


Here is what I've got so far assembled for test fit (Thompson lower is missing as it is with a friend who is trying to fix the afore mentioned bashing it took). So far, everything fits very nicely. I had to dremel out a couple of slots for the heads of the screws I used to attach the grenade launcher to the receiver, as they stuck up pretty high. Shouldn't be a problem as this area of the shrouds is very thick.
My_Pulse_02.jpg

My_Pulse_03.jpg

My_Pulse_04.jpg
 
Well, I think I should rename this thread "How Not to Build a Pulse Rifle" as I continue to screw up expensive, hard to find parts. I know that this thread and build pales in comparison to pretty much everything else on the RPF, but my hope is that it might encourage other fledgling builders to take the plunge and not be so afraid of screwing up that they never try.

So, today the mess up was the pump grip. I tried to make the cutout for the reinforcement plate where the screws go through to the shotgun pump. I began by using a dremel with a router bit and the router attachment, but this did not work out so well and after chewing up the pump grip pretty bad, I took the router attachment off the dremel and continued by hand. What I ended up with was a very rough cutout that is way too big. So, short of getting a new pump grip and starting over (don't really want to do that as I am using a real SPAS grip), I think I am going to get some JB Weld and glue the plate in place and fill around it. Once it dries I will reshape it and then repaint the grip.
My_Pulse_13.jpg

My_Pulse_14.jpg


The other thing I did today worked out much better. I drilled and tapped the holes for the stock keeper screws. Speaking of screws, I have been having the hardest damn time finding the black socket screws in appropriate sizes and lengths and also in quantities less than 100. Home Depot and Lowes are useless when it comes to socket head stuff. I did order some from microfasteners.com which were only about $6 for 100 (too bad I only need 2 :unsure) Unfortunately, for the stock, I need 1/4-20 x 1/4 and microfasteners don't carry 1/4-20 in socket head. So, I went to my local Fastenal, which is way overpriced, and they only had 1/4-20 x 3/8. I figured they would be close enough. Well, as can be seen in the pictures, they aren't. They are way too long. I finally found boltdepot.com, which not only has the needed sizes, but they sell individually and have no minimum :thumbsup. The only down side is that they only use UPS and shipping was $9 :thumbsdown. I ordered them anyway.
My_Pulse_15.jpg

My_Pulse_16.jpg
 
It's nice to see the progress.

Not trying to be an a$$ but I can't help but cringe at seeing the damage on some of these real (rare and expensive) parts.

Have you thought about having Matsuo or Steve (SDS) finish the build? I only say this because a lot of what you have left to do is far more complicated than what you have done so far (ie grenade launcher).

I have both an SDS pulse Rifle as well as a Matsuo PR and they are both works of precision art. Something I would never dare myself.

After all the Pulse Rifle is incredibly complex as you are mating 3 fire arms in a very precise way to create a single item. It's not like a Han blaster that is one gun with some greebles attached to it.

I assembled an Airsoft G&P Pulse Rifle myself and it was a great sense of accomplishment but the real deal parts as you have here was way to much for me and I shipped it off to have the experts deal with it.
 
I hear what you are saying and trust me, I cringe when I make the mistakes. This is a learning process for me and it is important to me that I do it myself. Will it be as nice as a Matsuo or SD build? Absolutely not, but I will have the satisfaction of doing it myself, which is just as valuable to me.
 
Made the spacer for the pump grip today. Used 1/4" bar stock, drilled, cut and then ground it to fit the slot in the SPAS cage. Pretty happy with it. Not as nice as some of the machined ones, but it was done by hand and it won't be seen.

My_Pulse_21.jpg

My_Pulse_22.jpg
 
Threw this together today. Planning on having it printed onto a plaque to mount on my Pelican Case.

The QR code is real and when scanned displays the same info that is on the plate.

Data-Plate.jpg
 
Well, I filled in and reshaped the messed up hole in my pump grip. I think it turned out fairly well. It will look better once it is painted.

before_after.jpg


Here is a shot of it assembled on the Grenade Launcher
My_Pulse_25.jpg


Had a little trouble with the spacer I made for the pump grip. It was too wide, so I had to cut it down, and of course, I cut it down about 1/16 inch too much, so once the grip was screwed on, it was binding. Solved this by placing a couple of small washers underneath it. This gave it the correct height and it works great now. I may try to make a new one so I don't have to use the washers, but it is a lot of work making that thing by hand with only a drill press and dremel. Have to think about it.
 
Coming along nicely, I must admit I didnt have the courage to cut the SPAS on my PR build. left that one for Matsuo after that he reparkerized the whole thing. even the pumpgrip remains untouched to this day, I opted for Matt's resin pump instead. nice fix.
 
Mounted the base to the mag. Drilled and pinned it across, but this alone was a little loose, so I put a screw in from the front. Now the mag is rock solid, but the pin has a tendency to slide out. Once the base is painted, I may put a dab of hot glue on either side of the pin to keep it in. I went this route rather than just gluing the base on because I want to be able to disassemble it, much like you would a real weapon. Also, in keeping with the theme of highlighting all my mistakes, you can see where I broke the mag base and repaired it.

My_Pulse_26.jpg


I also installed the front triangles on the shrouds. I went with simply gluing them on instead of screwing them on for two reasons. First, they are not held on with screws on the 10 hole hero. Second, with the SD Studios aluminum receiver, there is no room to place a battery for the counter here, so that was never an option.

My_Pulse_27.jpg


I also made a new spacer for the pump grip, so I don't have to use washers to get the extra height to keep it from binding. It was a pain assembling it with the washers. I also made a new reinforcement plate for the pump. It all fits together perfectly and the action is very nice. Makes that awesome KA-CHINK! when racked.
 
Very nice so far man and fair play to you putting it together. I did the same with mine (bar cutting the ejection port in the spas cage..wasnt as brave as you :p) and it really does feel good to get it done.

Looking forward to seeing your progress on this
 
Thanks. Cutting the ejection port in the SPAS cage was definitely the most nerve wracking part. I thought I had screwed it up at one point, but managed to smooth it out to where I was happy with it. I had some good cutting guides that I got at the Aliens Legacy board to go by.

I'm getting to the point now where I need to start thinking about painting and the age-old question of Brown Bess versus OD. I think I am leaning towards Brown Bess, or something similar. Perhaps something in between BB and OD. Tamiya has a color called Khaki Drab that I have always preferred over OD. It's a little more brown than green. I'm not going for dead on accuracy, but more of an idealized, like how a real issued weapon would look.

I've also got to get some switches for the counter display and work on getting that wired up.
 
Another little update.

I started working on setting up the Lightbenders counter. I had hoped to use a 3V CR2032 coin type battery because there is very little space in the shrouds, but these little batteries don't have the umph to power the counter. It will light up, but the counting function won't work. It will work with a 3V CR123A battery, which is quite a bit smaller than a 9V, but also quite a bit bigger than the coin type battery.

Any suggestions would be appreciated. The usual place (under the aluminum triangles on the shrouds is not an option as the SD Studios receiver has an aluminum block welded to the front for mounting the SPAS and barrel that fills this space completely. Inside the shroud around the mag is extremely tight with the shotgun and clearance for the mag. I am leaning towards working it into the mag somehow as this would also make it so I wouldn't have to take the shrouds off to change the battery. This does introduce potential wiring and contact issues. I do have an SD Studios delrin contact block, so I may explore an option similar to how the SD Studios rifles are setup.

My_Pulse_28.jpg
 
This thread is more than 6 years old.

Your message may be considered spam for the following reasons:

  1. This thread hasn't been active in some time. A new post in this thread might not contribute constructively to this discussion after so long.
If you wish to reply despite these issues, check the box below before replying.
Be aware that malicious compliance may result in more severe penalties.
Back
Top