Destiny Zhalo Supercell Exotic Auto Rifle Full Scratch Build (Pic heavy)

zanderwitaz

Well-Known Member
DISCLAIMER: The majority of this project wasn't built by me. It was built by the talented Terry Butler ( @Weaselhammer ) here, and then handed off to me later on in the build for some tweaks and molding. We now both have copies of the project and will be posting completed pictures when the time comes. You can follow him here to see the paint job happen right now! https://www.facebook.com/VectorSigmaCreations/ as he will be finishing his first, I've got a lot on my plate and won't get to it 'till later. You should follow his stuff regardless if you like scratch builds!

Onto the build!

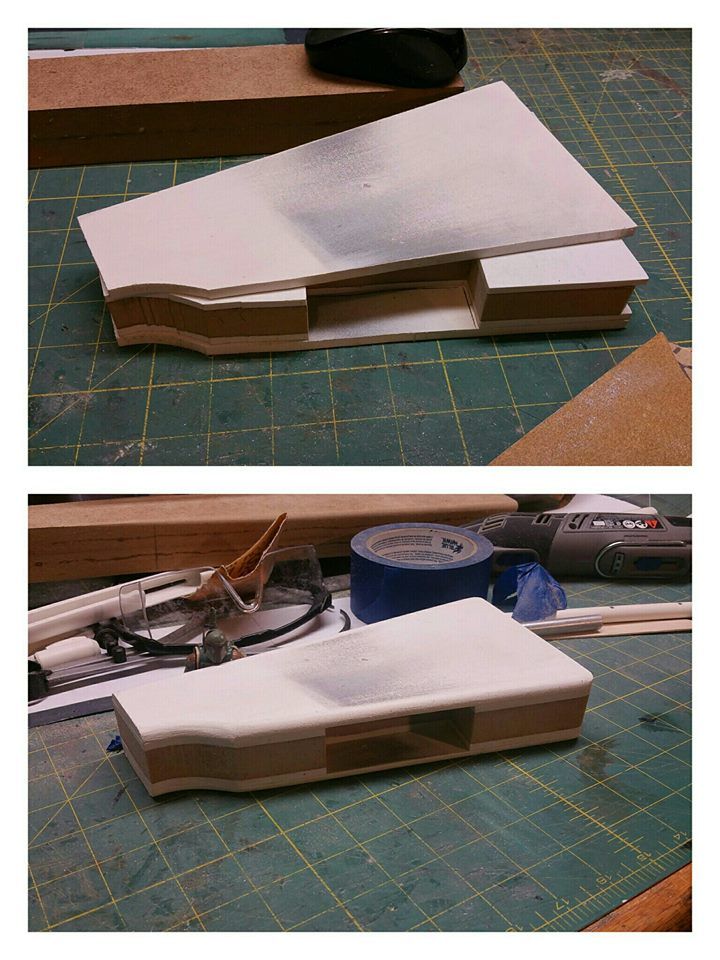
Terry started with the stock, cutting out the notch for the bullpup magazine before gluing and shaping the outer layers.


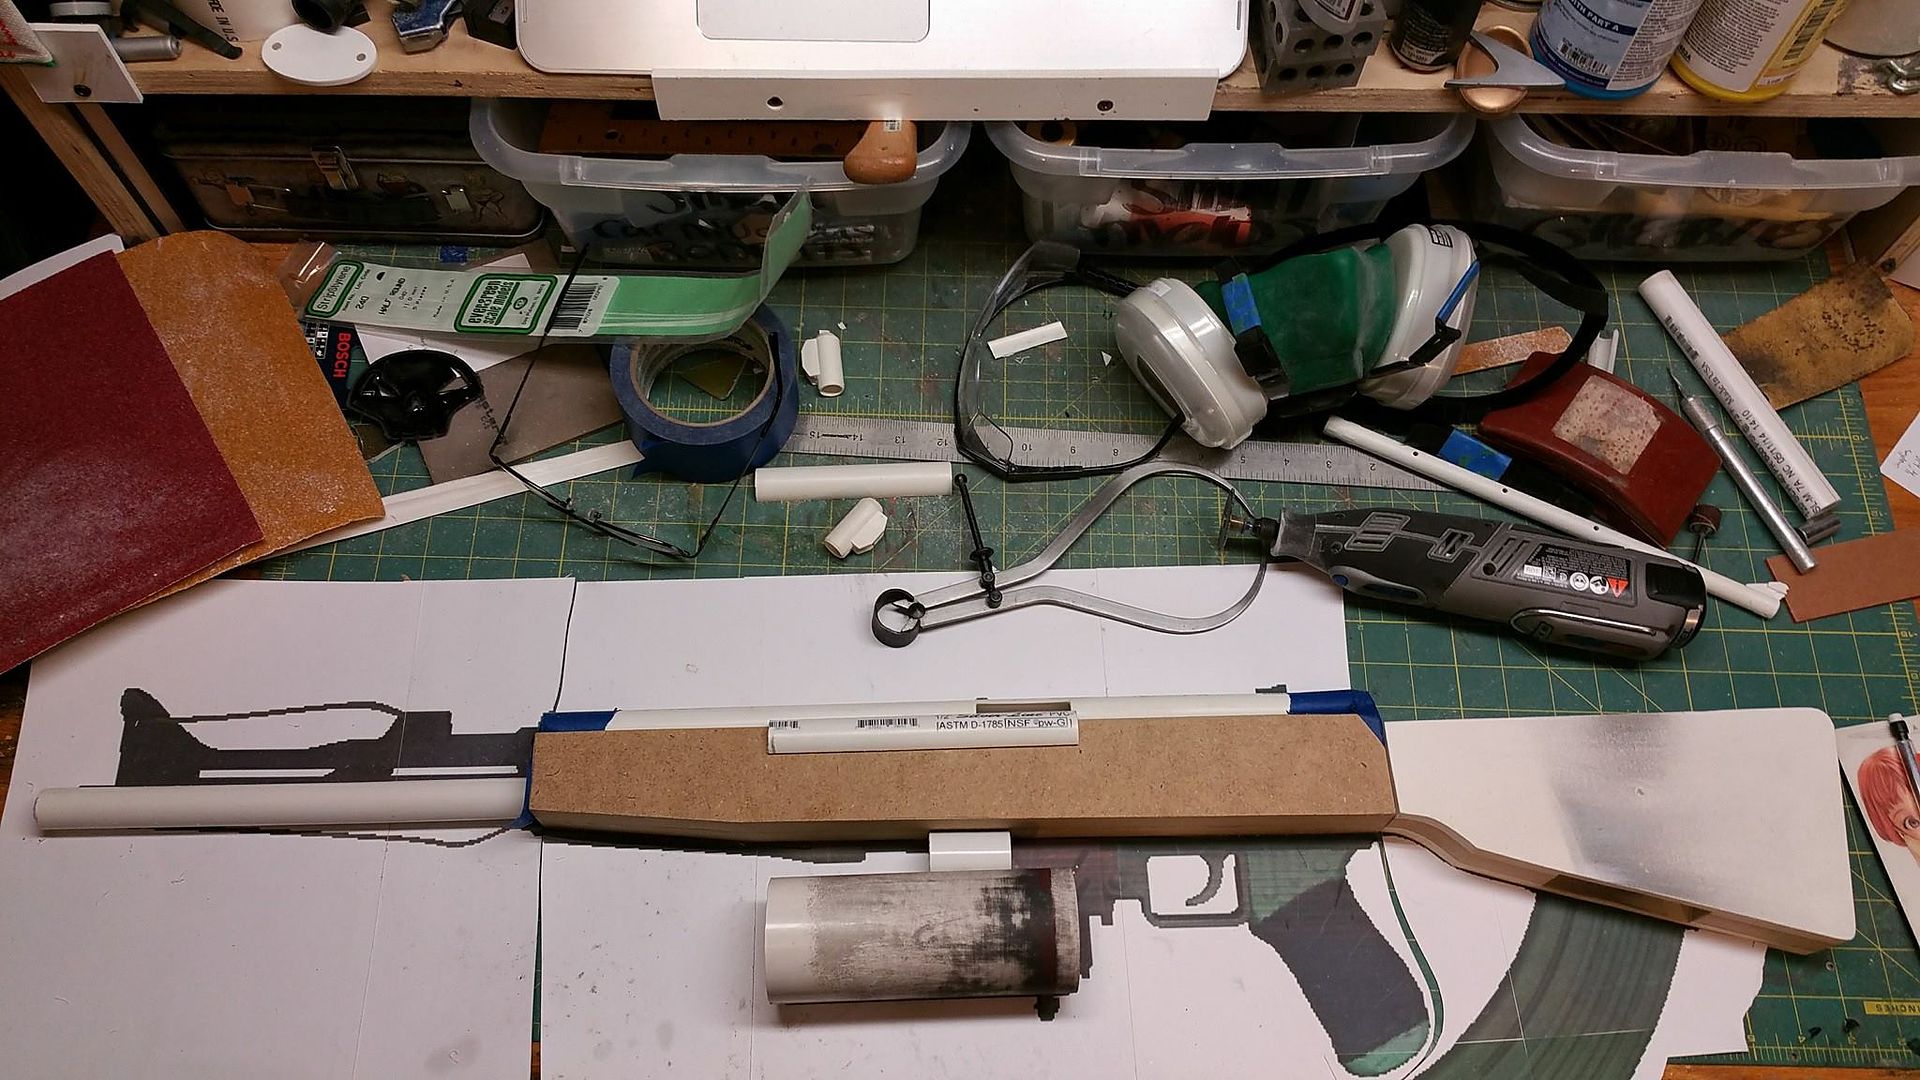
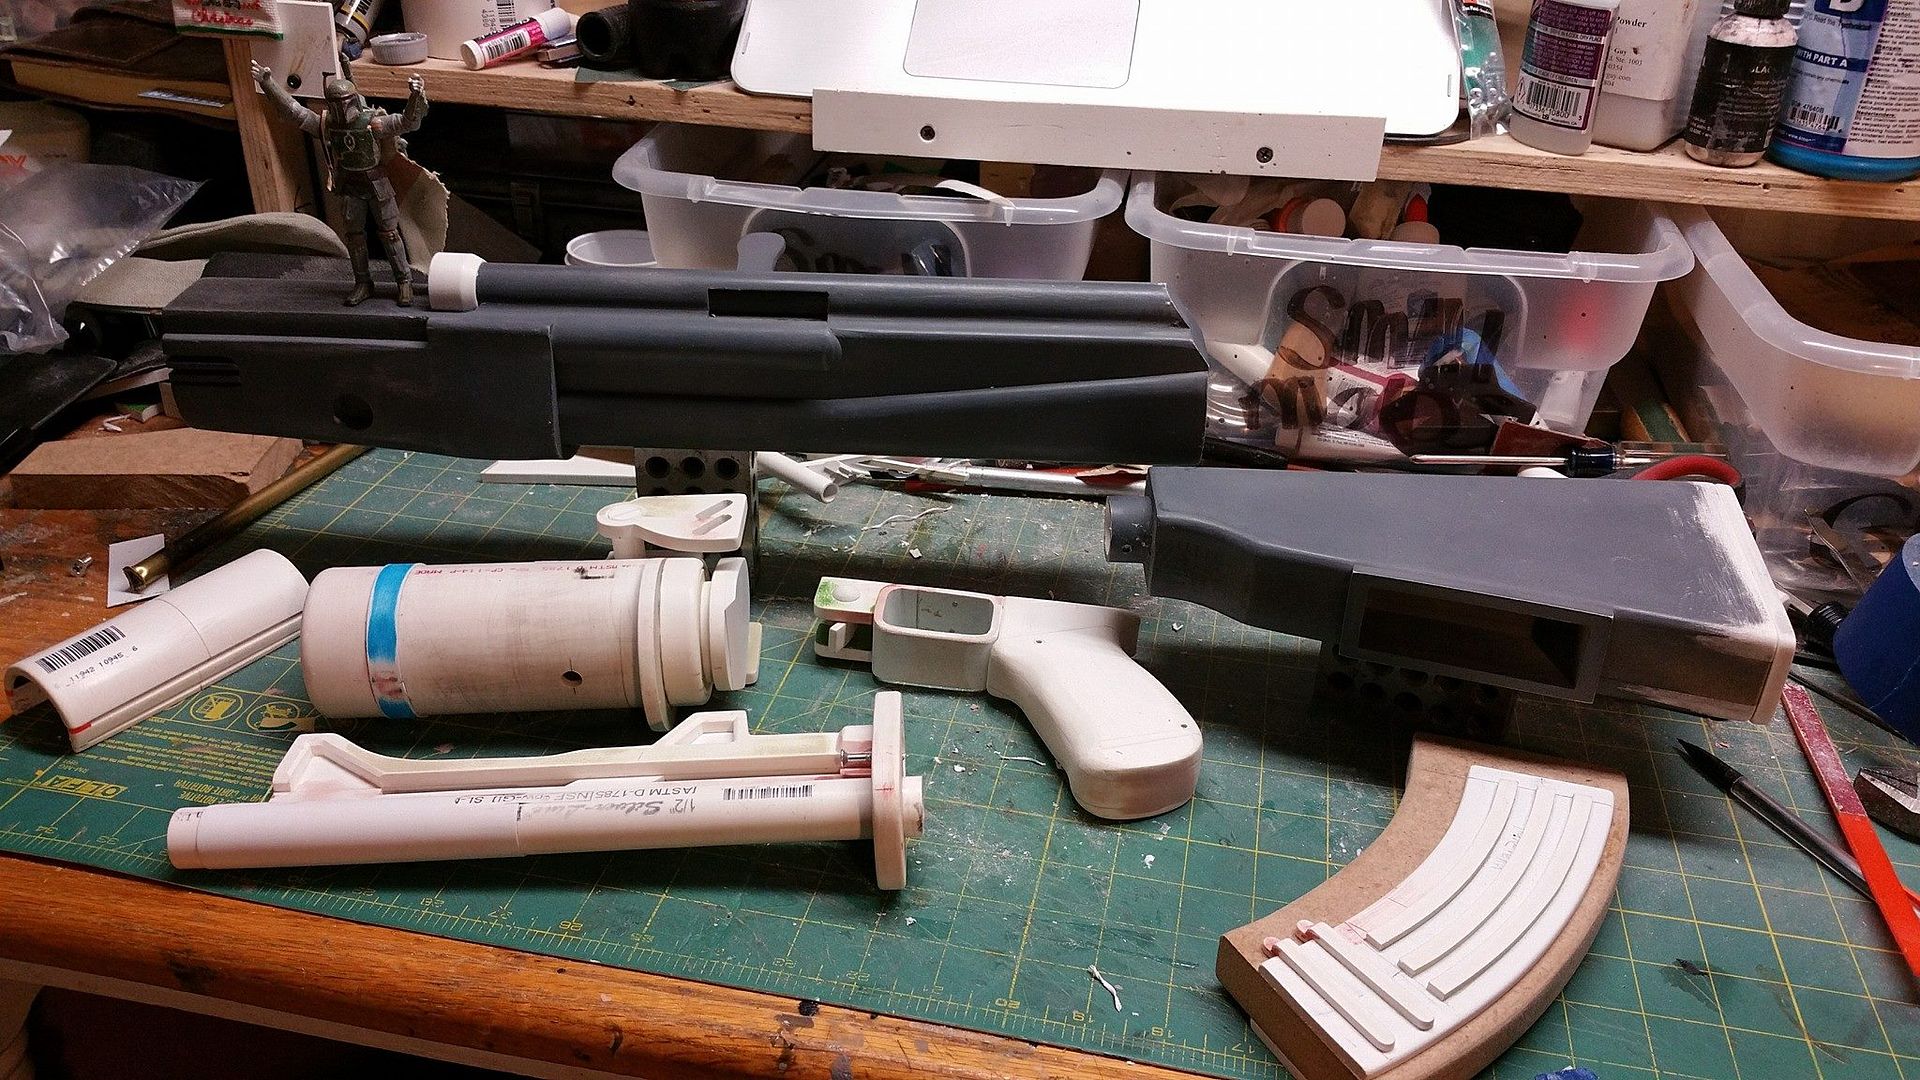
The receiver and lower canister got blocked out of MDF and PVC respectively.


The beginnings of the front handguard and receiver spine. This was a commission and the client wanted a moving bolt, so a cast resin slab slides back and forth inside that PVC spine.


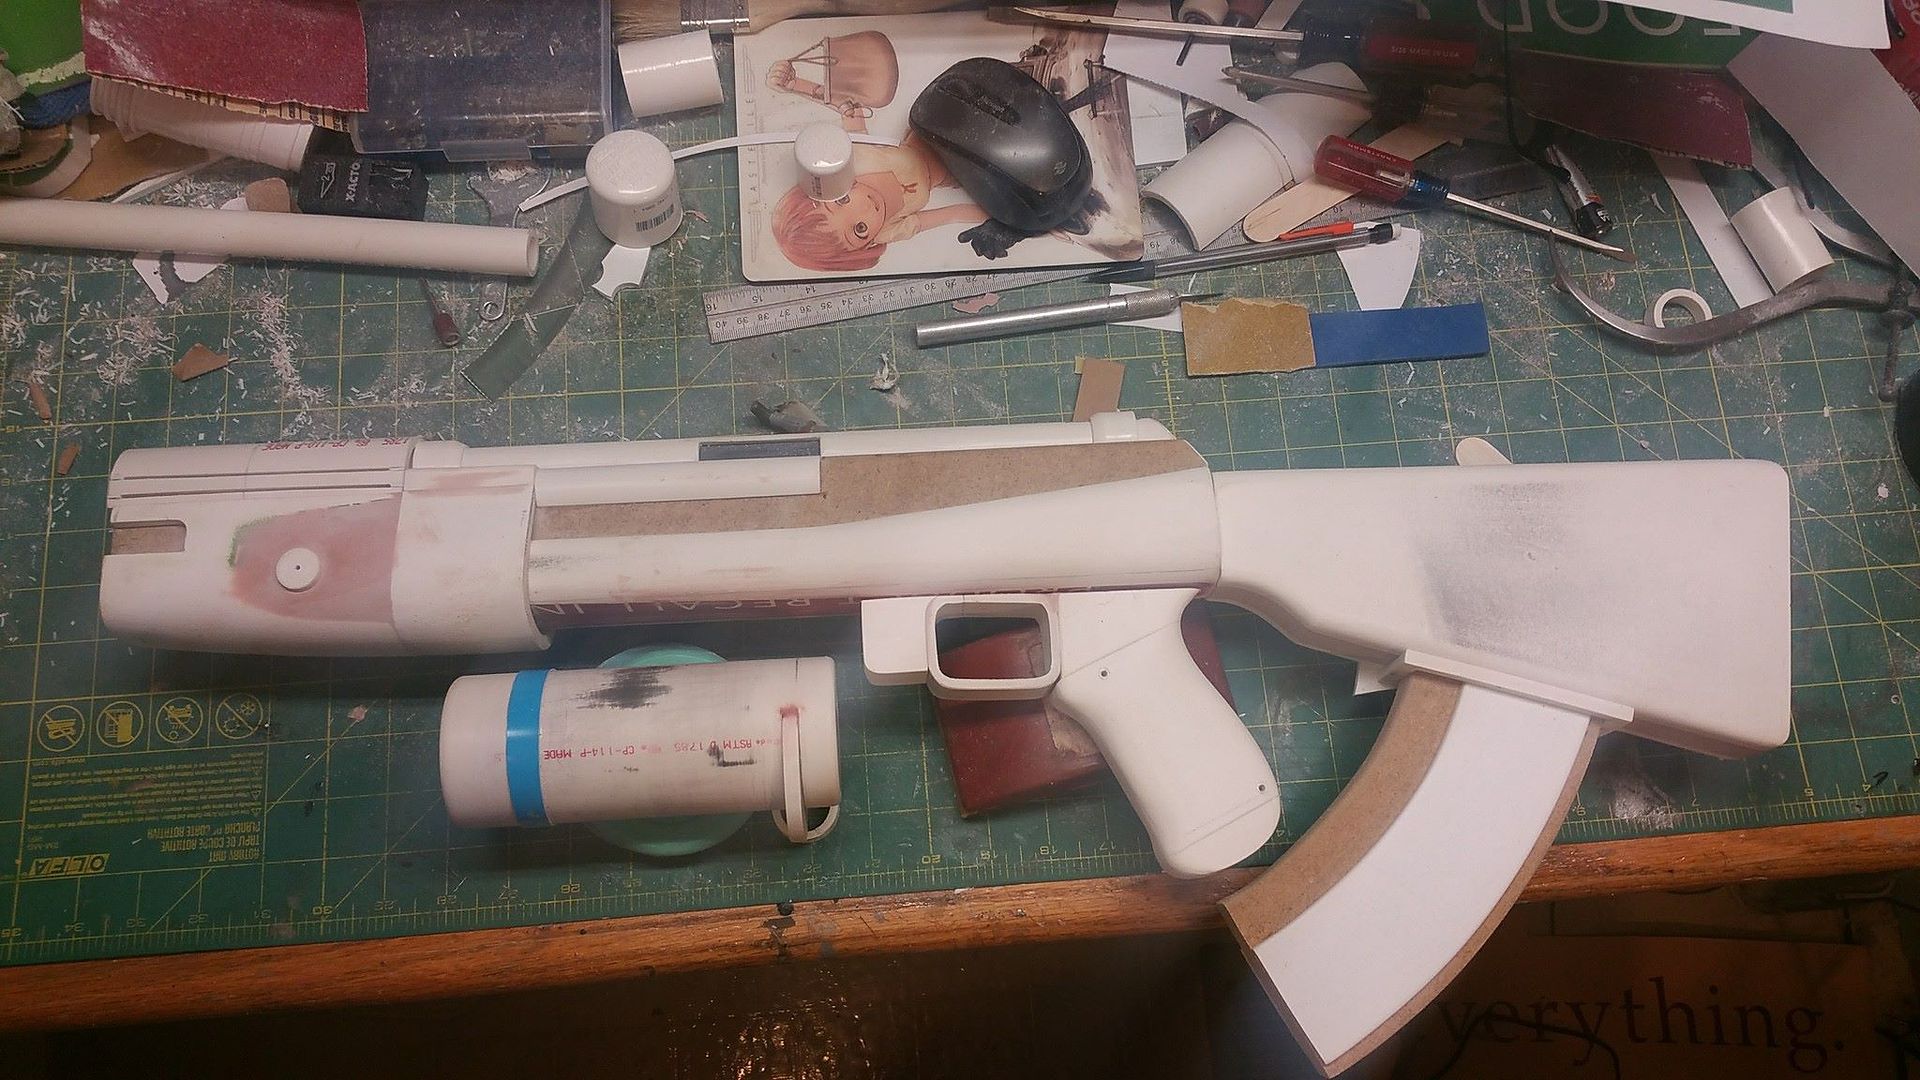
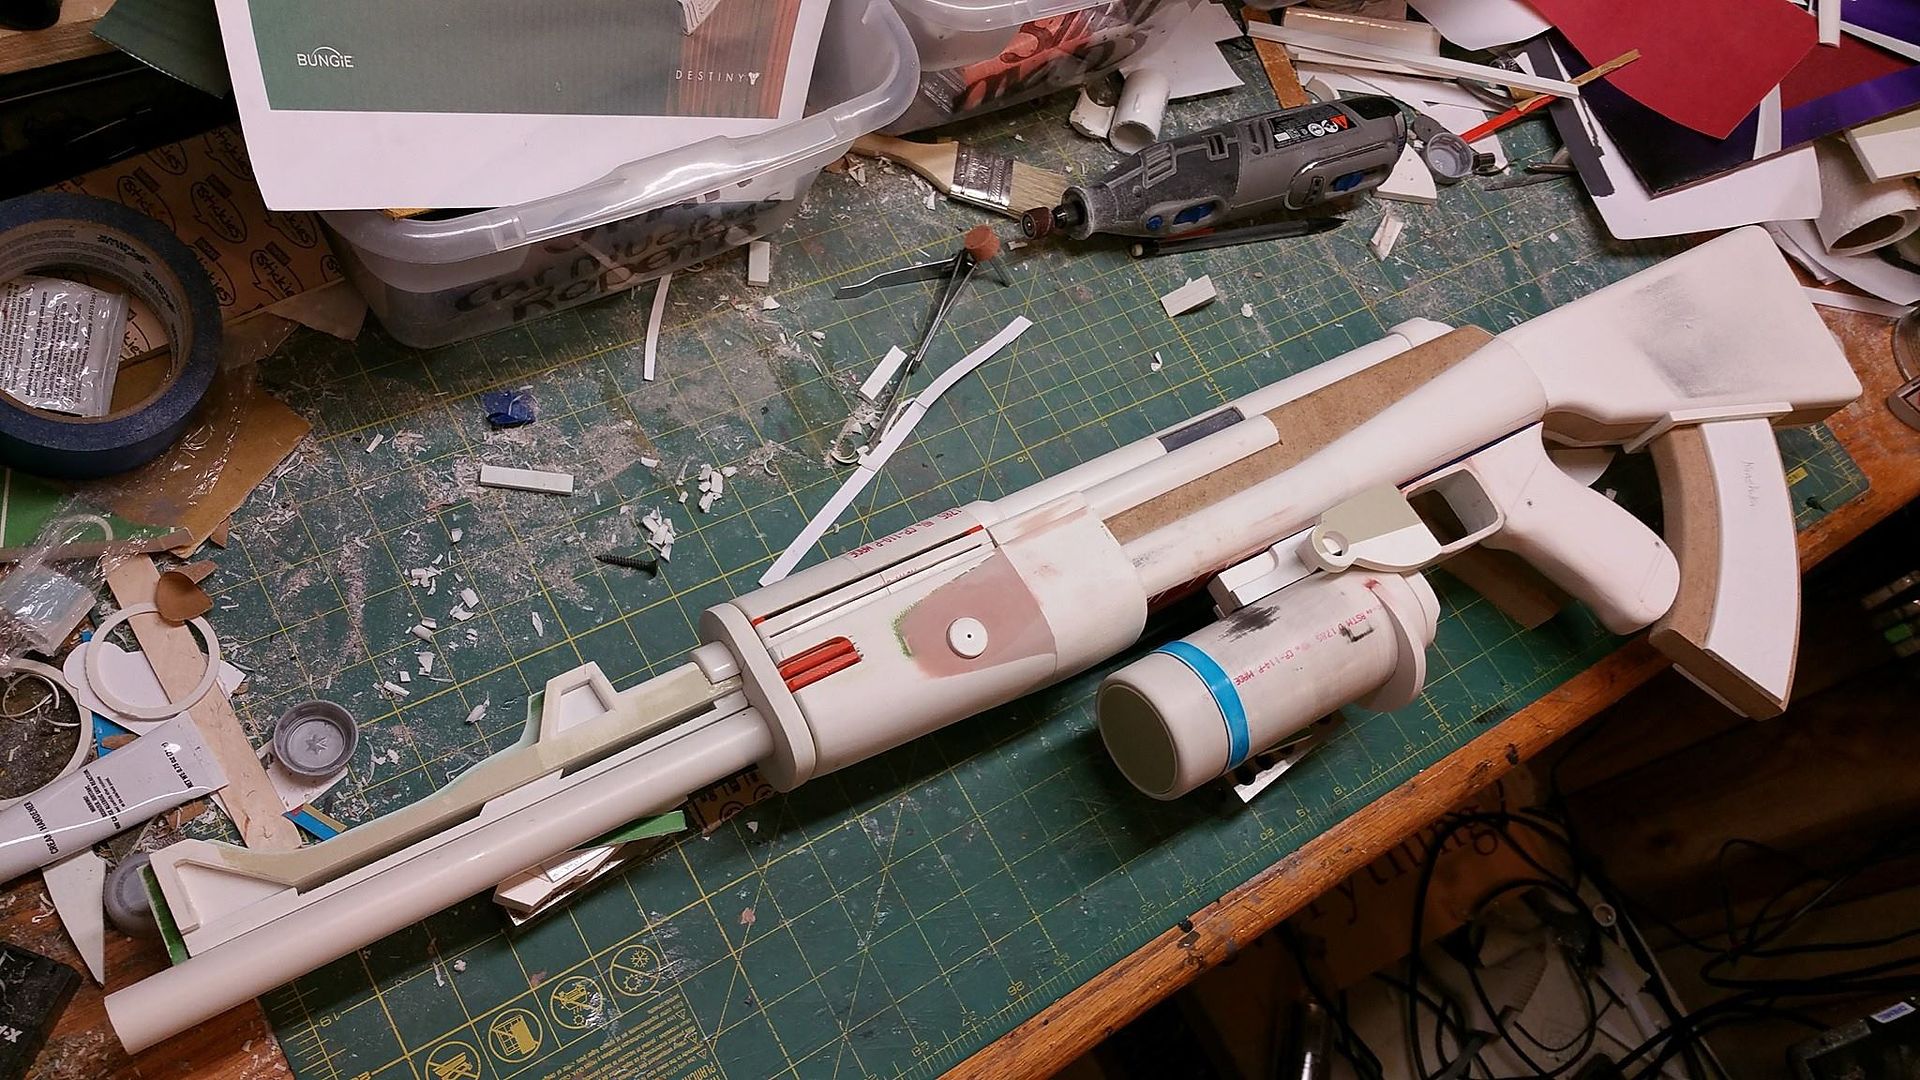
The front handguard got refined as well as the magazine shaped. The stock that cradles the receiver is sintra.


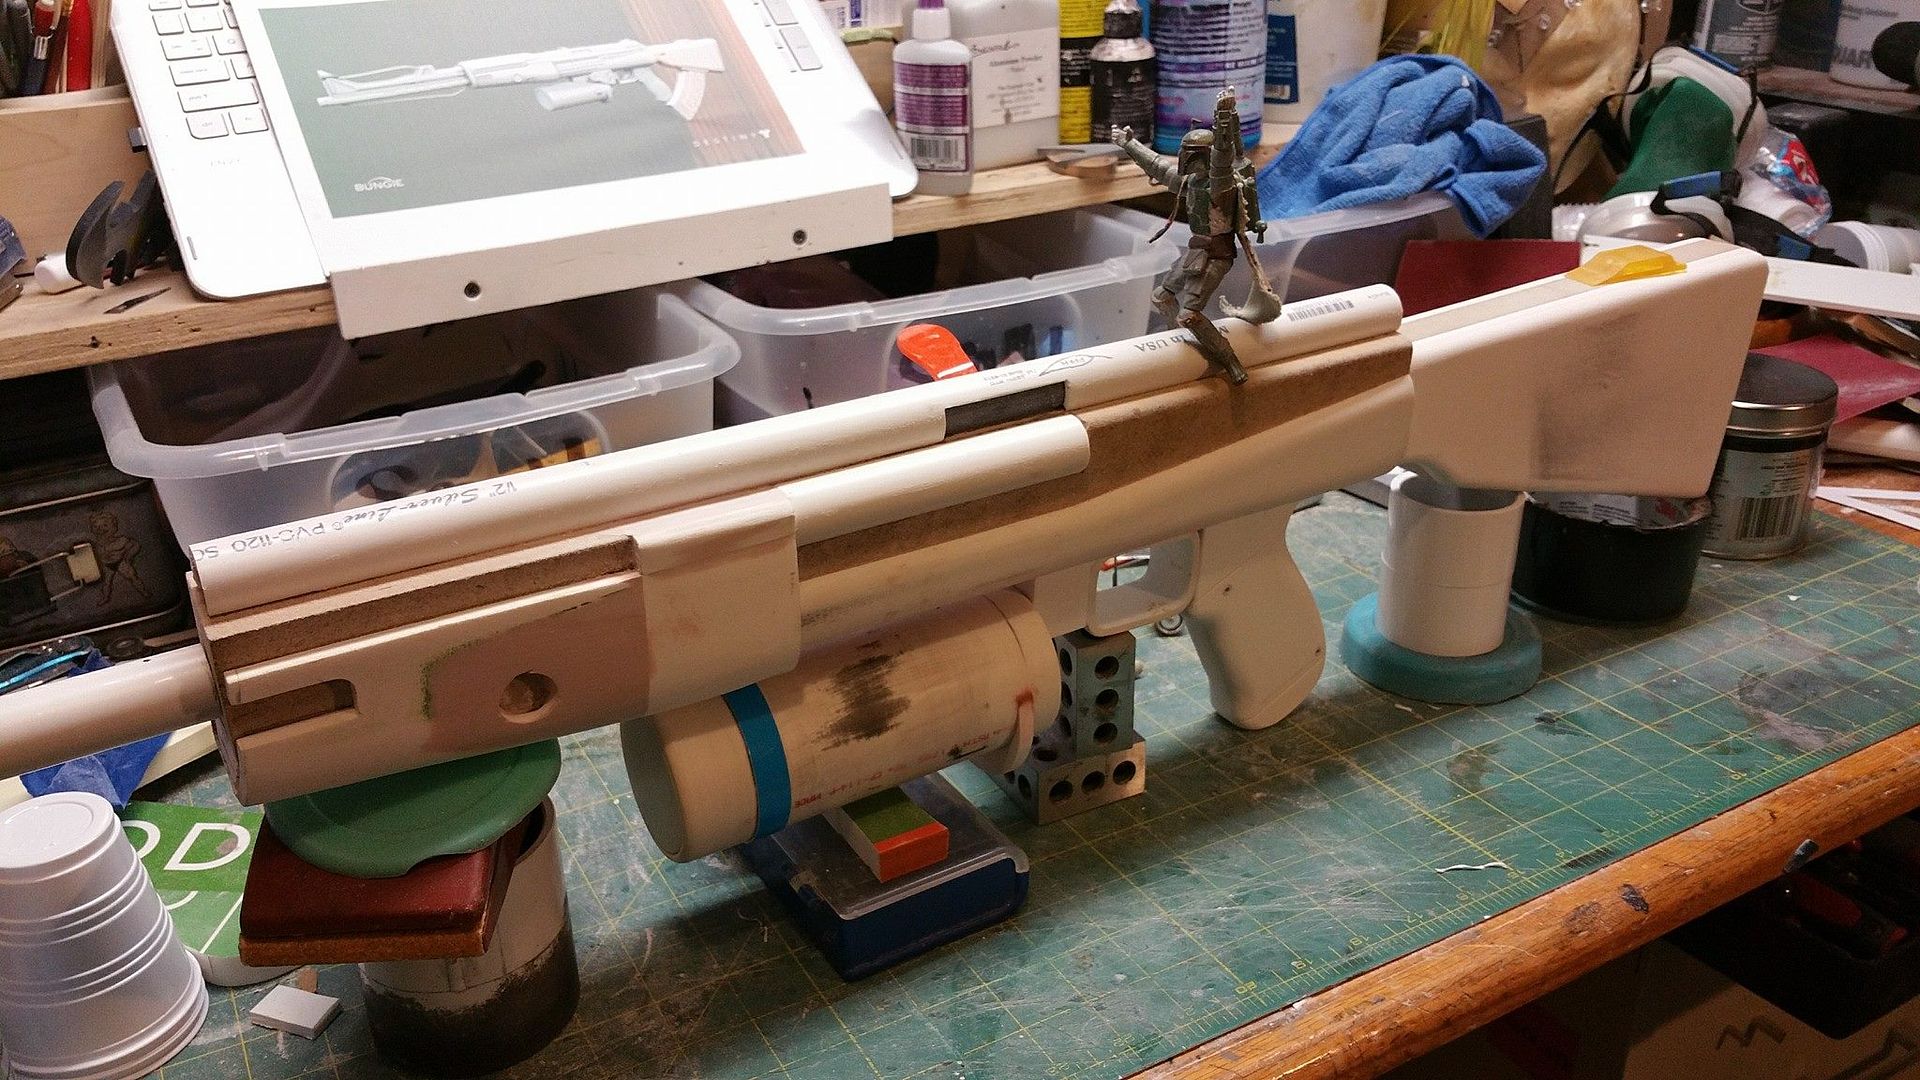
The outer barrel was PVC and sintra. The canister mount got blocked out too.


Some of the parts got a primer bath while others got detailed up.


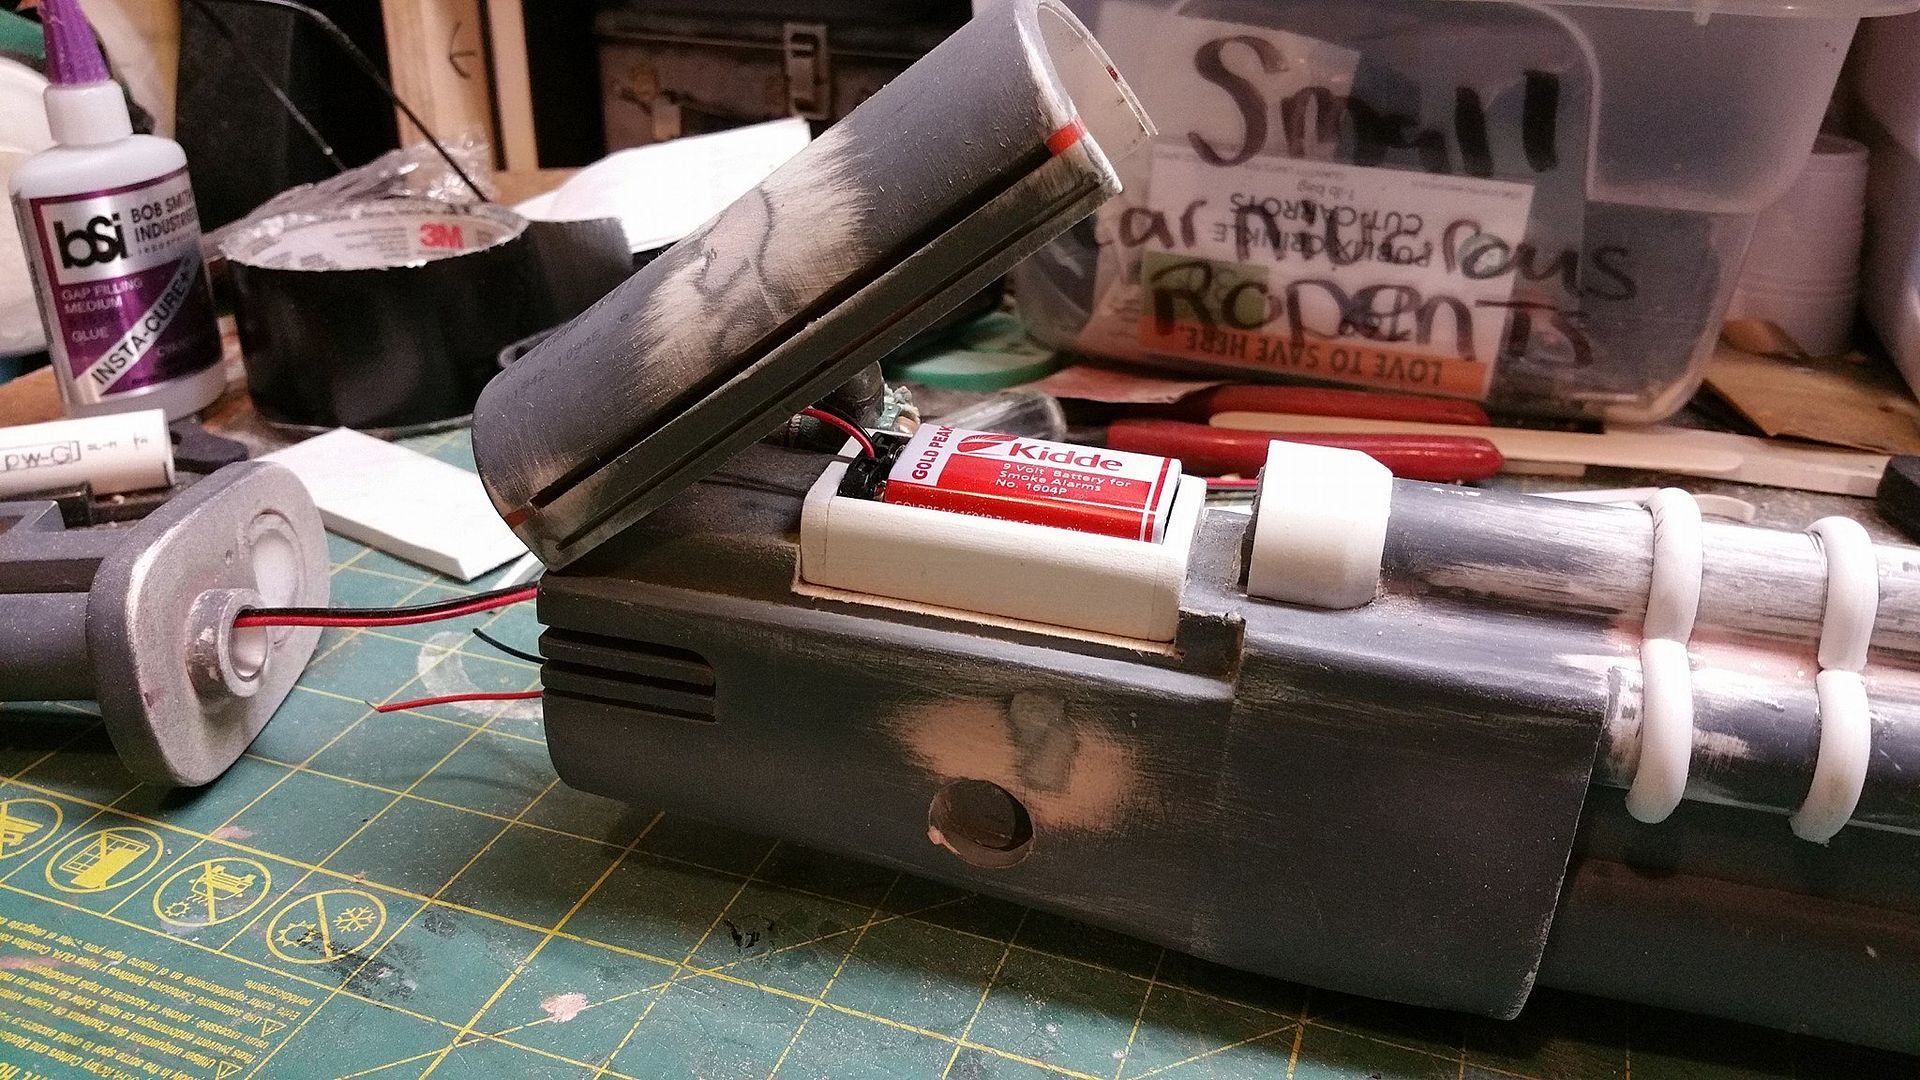
The upper handguard hides the battery compartment for the electronics.


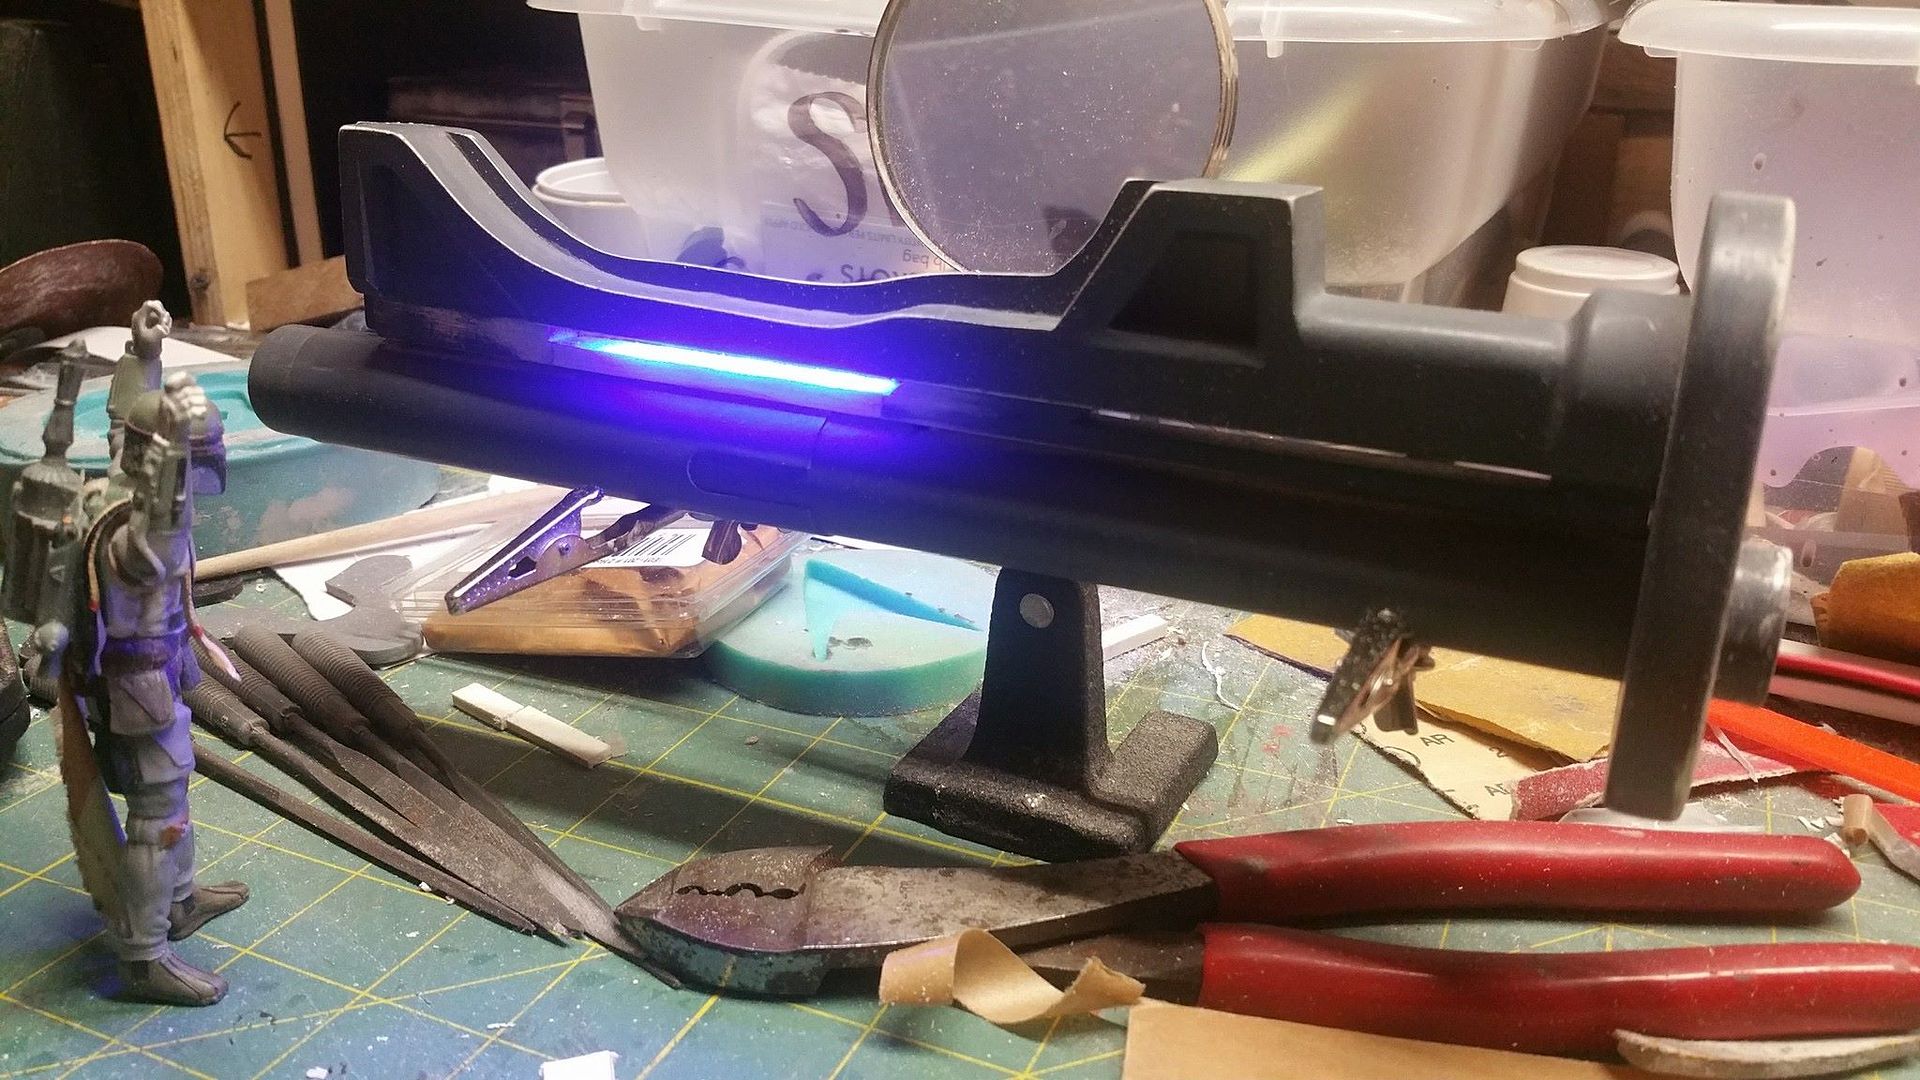
It glowsss! (The master, none of the subsequent casts will have this feature)


Some even primer to level things out. The most noticeable part here is the detailing, namely the tedious styrene half rounds that were heated and bent to fit in all of the nooks.


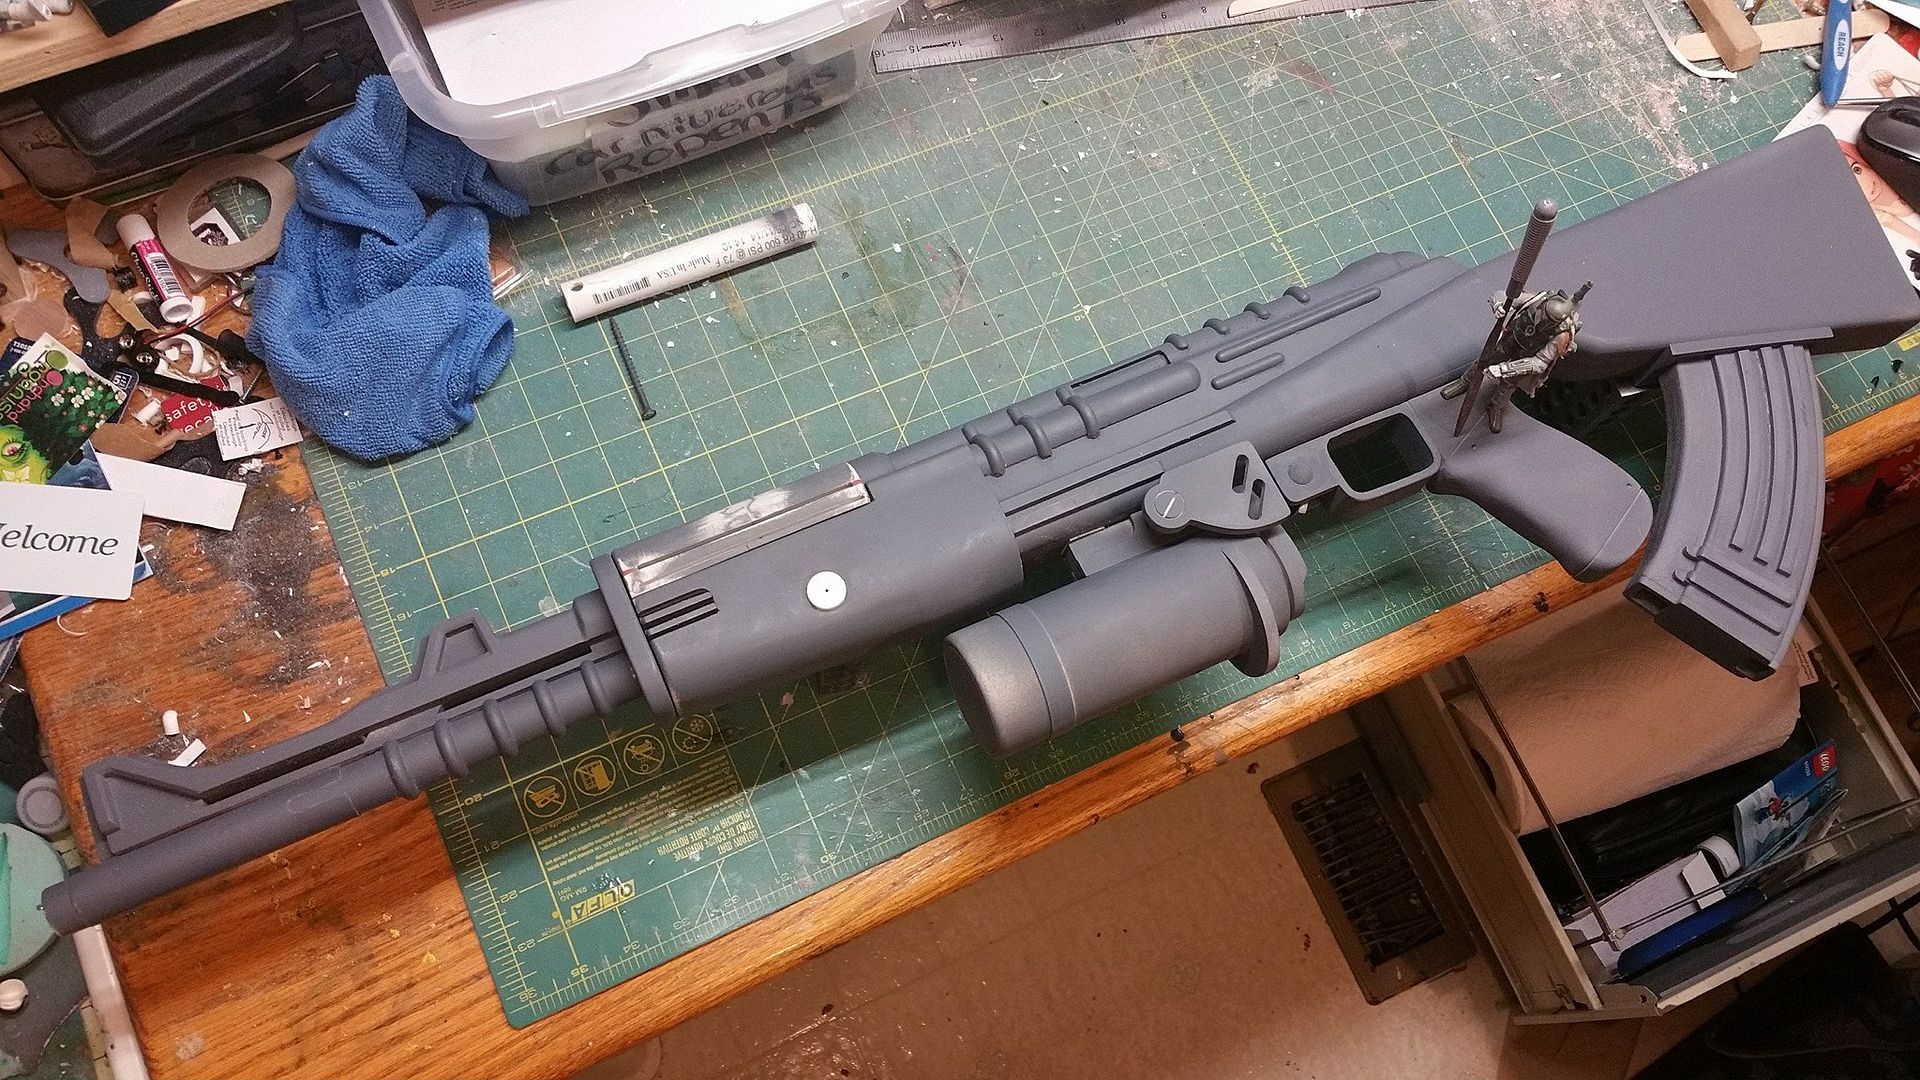
The grip getting some dowel pins for detail.


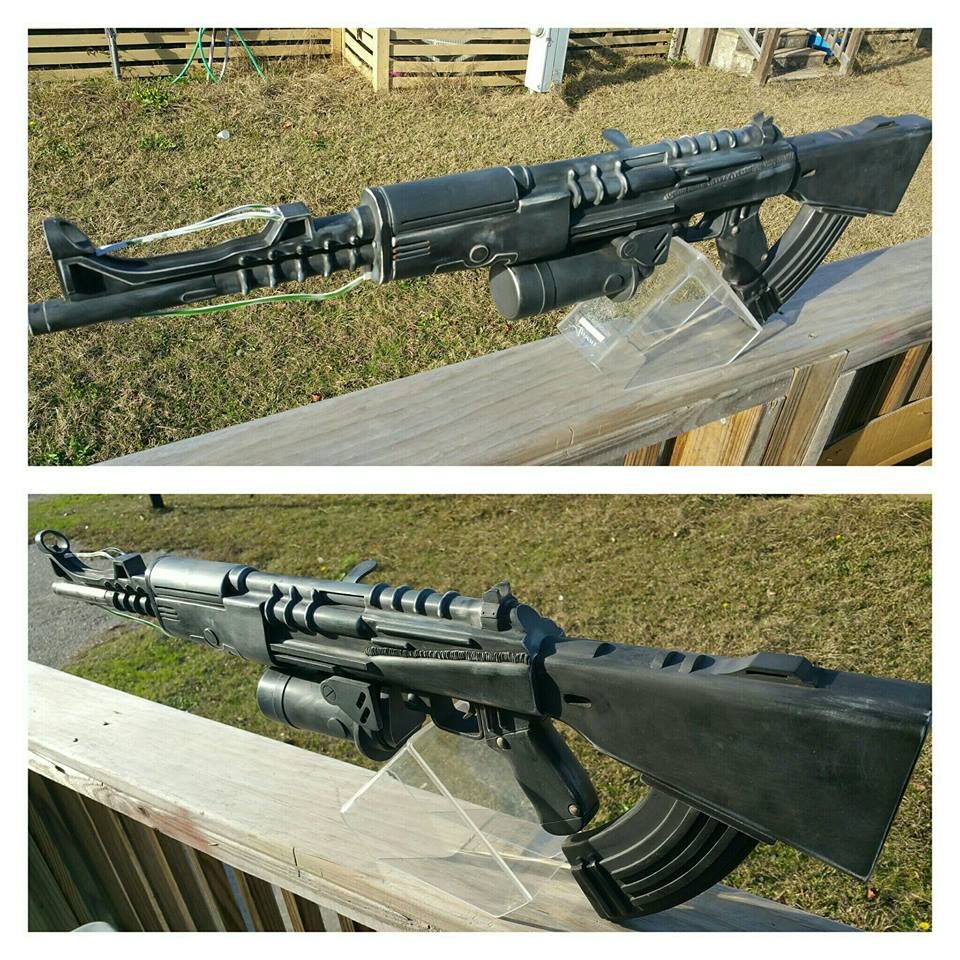
Carefully sanded and ready for paint!

 
Last edited:
Re: Destiny Zhalo Zupercell Exotic Auto Rifle Full Scratch Build (Pic heavy)

That's an awesome write up Zander ! Thanks for posting and for the kind words!
 
Re: Destiny Zhalo Zupercell Exotic Auto Rifle Full Scratch Build (Pic heavy)

Beautiful. Both of you are masters of your craft and this will surely be a gorgeous piece.
 
Re: Destiny Zhalo Zupercell Exotic Auto Rifle Full Scratch Build (Pic heavy)

You're more than Welcome Terry, and thanks Strode!

Much like the MIDA multi-tool, Hawkmoon, and other collaboration projects I've worked on or inherited, I had to put my special touch on the piece.

I started with the lower canister. The concept model Terry built this off of shows some slightly raised details, while the in game model uses a texture to represent these details. I decided to make it more accurate to the game and flattened out some of the raised details in favor pf panel lines.

Before:


After:


The same went for the circular plug on the side of the gun, which had to be punched out. The old plugs broke upon removal, So I made some new ones out of MDF that I could round out and sand flush.


The result is a nice panel lined plug. You can also see I was adding some small styrene details as well as some half circle details. I believe these may be teeny tiny hex bolts on the in game model, but it is too small to tell and these could cast easier.


After those small changes, I made some other small changes to the grip. The magazine release that was on there was a smaller simplified release simply represented as a bent piece of 1/8" sintra. It was cool because it could move, but presented some problems for molding without making extra parts. I decided to delete it and re make it larger and more accurate out of MDF.


Installed. While I was in there, I re-made the dowel pin larger to more closely match the existing ones.


I installed a missing dowel pin, seen in the upper right hand corner. I finished it off by making a panel line along the grip to match the game reference. (not pictured)


On to the stock! The stock and the receiver got the most work. I feel bad, but I had to destroy all of the details Terry worked on to round out the stock to my liking. It was just a little too hard edged for a buttstock to me. Some horrible phone pictures of it before:


Terry, don't look! The details also would have been severely damaged from the belt sanding process so they had to go regardless.


Round 1. (Pun intended)


First, the magwell got re-made.


I re-made the little "house" on the spine with some PVC and styrene.


The spine got its half rounds that match the receiver. These are actually cast resin copies of a half round styrene strip I ripped off of the receiver.


Its a bit of a nit pick, but I didn't like how "tall" the old half rounds were. I pulled two of them, sanded them and molded them for unlimited copies. The before on the right, revised on the left.


Aside from being too curved and too thick, with a couple of screw holes to boot, this cheapie airsoft L85 bullpup rifle buttplate was a perfect donor. I disassembled it and sanded it down.


Test fit. I still wanted to flaten it a little.


I boxed it up for molding, along with the two aforementioned styrene half rounds.


I pulled a cast, and while it was about 90% cured I tried flattening it some more. I sanded the bottom, and installed it.


I forgot to mention: while I was in the neighborhood, I added some accuracy to this intersection where the stock attaches by creating a rounded point that dips into the receiver.


At this point I considered the stock done! the front sight was next.


I felt that the front shade was too large and the front post wasn't angular enough. I removed the hood, and cut out the front section to be re-made as well as make it easier to plane down on the belt sander.


First, I tapered in the front a bit and then recreated some of the subtle beveling that I had sanded down.


I made the front bits out of MDF and styrene, and the smaller front sight out of PVC the same diameter as the barrel, with a more aggressive cut on the backside.


I preserved the old sight "blade" as best I could, but ultimately it had to be re-made thicker for the sake of molding/casting. Then It all got a primer bath.


Up next, the biggest changes. (The receiver!)
 
Re: Destiny Zhalo Zupercell Exotic Auto Rifle Full Scratch Build (Pic heavy)

Moving along..

The receiver had a few details missing, mainly because the initial client was on a budget. I decided it would be worth the time to cover the missing details and make some alterations before it got molded.

I wanted to reduce the profile of the "bulges" on the side of the receiver as well as the "strips" that sit below them.


The strips were first. the 1/4" MDF parts got pulled off and any damage was repaired before using some 1/16" styrene that was carefully cut and beveled to match the reference.


Here's a shot from the top. The bulges on the side were a tad wider than the front handguard. I had never held a gun with a reciever wider than the handguard, so it probably bugged me more than it should.


The strips below were level with the hand guard as well before alteration. I wanted to get it all narrower to match the reference below.


I started digging out the bulges. This process was probably the most time consuming and noticeable part of the alterations. All of those nice styrene half rounds that were on it had to be re-made.


A sliver of PVC goes over that bit. The old one on the left, and the significantly shorter one I installed on the right.


One down! Now the receiver is a bit narrower than the foregrip. Success!


I made the "dome" at the end of the bulge out of some styrene and primer/sanded it all together.


I very carefully scribed the little circles that re on the reference model.


On both sides, the top half round shown was removed, reduced in length, and shortened in height. (these are the donors I used to mold the ones for the stock half rounds) and reinstalled them, adding two little details that were missing.


I added a few details near the back. Those "U" shaped recesses got added on both sides, as well as the dowel pin positioned slightly above the welds. That was a scary hole to drill, I didn't want to mess up Terry's beautifully hand sculpted welds. Then, I dug up an old 1st generation airsoft TM M4 receiver and stole the serial number. I embedded it here, despite the fact that it actually is a bit smaller and sits higher on the game model.


The rear sight was already well done, all I had to do is shorten it a little in the name of accuracy and friendly molding/casting. The fin closest to you is the after, the rear is before.


If you've been reading this word for word, I commend you! These, again, are cast half rounds. I pulled them from the mold when about 90% cured and bent them into shape. I used a heat gun for the final fitment. Like the others I added, these are less bulbous versions of the styrene half rounds.


Did the spine too, they're there on the model.


I added this little collar towards the handguard side of the spine.


There's a front "plug" in the front hand guard. The previous one was good, I just wanted it a little larger and a little more prominent to match the reference. I popped the old one out which luckily was easy and bored out the hole. The old one sort of flowed with the curvature of the handguard.


New ones went in. Wasn't a big change, but hey. The subtle beveling around the plug make it look a little bit more refined.


Home stretch! The last bit to address was this back area. It was perfectly flat, and I wanted to add some subtle curvature to match the reference as well as the rest of the gun. You can see the little notch I dremeled out earlier for the new stock modifications.


horrible picture, but you can see the rounding a little, especially on the outside edges.


I cut this out by hand with an exacto. The text isn't perfect, but the logo is so I called it a win. I first etched it very lightly with a vinyl cutter. It doesn't cut the styrene at all, but it creates a nice outline for something this small. Even a fine point mechanical pencil is too large for something this small.


I dug out some layering for this to fit flush.


The logo is a hair over-sized, but I didn't want to develop cataracts trying to get an even smaller logo perfect.

All of these nit picks and whatnot probably aren't noticeable if you saw this sitting on a shelf or a quick glance at a con.

But in the hand, it made a hugeee difference.


I think we all know what comes next!


Paint jobs and some updates to come!
 
Last edited:
The master safely found its way back to Terry's house and he gave it a nice paint job, based partially on the in-game one. The master still had some mold release on it and some bits of clay, so he carefully had to strip the mold release and sand/clean up the surfaces for the new paint to stick. It came out great! Terry's page, with a few more pictures: https://www.facebook.com/VectorSigmaCreations/


I clayed and taped up the LED and wiring areas to make sure the electronic function Terry worked hard on could be preserved when I molded it. Looks like it worked!


While that was going on on Terry's end, I finished up molding and casting my copy of the Zhalo parts and started prepping them.The only exceptions being the magazine, and the charging handle. I wanted to re-make those entirely later on down the road.


Quick try fit!


A copy of all this stuff went home with Terry too, so he could have his own Zhalo after he sends the master to his client. (Everybody wins)

I got around to re-making the magazine out of MDF and styrene. Careful layering, usual stuff. The little half rounds near the bottom of the magazine were once again cast resin, same stuff used on the receiver and shoulder stock.


Didn't take pictures really. The master is the light grey, cast is the dark grey.


The charging handle is carefully shaped MDF and styrene, with a pinch of PVC for the round.


Final photoshoot on my end coming soon!
 
This thread is more than 6 years old.

Your message may be considered spam for the following reasons:

  1. This thread hasn't been active in some time. A new post in this thread might not contribute constructively to this discussion after so long.
If you wish to reply despite these issues, check the box below before replying.
Be aware that malicious compliance may result in more severe penalties.
Back
Top