Dark Trooper Project - Phase 3 Dark Trooper COMPLETE

vettejedi

New Member
First post here on the RPF, but me and my friends have frequented these boards for a little while, drawing inspiration for our dream project, which I hope to detail here for you all. Who here is old enough to remember the very first mission of Kyle Katarn? I've been a Star Wars fan ever since I was a little kid, but there was something special about the
LucasArts games for me and my favorite series (with special honorable mention of Tie Fighter) was always the Dark Forces series. I remember being caught off guard by how awesome that original Dark Forces was and Kyle Katarn quickly went on to be one of my favorite characters from the Star Wars universe. I even have a Kyle Katarn costume from Dark Forces 2: Jedi Knight.
IMG_4641.JPG

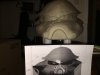
...But I digress, this thread is really about the titular Dark Forces themselves, the Dark Trooper. The Phase 1 and Phase 2 were always pretty awesome, especially when they got the drop on you in the game, but the one that always interested me the most was the Phase 3 battle suit that Rom Mohc wore during the final boss fight. I'm talking about this guy:
IMG_5147.PNG

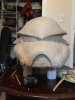
So, me and my oldest friend started talking about doing this for a Star Wars Celebration one year and doing it as it existed in the game, 8 feet tall and intimidating. We first had this idea before SWC 6 in 2012 but we couldn't pull it off because we spent too much time completing our Bender from Futurama dressed as R2-D2, which was fun in it's own right. Then we talked about it for another few years and instead of working on it for SWC Anaheim in 2015, we did the Kyle Katarn, a Sith Elsa, and an Undead Tie Pilot. So finally, jump to 2016 and I decide I'm just going to go for it and start working on it and draft him into that way! And what do you know, it worked. So, I will tell you now that the costume is complete and we did manage to debut it in the costume contest at SWC orlando 2017, just this last weekend. In the spirit of the two major threads that helped us pull off a giant costume, I wanted to post the trial and error process on here for anyone who is interested. I want to give a big shout out to two threads that we referenced to get it done - The Giant Raynor by MWiggs and the 40k Space Marine by Sylgian. An extra special mention to MWiggs for actually letting us use his hand models and answering any questions we had about his process for creating his awesome suit.

So, let's get this rolling. I'll probably be doing this over a few days because it was a year long process.

TLDR: We made a giant Dark Trooper costume from Dark Forces.
 
Yay, my thread got posted! So to start, we needed a plan. We decided to go with EVA form, like we did with our R2 Bender. So we needed models of the armor. We decided to commission the armor to be created since neither me or my friend Paul had anything but basic 3d modeling skills. This lead to our first set back.

The person we commissioned the armor from charged a good bit of money up front. We requested a few up front conditions and requested that he make it as close to the sprite sheet images as possible. We sent him several reference images from the game and a couple references of the dark trooper figure which we stressed that the helmet was not what we wanted:
IMG_4885.PNG
darktrooper-progress-thread-8mar2011-getting-back-dktrp15.jpg
Regarding the helmet, we noticed that the helmet on the figure was not quite what we were looking for. If you look closely at the sprite sheet from the game, the helmet has more of a hood behind it than the point that every other rendition seems to have. Well, when waited for a really long time for the guy to model the armor and when we finally received the models, he literally just modeled the figure. When we asked if he could remodel the helmet to the specifications, he told us he would not do it without more money and then violated our other request to not release the files to the public for a few months.

Why am I telling you all of this? Well I decided to remodel the helmet myself using the tried and true clay modeling and casting technique! Which I have never done before. So after a few measurements and scaling and reading a lot of tutorials, I got this show on the road last March (2016):
IMG_5214.JPG

To start, I decided to do something I saw online, create an MDF spine and fill as much in with cheap foam, so I didn't need to use a metric ton of clay:
IMG_4908.JPG
Drew it on MDF
IMG_4912.JPG
assembled the spine
IMG_4916.JPG
Cont
IMG_4921.JPG
Filled it in with insulation foam from Lowe's
IMG_4924.JPG
And started to shape it as best I could with a foam knife and sanding.
IMG_4934.JPG
And done the foam base!
 
So this might take awhile since I'm new and each post has to get approved...

Now that I was finished with the foam base for the helmet, it's time for the clay. I used non-sulfur oil based clay that I bought on amazon. It was the Klean Klay replacement if I remember correctly. This took about 1.5 months to do. One, it's huge and I've never done this before. Two, I was finished the basic shape in like a week and spent waaaay too long trying to smooth out the clay so there would be less sanding later.
IMG_4942.JPG
So I covered the foam with aluminum foil to make it easier to get off later, if I can bring myself to tear down the final sculpture that is! I took chunks of the clay and flattened them out. The medium hardness clay I used was still very firm, so I took to putting some in the microwave for a few seconds to warm it up and make it more malleable. I was trying to pay attention to the basic shape I wanted as I went here.
IMG_4945.JPG
Got it fully covered. Now to start shaping it.
IMG_4947.JPG
IMG_4948.JPG
It got hot in the garage so I moved upstairs. Here's one side mostly complete.
IMG_5039.JPG
Symmetry is hard...but I used the small clay tools to try and cut in the port and eyes. Starting to get there.
IMG_5043.JPG
Checking the sides.
IMG_5050.JPG
Not looking too bad.
IMG_5055.JPG
My dog helping me make finishing touches.
IMG_5100.JPG
And a ton of smoothing and a hot gluing to a base later (I learned not so quickly that my earlier makeshift base was making my life much more difficult). I've done what I can do with the clay at this point and next is the casting! Stay tuned in a day or two when I can post the next one.
 

Attachments

  • IMG_4951.JPG
    IMG_4951.JPG
    1.4 MB · Views: 101
  • IMG_4950.JPG
    IMG_4950.JPG
    848.3 KB · Views: 108
Ok, now for the casting part. This is where I called in help from my friend Paul and Dave. Paul and I were the architects of this project, but little did Dave know that he would be instrumental to the overall process over the next year or so...which he was absolutely thrilled about in the end. I did a bunch of research and decided to go with Smooth-on Products. For the soft mold, we used Mold Max Stroke, because it was cheaper and we needed a good bit, though I did end up buying way too much in the end. Mold Max Stroke is measured by weight, so you need to have a scale handy. This was a little annoying, but we dealt with it. I believe this one is a tin cure silicone rubber and the end result was a nice tough rubber mold. Having never done this, I watched lots of tutorials and read lots of expert advice. But there were still a lot of opportunities for what I'll call "learning experiences" with this process. Nothing teaches quite like first-hand experience...

Now, I don't have many pictures of this in progress because it was a day long affair of applying a coat of rubber really thinly, then waiting the allotted time for it to be "tacky hard" (look up some mold max videos, it'll make sense), so that we could apply the next thin layer. Repeat at least four times, but I think we went 5 or 6, with a few "thickened" coats in between. We used thi-vex to thicken up some of the rubber to try and reduce undercuts and build up registration keys. So...I'll show you the end result of the soft mold:
IMG_5116.JPG

I'm sure some of you who are experts at this can already see the future problems we were going to have when casting this thing. We did not build up the top of the helmet enough and we did not reduce the undercuts even close to as much as we should have. And our registration keys were a little lacking to say the least. More on all of this later.

Excited that everything set up properly and looked good the next day, it was time to do the hard mother mold. We used Plasti plaste for this. This product is pretty cool, it mixes up nicely and you really only need to do one good coat. Just watch the tutorial for it very carefully, because this stuff cures hard and any little imperfection in it becomes a nice little dagger for your hands later on. I've heard of people using a rag with mineral spirits to smooth it out while it's still soft and I really wish we did that...another learning moment. So I guess I never took a picture of the whole thing in the mother mold, but here's a few of one side of it complete.
IMG_5117.JPG
IMG_5121.JPG
So you can see we divided the thing down the middle with some clay and foil, and I lubed it up good with Vaseline so the two parts would come apart instead of curing together. Here's another fun tidbit, be careful where you divide your mold. If you look, we did it a little off center to the left and this part was damn near impossible to get off of it. Also, the lovely pointy bits we didn't reduce were quite fun to get around. But finally, I got the parts of and assembled it into the mold ready to receive the resin for casting:
IMG_5126.JPG

So remember earlier when I said we didn't get the mold thick enough in some places? Well, look at the undercuts at the base of the helmet trying to fall into the mold. When we finally got to slush casting this thing, which was insane in it's own right due to the size of the thing, we noticed the thinner spots buckling up. We used Smooth Cast 65D, which is really cool but rotating this thing properly was a task that we had to trade off on because it'll wear you out at that size. A few hours later...and our final product is going to need some work, but we did have a helmet at least. Unfortunately, it looks like if we ever want another of these things, we'll have to redo the mold because this thing is not ideal...but here's the result!

IMG_5151.JPG
See the divets?! WOOOOO!
IMG_5149.JPG
Still, it looks pretty good all things considered.
IMG_5208.JPG
Have I said it's huge yet?

So it needed a lot of sanding, some Bondo work, and a lot of paint. But I promise it came out looking pretty good even with all of our little mistakes. More of that later! For now, it was time to start thinking about actually building the rest of the costume I guess...
 
Let's keep rolling. We started the process of building out the rest of the armor. First I wanted to test my concept of the stilts fitting inside the really thin (relatively) calves on this thing. Like I said in the opening post, we referenced the giant raynor and the giant 40k space marine, so I used their concept of PVC stilts. The difference here though is the height needed and the smaller leg over which to do it. I determined that the stilts needed to be a little over 1.5 feet tall in order to properly line a person up with the rest of the armor. So I played with the pep files and printed out a calf to see how small I had to make the frame in order to still fit. Please don't mind my terribly messy garage...
IMG_5237.JPG
Not sure if there's a way to rotate the vertical pics, but there is a picture of the pep leg with the frame inside of it. Unfortunately I have no pictures of the stilts outside of the pep to show the overall frame set up, but it's PVC that was eventually glued with the PVC cement and attached to a plywood vase for the heel.

IMG_5265.JPG
Like so. So I did test them by standing on them and it was a little scary without a calf strap or anything, but they held so I considered the concept sound. Looking back on this now after having worn the costume for a long time, I would've liked to play with the design some more. Having walked across a long stage at SWCO '17, I can tell you they leave a lot to be desired regarding walking for anything but a few feet. More on that later though, after we build the rest around it. Next it's time to start cutting out lots and lots and lots of eva foam...
 
I decided to tackle one of the biggest pieces first just to see how it would look out of EVA foam. This ended up not being the best approach because my technique was a little sloppy still and this part required the most filling in later as you'll see. So I printed out the Pepakura and this thing took like 35 sheets of legal card stock. Cutting out the templates and cutting out the foam is easily the most monotonous and least exciting part of this whole process. And all the razor blades that I went through! No pictures of the cutting out process, but here's a few of each step toward putting the chest together.
IMG_5284.JPG
I laid the bottom most part of the chest across the helmet mold to check for size. I measured everything and tried to scale it to the best of my engineering skills against the very few good reference pictures, but it always helps to get a real life view of what you're doing.
IMG_5607.JPG
Oh boy, I cringe a little bit looking at how sloppy my first seams were and how many opportunities I had to combine the pep and not cut so many strips, but here's most of the chest built. The hardest part was getting that middle piece that bends in right, I had to actually Dremel the edge of the foam to a 45 degree angle because I just couldn't get it to cut right with any razors I had. If you notice I haven't glued the two pecs together yet. The pep for this was an extremely tiny sheet of paper that I just couldn't do, so I mimicked it and filled it in with a piece of foam sideways.
IMG_5611.JPG
There we go, a little rough, but the major chest piece was done and I was pretty happy with it (at the time). So I moved onto the collar pieces that would combine the chest with the back.
IMG_5664.JPG
The technique is improving, unfortunately these pieces are 90 percent covered on the final model...but it is what it is.

And I was done with these pieces. This is the part where a lot of the process actually moves to our next workshop, my friend Dave's house. Paul and Dave finished the back piece and eventually put the whole upper body together. More on that later.
 
Now it was time to start working on the legs. Next thing I tackled was the calves. Again, cutting out tons of eva foam and pep templates was fun, but at least I only had to cut out the pep templates once for both legs, that's a nice bonus. In the meantime, Paul and Dave have also been working on other parts of the chest/back, the shoulders and the arms. I'll get to those later.
IMG_5671.JPG
A good start, the seams are looking a little less terrible now.
IMG_5672.JPG
Another angle.
IMG_5681.JPG
There's one finished
IMG_5707.JPG
Starting on the second one, and test fitting the first one to the stilt.
IMG_5717.JPG
An inside view of the early stilt. It's missing the platform on the inside and the calf bar is not quite where we wanted it.
IMG_5715.JPG
And there you go, the calves are finished and fit over their respective stilts. Next, the thighs!
 
Oh, in the meantime while getting ready to do the thighs and some more armor pieces, we took our first run at sanding and filling the helmet. Here's some pics of that process.
IMG_5288.JPG
Filling in the imperfections.
IMG_5287.JPG
There were a few....
IMG_5605.JPG
First round of sanding.
IMG_5606.JPG
Looking better already...but still so much more sanding and filling to go. Sigh, if only we used more rubber in the mold. Learn from our mistakes!
 
Next step for me was the thighs. While I was working on these, the other two were putting together the shoulder bells and the arms. That'll be the next post. IMG_5751.JPG
The upper half of one started
IMG_5752.JPG
Checking it against a shin.
IMG_5759.JPG
Mostly built.
IMG_5760.JPG
Two mostly built.
IMG_5761.JPG
Completed the one on the left. The little box on the outside of the thigh was kind of a pain in EVA foam of this thickness, so it created some nasty gaps that we had to fill.
 
So while I was working on thighs, Paul and Dave were doing some more work on the upper body. Dave actually modeled a lot of the missing pieces, like the ball sockets and the inner arms, because the original guy we hired literally only made the armor plates. We needed something to hold it together. I'll call out the pieces that we had Dave build from scratch in any posts because he knocked it out of the park!
20161119_215038.jpg
Started one side of a gauntlet
20161121_213433.jpg
A support piece glued in lightly to help keep the curve and make it easier to hold the thing together.
20161121_213451.jpg
Some supports glued inside to help keep it rigid
20161121_221310.jpg
The inner part is complete.
20161121_221552.jpg
And a completed gauntlet. Rinse and repeat for the other mirror image.
20161121_222021.jpg
The inside of it with all the reinforcement. It's super sturdy!
20161205_215722.jpg
The wrist ball socket as Dave built it in Maya.
20161205_215950-1.jpg
Looks fun unfolded in pep...
20161205_235502.jpg
He got it cut out though.
20161206_002853.jpg
And it created a nice ball. We would later cut out a spot for the hand mount to slide though.
 
I am so totally jealous of this. The dark trooper has been a dream costume of mine for as long as I can remember but I knew that I would never have the skills to pull off building the suit from scratch. I keep hoping that one day someone will start selling armor kits for it but so far that hasn't happened. I'll definitely be curious to see more of your progress.
 
I am so totally jealous of this. The dark trooper has been a dream costume of mine for as long as I can remember but I knew that I would never have the skills to pull off building the suit from scratch. I keep hoping that one day someone will start selling armor kits for it but so far that hasn't happened. I'll definitely be curious to see more of your progress.

Hey, thanks for the interest! It was a dream costume of mine forever too, but we took forever to get around to it because of how difficult it was. I definitely couldn't have pulled it off alone.
 
Next, Paul and Dave worked on the bicep plates and the small shoulder bells and tested attaching the little shoulders to the chest piece.
20161203_132646.jpg
Templates for the shoulder bells.
20161122_233941.jpg
This is a test piece. It became obvious that the curvature was not matching up. So they rebuilt it using the template as a guide when gluing to ensure the correct curvature.
IMG_5630.JPG
A front view of the bell.
20161130_221636.jpg
Biceps cut out in foam.
20161202_182328.jpg
And built up. Curvature is looking correct. Dave is ever the perfectionist.
20161211_014025.jpg
And look at it mounted on the body. Notice that they've also added on parts of the back piece too, to start building up the chest. I don't have any pictures of those individual pieces, but you probably get the idea.
IMG_5743.JPG
A shot of the biceps next to it as well. Notice the paper template for the bigger over shoulders. They would be working on these next. I actually modified the original pep for these myself in blender, which is free on Steam! I have very very limited 3d modeling skills and did that before we got Dave involved.
IMG_5747.JPG
A test fit of the chest on me! Can you rotate pics on the forums? Haha. This thing is already huge.
IMG_5764.JPG
Also, just putting the thighs on myself as well to see how big they are. Making progress slowly but surely!
 
Let's see, what did we do next here...

IMG_5769.JPG
Dave and Paul put together the cod and butt. The original model has these as two separate pieces, but it worked out better as sort of a "diaper". You can see some of the piping inside of it to help it hold it's shape. We had to do another layer of it as well as several interior foam pieces to help it really reaaaaally hold its shape.
IMG_5791.JPG
Meanwhile, I was playing around with the legs some. Here's a view of the whole thing stacked up, with some foam circles in an attempt to create the knee "bolt" you can see in the reference images. The calf is fit over the prototype stilt. Let's test it out?
IMG_5770.JPG
So, sorry for the sideways pic, but here is me in most of what we got so far. As you can see, my head almost touches the roof! It's looking pretty decent so far though.

20161214_022636.jpg
So I mentioned Dave altered a lot of the model to fill in the gaps in the armor. Here's a view of him working on a few things. One, we needed some way to close the abs off and get the little grid like pattern you see on the reference (more on this later). Two, he wanted to fill in the "mechanical" pieces you see in silver on the reference images. So he built an interior for the thigh, a skeleton for the arm, a part to support the armpit, and you can also see an early prototype of what he was thinking for something to close the neck area off, though we ended up doing something different for that later.
20170108_212324.jpg
Here's the initial set up for the inside of the thigh. We used a little bit of that insulation foam to make tubes and we were hoping that the epsilon didn't eat it because we just went for it. Probably not the wisest thing, but what the hell?
IMG_5793.JPG
Over that, we layed strips of EVA foam to give it the look you see in the reference images. Also, he added some extra interior edge support out of eva foam to the thighs.
20161216_232021.jpg
Next, they built the big shoulders out of eva foam and the little chest circles that they connect to. And also they finished the back. The back was basically just a flat sheet of eva foam that we will later attach the jetpack to!
20161225_235009.jpg
Next was the interior frame. This thing is huge and if it didn't have something holding it straight, the epsilon would probably crack and bend immediately. We used a combination of pvc and 3d printed parts. Sorry I don't have a better picture of that, but this happened mostly while I was busy doing other things, so I only have pictures of the work Paul and Dave took.
20161216_233838.jpg
A couple more angles.
20161216_232034.jpg
You can see how the little shoulder fits under it. Though they eventually came up with a better mounting option for the bigger shoulders by using 3d printed mounts drilled through the collar pieces on the chest. I'll see if I have some pictures of that as we go along.
 
Up next, some of the more ancillary pieces.
20170112_233330.jpg
Cutting out the grid pattern for the abs
20170115_013705.jpg
Putting together the armpit. It'll make more sense later when you see it in place.
20170115_183752.jpg
Test fitting the cod piece against the thighs now with their interior pieces. Note the stilts without the calves.
20170115_184703.jpg
Checking the structure of the chest.
20170115_184759.jpg
Checking the chest against the cod piece to make sure it all fits in place.
20170119_183148.jpg
Meanwhile, Dave is working on a boot design for the foot!
 

Attachments

  • 20170117_204147.jpg
    20170117_204147.jpg
    316.4 KB · Views: 71
  • 20170114_210230.jpg
    642.9 KB · Views: 57
Meanwhile, I'm working on the helmet some more. Paul and I did some more touchup sanding and I also sprayed it with some primer to see where I missed spots. I started cleaning up the holes and ports as well.
IMG_5775.JPG
Looking pretty good now! No divets and the primer is actually not looking bad.
IMG_5777.JPG
You can see where I starting cutting out the front "frown" ports
IMG_5798.JPG
Cleaning them up and trying to line them up a little better than I did on the clay mold.
IMG_5840.JPG
Cutting out the side ports and cleaning up some of the underside with bondo.
IMG_5843.JPG
More ports and you can see the bondo on the underside of the brow there, looking a little cleaner and sanded.
IMG_5851.JPG
Hit the outside with gloss black to see if I liked how it was looking and to get the eyes the right color. Though I would end up repeating this later. I always get too excited about painting though and want to see the look.
IMG_5858.JPG
And inside view. I decided to spray the inside of the helmet with plastidip to give it a rubbery feel and plus it looks pretty cool. This thing is freaking huge though and maybe a little too heavy. We're going to mount it to the body so it doesn't sit on a person's head.
 
We kept chugging along
IMG_5861.JPG
One of the hand prototypes printed out. Again a big thanks to MWiggs for the hand design!
IMG_5864.JPG
Testing the leg together. We've added knee bolts and a front knee covering.
IMG_5867.JPG
Oh, and the feet are built now! I may have to dig up some more pictures of this if I have any.
IMG_5869.JPG
Looking pretty neat!
IMG_5877.JPG
So I had to sand down the gloss paint. It actually created a really neat effect on the helmet, might need to remember this for my mando armor or something. I also started using craft sticks to build the "teeth".
IMG_5879.JPG
Painted the round thing and respray the rest after the sanding. A little silver for the silver bits as well.
IMG_5882.JPG
Helmet is coming along!
 
Some more work on the chest!
20170122_002344.jpg
A good view of the ab plate added on with the little squares. And you can see the framing inside and the little mounts for the big shoulders.
20170201_213924.jpg
Testing the inside of the arm. This bit here was a preliminary mount for the arm to hand off of. You can also see the beginning of the "inner" arm, which is the piece Dave whipped up to mount all the armor pieces on and for me to stick my arm through.
20170201_213943.jpg
An example of the bicep part mounted to the inner arm. Also, you can see the armpit piece in place now. There will be better views of that later though.
20170219_130923.jpg
You can see the elbow hinge and the hand here. Paul mounted the hand pieces onto a piece of plexiglass that slide into the arm for easy-ish removal. The bar that goes through the elbow also goes through a hole in the plexiglass to give it something to mount to. We didn't want me holding up any part of the arm with my own arms to save the weight. Which ended up being a very good decision because the arms are not light.
20170219_185427.jpg
A view of the hand in with the EVA foam wrapped around it now.
20170219_185442.jpg
A test of the arm bending.
20170219_195313.jpg
Here it is with the inner workings exposed so you can get an idea how we mounted everything. It looks rather robotic already for something made of foam! As of this point, pretty much all of the armor pieces are built except for the belt and jetpack, which Dave was still modeling.
20170121_192126.jpg
Though it was coming along well.
 
This thread is more than 6 years old.

Your message may be considered spam for the following reasons:

  1. This thread hasn't been active in some time. A new post in this thread might not contribute constructively to this discussion after so long.
If you wish to reply despite these issues, check the box below before replying.
Be aware that malicious compliance may result in more severe penalties.
Back
Top