Deathtrooper blaster

westarsmith

Active Member
Good day,
Rogue One Deathtroopers carry an interesting sterling-based blaster. One of the best things, besides it’s nasty appearance, is that the original props were built in the recent past, not 20 or 30 years ago, so parts are much easier to get. I’m building it now so I thought I’d start a progress thread. Also, maybe those with access to better info might point out something I need to change. Or post pictures from public appearances of this blaster.
I’m using photos from the movie. I refer to Battlefront images and the action figures to help with proportion or a detail I can’t see in the movie image. Parts that I’m making are machined not 3d printed so the blaster has the real feel.
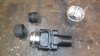
I bought the air soft sterling and started with the receiver rear end cap. The air soft cap has a spring loaded mechanism and has the locking cuts so that it can be rotated into place and stay on the back of the receiver because this design has no recoil spring. In the picture from the movie, you can see that the prop receiver end cap is held in place with a screw on each side of the receiver. No need to make the inside locking cuts ( whew!). So I machined an end cap that had the outside shape as in the movie still and just fit over the receiver. I put in the locking hole for the spring-loaded receiver mounted lock, also. I threaded the adapter for 1 3/16 -16 internal so that the collapsible stock would thread on (same as AR15).
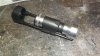
Fortunately, the threads at the rear of the stock body are also threaded into the stock body so the threaded piece can be removed. ( see picture) I machined my piece for this spot and sized it so it would fit tightly in the back of the stock body and be held by a screw using a convenient hole in the underside of the stock body. I guessed that the piece had linear knurling on the band around the outside. I wish I has a finer knurl. This piece looks different on the action figure.
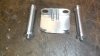
Another picture shows the power cylinders for the magazine housing. They are different from E-11 in only a couple small details so not too bad to make.
This is fun! More to come.
 

Attachments

  • DSCF0653.JPG
    DSCF0653.JPG
    660.6 KB · Views: 522
  • DSCF0650.JPG
    DSCF0650.JPG
    657.8 KB · Views: 622
  • DSCF0656.JPG
    DSCF0656.JPG
    634.7 KB · Views: 528
Subscribed Steve! Do you take commisions ;)?!

will tackle the DT blaster myself at some point in the distant future.
have the sterling, swivel rings, flashlight, counter, scope rail, scope and HK shoulder stock.

Check out the 3d model from 3Dpropsnl for addtl reference... It's the best currently IMHO
ordered one of their Shoretrooper rifles last week plus a few airsoft Sterling parts to upgrade it :)
 
Question not relevant to this build but to the original prop design -

Why does the blaster have two adjustable stocks? I doesn't make any sense. I get they wanted to keep some of the aesthetic of the E-11 but any trooper worth his/her salt would strip one of them off instead of carrying around pointless dead weight.
 
Don´t overthink it ;)

The prop dept. simply wanted some continuity with regards to the blasters, so they used and modified a Sterling.
Since we never see any trooper in ANH/ ESB/ ROTJ using the Sterlings folding stock, take it as a simple "tactical grip" instead of adjustable shoulder stock...making it plausible that they added an actual FUNCTIONAL stock to the DT blaster.
 
Good Day,
Deathtrooper blaster continues.
Drilled and tapped a hole in the back end cap detent for the quick detachable sling mount as in the screenshots. I marked where the hole should be then drove the pin out and drilled and tapped the square bar off the gun. It has a leaf spring so don’t worry about some coil spring shooting off into the black hole where these things seem to go. The threaded qd stud does not have threads all the way to the top so I cut the threaded part off and drilled and tapped a hole in the stud for a small machine screw with head cut off that would fit the hole in the detent bar. Used JB weld to lock it in the stud.
The stock need bent to allow clearance for the “laser sight “ under the barrel. I stuck a block of wood in the position shown and just used my hands to slowly squeeze the stock till it was parallel to the barrel but lower so it would clear the laser sight. Caution, it bends easily!
Major fun! DSCF0657.JPGDSCF0658.JPGDSCF0651.JPG
 
I'm not sure how helpful these might be. The reference pictures you have seen pretty comprehensive. This was scanned from The Art of Rogue One and is concept art for the death trooper rifle.

IMG_20170317_0007.jpg
 
Here’s the “laser sight” (or whatever it is). Had to make it in 3 pieces to get it the way I wanted. Somebody better could probably do it in 2 piece. Threaded rod holds the solid aluminum rod pieces together. Have yet to make holes for the mount but I thought I’d wait till the barrel is added so I can get the relationship with the folding stock right.
To that end needed to disassemble the sterling air soft. As you can see, there’s a lot in there. Not sure yet how much of the internals I’ll use. Trigger for sure.
Thanks to Odiwan for the reference. Always helpful. Thanks to all who are interested. Thought there might be some who would like a blow by blow build of this blaster. This one’s for you Markus. DSCF0661.JPGDSCF0664.JPG
This is fun, fun, fun!
 
The fun continues…
I removed the motor and gears and just used the frame of the grip. I removed all the internals from the receiver. This allowed me to cut the square hole in the magazine side of the receiver. Just drilled overlapping holes with a drill to remove as much metal as possible and then finished it up by milling square with a .125 mill.
Then I cut the barrel shroud leaving extra so that it would act as a stop locating the internal spacer as well as help support the new barrel shroud. Pictured is the internal spacer turned down part of the length so it will fill the above mentioned square hole and the ejection port, allow for the grip to be fastened to the receiver, and the unturned end will slide into the new barrel shroud. That’s one hard working piece of aluminumDSCF0665.JPGDSCF0668.JPGDSCF0669.JPG
 
I machined a flat onto the receiver piece so the grip frame would join the frame as it had in the air soft configuration. Also machined a slot in the back to capture a projection on the grip frame so it would act to locate the grip frame correctly in relation to the receiver.
It took a while to figure out how to attach the grip frame to the receiver. Simple is usually best so I decided to use one bolt through the convenient hole that the motor worked through. I wanted it to be like the ar15 grip mount. After much figuring and trying to decide how to hold the work piece for drilling and threading I came up with a 50 degree angle. I also used a bolt that would not completely fill the hole in the grip frame so there would be some leeway in case I calculated or drilled the hole off a little.
Before drilling I used JB weld to hold a piece of solid bar in the receiver piece because I needed to fill the center hole in the receiver piece ( I used tube because it was what I had that was the right diameter) so there would be metal for the threads.
I’ve come into possession of some pictures from a public display of the death trooper so the under barrel “ laser” needs redone. Working on it now. This had to be some commercial thing repurposed or cnc because it’s just too labor intensive for such a small DSCF0671.JPGobject in the film. Or maybe it isn’t.
Stay tuned…DSCF0670.JPG
 
More fun,
DSCF0666.JPGDSCF0672.JPGDSCF0673.JPG The barrel shroud is next. I chose .125 inch wall tube so that I could accomplish the machining on the receiver end and still have a stiff tube. The rear of the barrel shroud needed bored out a bit to fit over the cut off end of the receiver so that the shroud ended up resting against the magazine housing, In the death trooper pictures the outside back of the shroud tube is turned down a small amount. Here’s a picture of the overall progress to date.
 
you make working with heavy machinery look so easy Steve...great progress!

LOVE the picture with the dryfit parts :love

Too bad I was not interested in the R1 props at the time of Celebration Europe...really should have taken TONS of reference pictures :(
 
Last edited:
More excellent fun.
After getting some pictures from the European showing of the death trooper, I revised my under barrel laser sight. Here’s the new one. Again I made it in 3 pieces held together by a threaded rod. The front required the most work, getting those little rectangles. I used a watch crystal for the clear front. Pictures show a ring on the glass like a sight or area from which the laser projects. My first thought is to use a dry transfer letter ‘o” centered on the glass.. Not sure how that’ll work out. Getting the “sight” under the barrel shroud and anchoring the folding stock to it is proving to be the biggest challenge yet.
The saga continues..DSCF0675.JPGDSCF0682.JPG
 
This thread is more than 6 years old.

Your message may be considered spam for the following reasons:

  1. This thread hasn't been active in some time. A new post in this thread might not contribute constructively to this discussion after so long.
If you wish to reply despite these issues, check the box below before replying.
Be aware that malicious compliance may result in more severe penalties.
Back
Top