What was your first project?

GatorDave113

Jr Member
Hey RPF,

I've been a part of this community for a couple of months now and so far the hardest obstacle to overcome has been trying to figure out what projects I can undertake without drowning in the learning curve or being buried by the cost of materials and tools. I've started a couple projects that didn't seem daunting at first, but I soon figured out that I just didn't have the skills or resources to really accomplish what I was setting out to do. This brings me to my question. What were some of your early projects as makers? How did you get around not having the right tools or skills to get those first projects done? What were some early mistakes you made that you would do over? What would you suggest as a starting project/resource for a 22 year old college kid with some spare time?

Sincerely,
GatorDave
 
Gator Dave, Welcome to the forum.

It appears that you have Builder's Disease, where your dreams outweigh your circumstances. This is true of all builder's and their dreams. This is an expensive hobby, but JUST a hobby.

My advice is to Study, Graduate, get a job and earn a living first, before following your dreams. I am not trying to be a jerk, I just remember those college days, and NONE of the diversions (Read: Girls, parties, cars, drinking) were anywhere near the joy of graduating and NEVER doing homework again! Seriously, its an AWSOME feeling!


That said, one of my favorite hobbies as a broke young man, was model Airplanes. Stick and Tissue, rubber band powered airplanes. If you buy strips of balsa, it is more expensive than if you were to buy a sheet and make strips. A whole airplane can be made for less than $1. A rubber band powered airplane can get some serious altitude and distance. I would write my name and number on the wing, with a promise of a $5 reward if someone would return the plane. Not a big deal, I really didn't care if I lost the plane, but I just found it interesting to learn where they were found. I got a call from a kid who had found an airplane of mine from 3 years earlier. It was found in a field 10 miles from the launch point. The rubber had rotted, but after 3 years of sitting in a field, beaten on by the sun, wind and rain, it was still in pretty good shape.
 
My first project (apart from plastic model kits as a kid) was trying to build a TOS Phaser I out of Sculpey, based on the diagrams in the Technical Manual.

It was oversized, faithfully reproduced the TM's inaccuracies, and added a few inaccuracies of its own. But I had made it with my own hands! I made a few other things after that - mostly for Halloween costumes - but then I tried out 3D modeling, and for years the only things I made were digital.

Then a few years ago, I bought the John Long P1 kit, but I was reluctant to start to work on it because it required a number of skills which were new to me. So I made a solid P1 blank (again out of Sculpey), learned how to make silicone molds and slush-cast resin, and refined it until I had some P1 shells of my own to practice on first, and I wouldn't care if I screwed them up. The first couple were terrible, but then I started getting the hang of it. Then I modified my master to get the shape closer to the one in The Making of Star Trek, recast it, made three phasers I was really happy with, and gave two of them away to some of my friends. (And I still haven't put the Long kit together!)

But that gave me the bug to start making props again, and when I discovered Shapeways, I put my digital modeling skills to use and had them print me up a few small things. And being able to turn my digital models into real things was so satisfying that I saved up my money and bought a 3D printer of my own, which has been great fun.

I don't think I'd "do over" any mistakes I've made (and I've made plenty), because I have learned from every single one.

As for getting access to tools and resources, and learning how to use them, look to see if there are any Makerspaces near you.
 
I'm also in college, and very new to this. But I've found some small projects to get started with.

There's all sorts of things you can do at little to no cost. I made an elder wand out of paper, hot glue, and paint. Made Nuka Cola bottles and caps with labels I designed in illustrator. As well as a few other projects that are still in various levels of completion.

Props.png

I just sort of browsed around this forum, found interesting (but small) projects, and tried to find cheaper ways to do similar things. I bought a pathetic $10 rotary tool from Harbor Freight, some hot glue, some paints, and used Adobe Illustrator in one of the computer labs on campus (I've also used Inkscape... if you don't have access to illustrator it's a decent free alternative). Until I graduate and have more resources, I'll just stick with stuff like this.
 
My first was a scratch build foam Skyrim helmet to wear at one of those Medieval Banquet evenings my work took us to.
(foam, cheap glue gun, cutting knife, modgepodge and some paint) http://www.therpf.com/showthread.php?t=182075

I then made a mask for a Masquerade Ball, which was really a practice run for using Pepakura, fiberglass resin and Bondo.

My first real project was a Judge Dredd helmet.
(not my build, but extremely well documented Dredd Helm build, that will give you a good idea of what it takes to work iwth Pepakura, fiberglass and Bondo) - http://www.therpf.com/showthread.php?t=255611

--------- Tips.
Your first project 'could' get expensive (initial outlay on tools and materials)
Don't spread Bondo too thick. You can always add more in thin spots.
A 'Mouse Sander' is a lifesaver when working with Bondo.
 
Last edited:
My first build when I came to this forum was a (not screen accurate) replica of the NIKE FOOTWEAR tube bag in BTTF 2. What started out as a $50 build soon became a $250 build.

After that was learning to mold and cast which cost me literally thousands of dollars of R&D. I was given a lucky break in that what I was making for myself would attract attention of a fan base and be in high demand, so I made all my money back and then some. But it was pretty scarey along the way. Sometimes you have to ask yourself - is that really light at the end of the tunnel of just a freight train coming my way?

There are guys that turned this hobby into careers, but that is not going to happen for everyone. Not only do you have to become good at this stuff, you have to find a market for what it is you do.

Probably the best thing to do is tackle some "speed builds". These are projects that you can knock out in a day. They usually don't require much in the way of materials or tools and give you a great feeling when you finish them.
 

Attachments

  • 20161120_212331.jpg
    20161120_212331.jpg
    84.2 KB · Views: 98
  • 20161120_212705.jpg
    20161120_212705.jpg
    93.1 KB · Views: 109
Last edited:
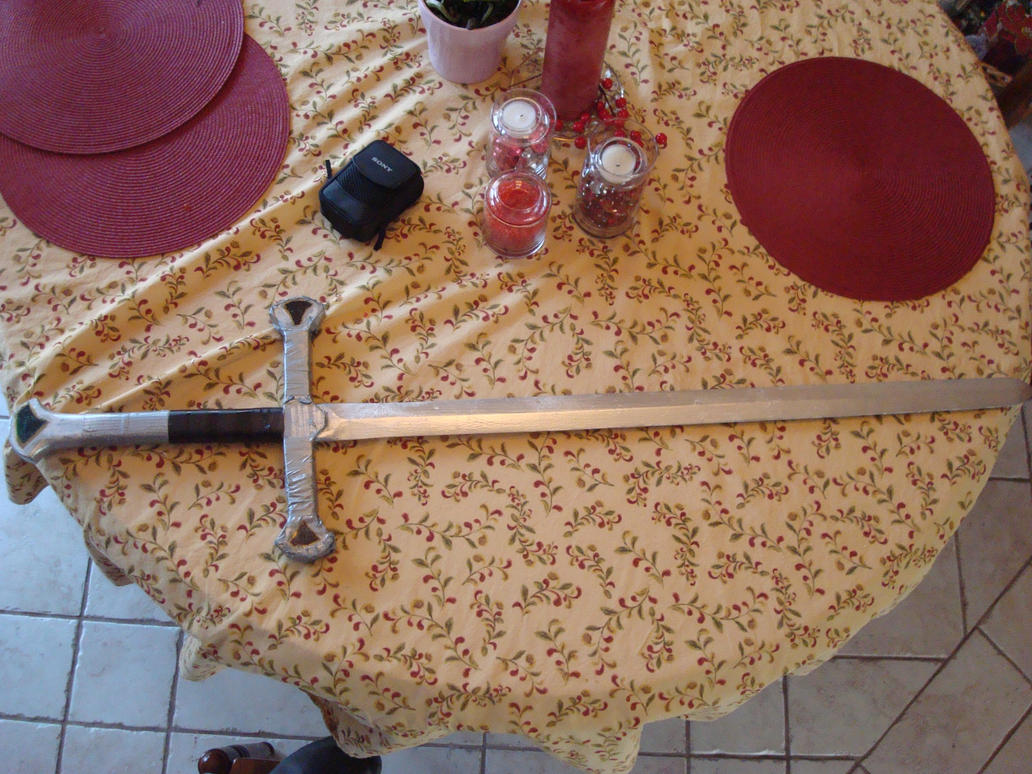
First prop I ever built was a replica Narsil I built off a random wooden practice sword I bought when I was 12. Can't remember the spray paint I used, but it has stayed well put together even to this day, with only some slight chipping. Here's what it looked like new:
narsil_by_abekowalski-d4v8uf4.jpg
 
My first prop/costume project was a lego guy head for a Halloween party in my teens, but I had been making models and scratch building stuff for years. With that in mind, my suggestion would be to not jump in at the deep end. Skills are built on the legacy of mistakes, so the best way to get up the curve is to build lots of stuff. If you're struggling with the projects that you've started, maybe scale back your aspirations to start with and attempt smaller and less resource intensive projects while you build up the tools, materials and, most importantly, the skills to tackle your dream projects. If you're really struggling, maybe take on some fan made resin kits - they'll teach you some important finishing skills.
 
After that was learning to mold and cast which cost me literally thousands of dollars of R&D.

Lest this scare the OP off the idea, learning to cast doesn't have to cost thousands of dollars.

You can pick up some basic Smooth-On silicone and resin kits for about $25 each on Amazon, a can of mold release spray for $15 or less, and some modeling clay for under $10 if you want to do two-part molds. A cheap piece of foamcore will serve for mold walls and floor (using hot glue to hold it together, or even duct tape in a pinch). Add a stack of disposable clear plastic cups and some Popsicle sticks for mixing, and you've got pretty much all you need to get started for under $100.

YouTube's got hundreds of "how to cast" videos, of varying quality, but they're all free; so watch a few to figure out the process.

Practice by molding and casting small objects at first until you've got the hang of it, and then you can start spending more on mass quantities of silicone and resin, vacuum chambers for degassing, rotary casting frames, and so on (if you want to - they're not essential).
 
Mine was a foam Magneto helmet I built for one of my daughter's costumes. All it took was some floor mats, cement, heat gun, paint and a whole lot of Evil Ted videos.

It looked pretty good at first, but I used an inflexible seal coat so it eventually cracked. Live and learn.

Stotesbury and helmet 459.jpg
 
I'm also in college, and very new to this. But I've found some small projects to get started with.

There's all sorts of things you can do at little to no cost. I made an elder wand out of paper, hot glue, and paint. Made Nuka Cola bottles and caps with labels I designed in illustrator. As well as a few other projects that are still in various levels of completion.

View attachment 715869

I just sort of browsed around this forum, found interesting (but small) projects, and tried to find cheaper ways to do similar things. I bought a pathetic $10 rotary tool from Harbor Freight, some hot glue, some paints, and used Adobe Illustrator in one of the computer labs on campus (I've also used Inkscape... if you don't have access to illustrator it's a decent free alternative). Until I graduate and have more resources, I'll just stick with stuff like this.
Alot of started with the classic Star Trek TOS phaser.
I believe many of older members had made some type of attempt of building a phaser in their youth, most likely from would and what ever everyday products laying around:)
I think a good start is to mod and paint a Rubies like Vincent V here.
I will like to add that the pathetic $10 Harbor Freight tool to me is kinda a blessing at times because it bogs down so much, it helps with not grinding away to much plastic with these cheap Rubies..Harbor Tools great place for get me by stuff also..
 
Thank you guys so much for all of these suggestions, I really appreciate all of the supportive feedback! This has put a lot into perspective for me.

My school has paired with a 3d printer company and offers free unlimited printing for students and I think I'm going to start there. I've gone out and found some print files for the pieces of the Bladerunner gun and I think I might use it to practice painting and weathering.

I also have more floor mat foam than I know what to do with and I think ill try crafting small objects out foam and then maybe even casting them in resin!
 
My school has paired with a 3d printer company and offers free unlimited printing for students and I think I'm going to start there. I've gone out and found some print files for the pieces of the Bladerunner gun and I think I might use it to practice painting and weathering.

Sounds like a great place to start. 3D printing is a rewarding (if slow!) learning experience. Just a word of warning though, I would be a little careful 3D printing a replica gun at school, there's potential to get yourself into a lot of trouble there.
 
My first full build of my first "proper" project:

attachment.php


I don't think that's exactly reasonable to expect your first time out (unless you're supremely confident in your bloody-mindedness and have a build that keeps you engaged for the long haul), but I'm used to being an anomalous data point in all things by now. It was, however, almost entirely built (the master was, anyway) out of MDF, PVC and Bondo. So other than the time (8 months of 6-14 hour days, 6-7 days a week, start to ready to pour silicone), it was really very inexpensive to make. I went out and bought the Harbor Freight mini drill press and belt/disc bench sander, and during the project I got the Ryobi 9 inch bandsaw. Obviously I already owned a few basic tools like a Dremel and stuff.

18.jpg

So for about $150 in materials (once you factor in all the paints, epoxies, etc) and $250 in tools (none of which I've yet replaced, though the HF stuff's days are admittedly numbered), if you don't worry about the moulding and casting (therefore saving $1000, but giving up an equivalent scale of income), and just paint up the "master" for display, you can really create just about anything you can wrap your head around. You don't need a couple grand in fancy CNC tooling, or a bunch of Hollywood-grade composite stocks to work with, to create something impressive.

Foam is a good material to work with too- reasonably priced, and cheap tooling. You can still throw 3D printing into the mix even if you're scratch building; small detail sections and repetitive design elements are ideal for that. There's no reason to limit yourself to one particular material or method unless you have specific situational constraints- like your building won't let you own certain tools. Scratch building is generally a good idea anyway, if you can; whether as a fallback if for some reason you're left without access to 3D printing (say some wiseguy tries to print one of those open source guns for the lulz and they cut you all off... Not exactly beyond the realms of possibility), or simply as a learning tool to understand how things go together and to get better with your hands.

Depending on what college you're at and what you're doing, you may be able to get access to the engineering department too, and their industrial-grade toolsets.
 
Started small and started with something I could complete with my limited skills :)

My version of a Second Doctors Sonic
http://www.therpf.com/showthread.php?t=171713

PQI9J.png
Wish I had more time to do more things

I like the saber idea I saw a post the other day about a 20.00 light saber challenge. Grab 20 bucks head to Home Depot buy the things you need get home and put it all together.
Also like the sculpy comment - it is amazing what you can do making parts heating them up them layering them together / glue and clean up.

Good luck please be sure to share your first!!
 
Sounds like a great place to start. 3D printing is a rewarding (if slow!) learning experience. Just a word of warning though, I would be a little careful 3D printing a replica gun at school, there's potential to get yourself into a lot of trouble there.

Also worth stating a lot of professional services reject weapons,even non moving replicas. Find a local maker/hacker space a lot of them have scrap material you can use......and never underestimate the joy in making things from cardboard :)

d73505716da4f11b3b9014504f739b11.jpg


I had a hard time getting just the grips 3D printed for this project. The body is mostly pla and the frame is mdf (was printed but the print failed so I used the good bits).


Sent from my iPhone using Tapatalk
 
My first replica props were definitely on the rough side, with an interpretive version of a Rocketeer pack when I was ~7 years old, then a rough yet passable Lara Croft for Halloween while at Uni, (had other better builds but they were not prop focused).

Depending on which university you're at they likely have a student theater, with that comes a workshop with both tools and scrap. You ought to check on a work-study position where you get paid and can learn on a full assortment of tools with associated skills. All else, approach the head of the theater shop and explain what you'd like to get out of it and you will likely be able to sort out a volunteer agreement trading volunteer time for occasional personal use and access to scraps. You would need to replace consumables such as dulled blades/bits/etc... but that is a pittance for the access to tools and skills you can learn, as well as the paint shop. Paint fumes do not promote happy roommates.
 
My first prop was the iconic Skyrim iron helmet (http://www.therpf.com/showthread.php?t=274104) as part of a complete costume.
I'd argue that you don't necessarily need to go overboard with buying a lot of power tools on your first builds. However, I think a Dremel is a must-have, but that's probably just personal opinion ;)

You could definitely start with some Pepakura + fiberglass + body filler build - that's a comparably forgiving method since you can improve, modify or redo parts of that item rather easily. For example, my helmet came out a bit warped, which I only realized once i tried it on. so I back-filled and cut off parts on the outside to improve it and make it more symmetrical. Also, this method isn't too expensive, especially if you put in some manual labor when sanding, instead of buying something like a mouse sander. However, I bought one of those rather late in the build and instantly regretted not doing that sooner ;)
 
This thread is more than 7 years old.

Your message may be considered spam for the following reasons:

  1. This thread hasn't been active in some time. A new post in this thread might not contribute constructively to this discussion after so long.
If you wish to reply despite these issues, check the box below before replying.
Be aware that malicious compliance may result in more severe penalties.
Back
Top