Cormac's "Sully", Monsters' University (Complete)

Cormac

Active Member
Hello all,
I'm finally getting around to putting together a thread for this build. It was completed last October, just in time for Halloween, having been started in early August. This is my second build thread, following on from my Hulk build last year.
It was done as part of a pixar group theme. The Buzz Lightyear built by Scopey can be seen here: http://www.therpf.com/showthread.php?t=273950

I'll give an overview of how it was put together over the next few posts. Unfortunately i probably didn't document this in as much detail as i should have but there were a lot of design changes along the way which made it difficult.

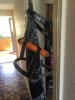
The materials used were as follows:
-2" upholstery foam,
-pvc pipe insulation
-foam pool noodles
-chicken wire
-blue acrylic fur
-a small amount of urethane foam

on top of this there were a lot of consumables like duct-tape, cable ties, some liquid latex, paints and hot glue

overall i think it probably came in at around €200-€250 for all materials.

I'll update this with some photos later.
More to follow
 
Last edited:
Re: Cormac's "Sully", Monsters' University

After some quick sketches (long lost i'm afraid) i began putting together a rough skeleton for sully's body. The general plan involved breaking up the costume into five major components:
-Head
-Arms
-Back/shoulders
-Torso
-Legs & Feet

I started with the Torso.

I used a cheap pair of dungarees/overalls as a basis and to help keep a sense of scale. Having looked at a lot of other sully costumes i was keen to avoid the "walking puppet" look that you can get with some larger costumes. I hoped that using foam insulation and pool noodles would allow for a certain amount of flex and give a more natural appearance.

I used a series of cuts to the foam to get the curvature of these right. All of this was to be hidden in the final product so it was a pretty rough and ready piece of work. There was a lot of duct tape and hot glue used to join the sections and prevent the foam from tearing. There was a certain amount of experimentation at this point as i was keen to capture some of Sully's major proportions.

IMG_4463.JPGIMG_4461.JPGInkedIMG_4472_LI.jpg
(apologies for the landscape photos)

Once i was happy with the "bones" of the torso I took some thin foam sheeting i had available and began to mock up the patterns for the upholstery foam skin. Again this was just a mock up so there was lots of cutting and taping involved.

IMG_4470.JPG

Once i was happy with the rough form i had i removed this foam and flattened it out, making cuts as necessary, to create something that resembled a pepakura template.
IMG_4516.JPG


At this point I was still waiting to buy a sheet of upholstery foam so I put aside my work on this section and began to work on the structure for the Back and Shoulders.

These were done in a similar way. More pool cutting and taping of pipe insulation until i had something that gave the overall proportion i was going for. The main thing i wanted to achieve here was the width of his shoulders and the hunched back.
IMG_4476.JPGIMG_4484.JPGIMG_4485.JPG

I haven't got any pictures of this with the skin attached unfortunately. once it was removed and unfolded i was able to make it into a pattern which i split into two halves.


. IMG_4514.JPGIMG_4515.JPG

these formed the basis for my work with the upholstery foam and also acted as rough guides for the patterns for the Fur so they were set aside for use later.

I'll have to leave it at that for the time being. It's past my bed time. I'll try to get the next stage posted tomorrow.

Feel free to leave any comments or questions.
 

Attachments

  • IMG_4462.JPG
    IMG_4462.JPG
    939.5 KB · Views: 132
Last edited:
Re: Cormac's "Sully", Monsters' University

Hello again,
So once i was happy with the patterns I had created I began to work with the upholstery foam. I transferred the patterns to the foam using a sharpie, then cut them out using a large ceramic kitchen knife. In my experience the best way to get a decent cut through the foam is to use a long blade.
View attachment 712937

These were then folded and glued. I burned through a lot of glue sticks at this stage. It also took longer than expected. The foam insulates the glue so it takes a long time for each seam to set. This means a lot of time is spent holding the seams in place.


While still trying to source the right fur I began to work on other elements. In particular, the arms. Sully's arms hang quite low, almost to his knees, so it was clear that i would have to extend my own. Pipe insulation & some upholstery foam was used to create the forearm structure.
IMG_4490.JPG

In the above photo the hand (without fingers) was mocked up in paper for scale. This was transferred to some EVA foam and upholstery foam was used to build the shape of the outer arm.

(I'm really sorry about the appalling photos in this post. I was figuring this out as i went so i didn't know what would make the final cut)
IMG_4494.JPGIMG_4496.JPGIMG_4497.JPGIMG_4498.JPG


I decided not to include any structural material in the upper arm. This would allow a greater range of motion. A nylon strap was attached at the elbows and used to hang the arms from the shoulders. I included a buckle on each so that they could be easily separated for transport/storage and to make it easier to suit up.

Using some scrap fabric/underlay i mocked up the fur sleeve which was to go over the arms and attached it to the Back/Shoulders section.

IMG_4570.JPGIMG_4572.JPG


Sadly i didn't take many photos at this point so i'll quickly run through the next few steps.

-I attached (using glue and a number of cable ties) the foam skin to the skeleton i had previously made.

-I used the same templates as used for the Upholstery foam and cut out a pattern from some scrap fabric. in this case i used some old curtains. Since this had to go over the foam I allowed a couple of extra inches all around. This was pinned to the foam skin and trimmed/patched/adjusted until i had a decent fit over the body.

- This final pattern was transferred to the fur, cut out and attached to the torso.

I finally had something that looked more like part of a costume than the contents of a bin.
IMG_4611.JPGIMG_4612.JPG

The sense of the scale of this project started to set in while wearing this. It began to feel pretty unwieldy and i could feel my knees hitting the lowest piece of the inner frame. I realised adjustments would need to be made later. However for the time being I decided to leave it as it was. the frame was awkward but it helped to support the shape and made it easier to work on.
 

Attachments

  • IMG_4611.JPG
    IMG_4611.JPG
    992.8 KB · Views: 117
  • IMG_4612.JPG
    IMG_4612.JPG
    970.5 KB · Views: 136
Re: Cormac's "Sully", Monsters' University

Since a lot of this project was just a matter or repeating the previous steps (Skeleton- pattern- Upholstery foam) i thought i'd skip ahead.

Today I'll go through the process of making the costume's head. This starts off pretty poor but i promise if you read to the bottom it comes together in the end.

I began by creating a rough cardboard frame to get an idea of some of the proportions. Wire-mesh and then masking tape were wrapped around this to create the 3D structure.
IMG_4668.JPGIMG_4669.JPG


A quick sketch was then used to help figure out the placement of the main features. I had a plan in mind for making the lower jaw movable. You can see below that I attached a strip of foam where the upper lip was to be. Then I cut out an over-sized space for the mouth.

IMG_4691.JPG
(Honestly! I promise you this turns out pretty well in the end)


IMG_4695.JPG
Getting the pattern for the took a little while but thankfully the pile is quite deep and it hides a lot of imperfections. You can see the inner jaw in the above photo. It was made from a few spare pieces of EVA foam and hung from the inside of the wire mesh. a few pieces of elastic were attached so that it would spring shut.

IMG_4749.JPG(every time i see this photo i wonder how i didn't give up there and then)
IMG_4697.JPG


I created a bottom lip from upholstery foam. I used this to determine the shape of the mouth. The fur and the lit were attached to the inner jaw in the centre with the sides left free.. This created the most natural looking movement.


IMG_4699.JPG
After that some nice big teeth were cut from EVA foam and fitted to the inner Jaw.

IMG_4701.JPG
This made sully happy.


IMG_4780.JPG

When the eyes went in the face really began to come alive. This along with painting the teeth and lips made a huge difference.
The horns were made from foam and wrapped in fabric in a rough spiral. The same fabric was used to make the eyelids before both were coated with liquid latex and acrylic paint.

The eyebrows are made from short sections of foam wrapped in fur and stitched in place and I made a nose from a piece of high density polyurethane foam i had lying around.


As I promised above, this piece of the costume looked pretty rough for a long time. I have to admit I had my doubts that it would work out but thankfully it came together in the end. I'm pretty happy with the results.


IMG_4783.JPGIMG_4788.JPG


Thanks for reading. I hope to get the rest of the build posted this week.
Questions/comments are welcome.
 
Re: Cormac's "Sully", Monsters' University

I continued by taking the patterns u had created for the arms and transferring these to the fur. From that I was able to create a sleeve to go over the forearms i had built. Tney also cover up as far as my shoulder. Upper arm was left loose. Later I would use velcro to attach it to the shoulders of the costume. The sleeves were created with an angle at the elbow. I kept these patterns as it meant i could use them to create the letter jacket later.

IMG_4596.JPGIMG_4702.JPG

The palms of the hands were covered in fabric. This was then painted with a liquid latex and acrylic paint mix. The claws were cut and shaped from EVA foam and attached with hot glue before the back of the hand was covered in fur. Again the depth of the fur helped to hide some of the rougher edges.


IMG_4781.JPG


As i began to assemble more and more of this costume i realised that I had gone overboard with the initial frame. Had i continued as planned the suit would have been far too large and rigid. It would have been impossible to go out in public. The tail in particular was completely impractical.

I began to cut away the frame. The upholstery foam skin gave a lot more rigidity than i had imagined. As a result i only left a few structural pieces around the waste and across the shoulders. I also made the decision to remove the lower portion of the back and the entire tail. The lower back would instead be made from only fur There was definitely a trade off between the overall look and usability here but given that this was to be a halloween costume and needed to be worn in public i don't think i had much of a choice.
IMG_4704.JPG

The fur was attached to the foam using a spray adhesive. I left the areas at each shoulder unattached. under these flaps i fixed some large sections of velcro. I used the "hook" side on this and the "loop" side was glued to the upper sleeves. Between these and the plastic buckles i could attach and detatch the sleeves as necessary. They would also hang in the correct position even when my arm wasn't in the sleeves.
 
Last edited:
Re: Cormac's "Sully", Monsters' University

Personally I think Monsters University is the better of the two movies. That's the fist reason i wanted to make Sully's jacket. Secondly I didn't know, when i began the build, how well the pieces would fit together so the jacket seemed like an obvious way to cheat.

Given the size and shape of the costume a regular jacket pattern was of little use other than an initial visual guide. Instead i just eyeballed it using a roll of paper. I also had the patterns used to make the fur for the body and arms to use as reference. Even when i moved on to the final material I made sure to leave a lot of excess and pin everything in place before I did any permanent stitching.

IMG_4708.JPGIMG_4709.JPGIMG_4707.JPG
(you'd never believe from my face that I enjoy making these)
IMG_4736.JPGIMG_4715.JPG

I did have access to a sewing machine at the time but it was being it's known to be a bit temperamental and I haven't got a huge amount of experience with it. My housemate is a bit more competent with them so I was going to get his help but he was busy with his Buzz build and we were under time pressure at this point. I ended up hand stitching the whole lot. It's not the neatest work I've done but was robust and didn't take too long in the grand scheme of things. I think the whole construction, including mock up, took approximately a week (evenings after work) and the stitching was done on the saturday and sunday.

img1111.jpg
(I had to go house-sit that weekend so Sully kept me company)


IMG_4719.JPG
(transporting Sully didn't get any easier. More on that later)


IMG_4721.JPGIMG_4720.JPG

The logo is just three pieces of felt with the black dot drawn in with sharpie.


IMG_4716.JPG

Final Jacket with most of the stitching done. I think at this stage the collar and the false pockets still had some pins in place.


I was pretty happy with the fit overall. It was never supposed to be able to close as i didn't want it to flap around too much. My main concern was that the arms wouldn't fit properly and could tear the stitching when worn. They seemed to work fine and didn't impede my movement at all.
 
Re: Cormac's "Sully", Monsters' University

Hello All,
I think i've kept you all waiting long enough. I'm sorry for any distress this delay may have caused.

Without further ado here are some photos of the finished project.


IMG_2577.JPG
Me with Scopey. See link to his build thread in the first post.
IMG_2565.JPG
Sully walking on walls because I can't crop the image enough.

14872436_10210421767207803_683414102_n.jpg
Buzz, Wall-e, Sully and Luxo


WhatsApp Image 2017-03-19 at 15.31.59.jpg
A few weeks ago we re-grouped and paid a visit to Temple Street Children's Hospital.

WhatsApp Image 2017-03-19 at 15.31.58_1.jpg

The Staff enjoyed it as much as any of the children.

IMG_2563.JPG

Honorable mention to my sister for her very impressive make-up job.


14937001_10210421764247729_1196014032_n_1.jpg
Our fully assembled Pixar group at Halloween.

Honorable mention to my sister for her very impressive make-up job.

Thanks to our resident snapchat fanatic there's some video from Halloween. You get an idea of the mobility of the costumes. If you skip to about 01:40 you'll see how nicely sully fits in the back seat of a renault clio.
https://youtu.be/ejCGeIs0c6w

That's my build all done and dusted. I hope you've enjoyed it.
Any questions or comments are more than welcome.

Thanks for reading,
Cormac
 

Attachments

  • IMG_2577.JPG
    IMG_2577.JPG
    1.5 MB · Views: 130
Last edited:
This thread is more than 7 years old.

Your message may be considered spam for the following reasons:

  1. This thread hasn't been active in some time. A new post in this thread might not contribute constructively to this discussion after so long.
If you wish to reply despite these issues, check the box below before replying.
Be aware that malicious compliance may result in more severe penalties.
Back
Top