You are using an out of date browser. It may not display this or other websites correctly.
You should upgrade or use an alternative browser.
You should upgrade or use an alternative browser.
Star Destroyer by Zvezda: in my workbench
- Thread starter Scarecrow Joe
- Start date
Thanks so much for sharing your step-by-step pics! I just got my Zvezda SD kit and decided to illuminate it. Like other members here, this will be my first build using fiber optics and I'm alittle nervous...but following your build and Robiwon's has really encouraged me!
A few things that I'm wondering about...
- It appears that you painted the interior black after drilling the FO holes. Did that require cleaning/reopening the holes afterwards? I'm worried about paint clogging those holes and wondered if there is a problem with painting the interior black first and then drill the FO holes.
- Did you use a particular method or have a recommendation for deciding how many total FO strands to insert into each LED bulb fitting? In other words, is there a max amount of strands one should use per LED?
- Did you have a pattern or use a guide to determine where to drill the FO holes in each section of the hull?
- What are you going to use for powering the LEDs - 9V batteries or an AC/DC adapter?
- Where are you going to put the power unit(s)? Inside the model or channeled down through a rod into a base?
Sorry for all the questions, I'm very excited to get started on my own build and want to make sure I understand how the experts are doing it before attempting it myself.
Scarecrow Joe
Sr Member
Thanks for looking into my build!
-You could paint the interior before drilling. I did after because since this is my first FO work Im trying to cover up all the possible areas that could result in light leaking. In my case the paint did not clogged up the holes, results may vary.
-I did not used any particular method but decided to let the strands show me the best place to accommodate them according the internal arrangement of the model structures first. The max of fibers depends on the light source and the diameter of them. Im using 5mm LEDS with 0.5mm FO all tucked inside an 1/4" clear vinyl tubing. My guess is you could fit between 25 to 35 fibers inside easily per LED. Sometimes I stuck just a few FO per LED depending the location. Its a learning process.
-I did not use a pattern. I went randomly into where I wanted a spot of light to show. A pattern will look weird. I did it just as the guys at ILM did it...by ear! LOL!
-I thought for a time to use a 12v external source. But Im leaning to use a 9mm battery outside the model itself, probably hidden in in the base. The 9v source seems more than enough! The LEDS really light up super bright. The blue ones for the engine can be used for a weird blue flashlight if desired. They can light up quite far into my backyard! I will have two circuits, 1 for the whole little light of the model, including the bay and one for the engine. The reason is that I will use a dimmer for the hull and bay lights. Dimming the lights makes them more to scale and better when photographing the model since photography is another hobby of mine.
Hope this helps.
Thanks for looking into my build!
-You could paint the interior before drilling. I did after because since this is my first FO work Im trying to cover up all the possible areas that could result in light leaking. In my case the paint did not clogged up the holes, results may vary.
-I did not used any particular method but decided to let the strands show me the best place to accommodate them according the internal arrangement of the model structures first. The max of fibers depends on the light source and the diameter of them. Im using 5mm LEDS with 0.5mm FO all tucked inside an 1/4" clear vinyl tubing. My guess is you could fit between 25 to 35 fibers inside easily per LED. Sometimes I stuck just a few FO per LED depending the location. Its a learning process.
-I did not use a pattern. I went randomly into where I wanted a spot of light to show. A pattern will look weird. I did it just as the guys at ILM did it...by ear! LOL!
-I thought for a time to use a 12v external source. But Im leaning to use a 9mm battery outside the model itself, probably hidden in in the base. The 9v source seems more than enough! The LEDS really light up super bright. The blue ones for the engine can be used for a weird blue flashlight if desired. They can light up quite far into my backyard! I will have two circuits, 1 for the whole little light of the model, including the bay and one for the engine. The reason is that I will use a dimmer for the hull and bay lights. Dimming the lights makes them more to scale and better when photographing the model since photography is another hobby of mine.
Hope this helps.
Very helpful, thanks so much!
Scarecrow Joe
Sr Member
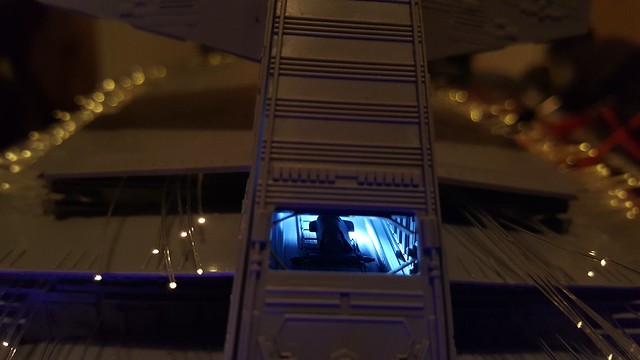
Im at aprox. 90% in the wedding cake part. Ive used so far 575 feet of FO,and just ran out. Since this is my first FO gig I think Ive wasted some material but thats the only way to learn. The upper hull underside looks like a scale model of the world's internet network.
Doing a test:
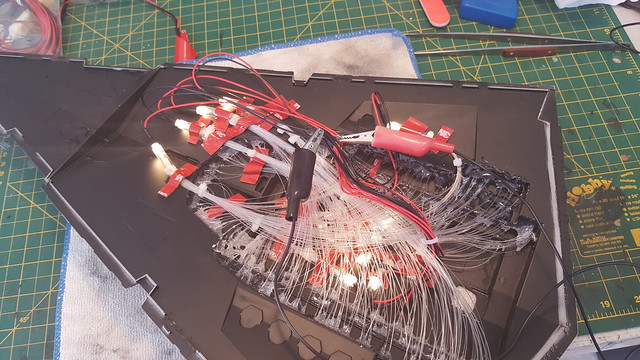 20170226_153346 by Oscar Baez Soria, on Flickr
A close up:
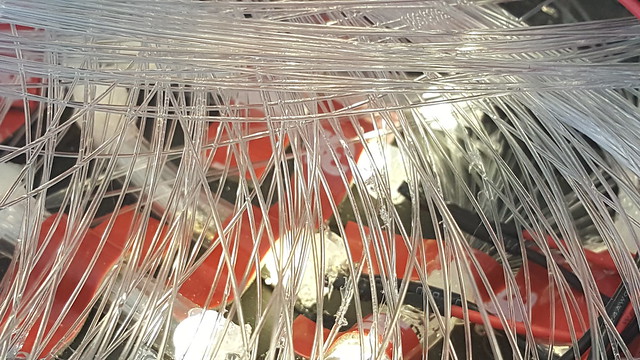 20170226_153356 by Oscar Baez Soria, on Flickr
Main parts minus the tower and bridge:
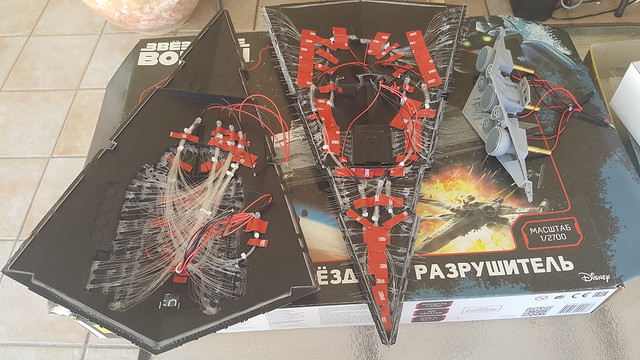 20170226_153548 by Oscar Baez Soria, on Flickr
Its getting time to plan the electronics connections and marry these to get some paint on it, if....there is not a catastrophic event along the way!
Doing a test:
20170226_153346 by Oscar Baez Soria, on FlickrA close up:
20170226_153356 by Oscar Baez Soria, on FlickrMain parts minus the tower and bridge:
20170226_153548 by Oscar Baez Soria, on FlickrIts getting time to plan the electronics connections and marry these to get some paint on it, if....there is not a catastrophic event along the way!
WarpeD
Active Member
cheers:thumbsup:love
Amazing. Wonder how much FO Robiwan ends up using. I'm clearly in need of more with only 200' on hand. Yikes!
Reminds me of one of my favorite hockey tunes... https://www.youtube.com/watch?v=LkIWmsP3c_s
You can eat up a lot of footage with fiber. I learned that when I did my 3 foot Salzo Galactica. That's why I did much shorter fiber runs on the Big Z. I went thru 160 feet with a fair amount of waste (from cut ends). I ordered another 160 as I still had to do the bridge face. I'd say all in all I'll have used about 170 total.
Timmythekid
Sr Member
You can eat up a lot of footage with fiber. I learned that when I did my 3 foot Salzo Galactica. That's why I did much shorter fiber runs on the Big Z. I went thru 160 feet with a fair amount of waste (from cut ends). I ordered another 160 as I still had to do the bridge face. I'd say all in all I'll have used about 170 total.
Oh, dang! Glad you posted that! I've got 500' of 0.25mm and 100' of .5mm in my cart, ready to checkout at the FO store - sounds like way, WAY too much in that case! Maybe a hundred feet of each then (just for some variety).
You should be good with 200 feet. You just need to be mindful of how long your runs are. I kept mine short, but had a lot of waste. You will use more LEDs with short runs. I could have packed another 10-15 fibers in each LED and that would have dropped me a few LEDs that way. There's no science to this stuff. Play with what you have. I make it up as I go along, lol!
Scarecrow Joe
Sr Member
Does the zvezda kit come with fiber optics or will that need to be bought separate and if so where should I be looking for a kit?
Sent from my SM-G930V using Tapatalk
NO FO included. You need to buy the FO separate and build it yourself. Whatever kits, if any, available are usually overpriced
Someone on ebay is selling a lighting kit for the Zvezda. It's basically all the individual components needed, fiber, LEDs, wire, shrink wrap, etc but he's selling it for an outrageous price, and you still have to build it yourself. You can save yourself a LOT of dough buying the stuff separately.
The FiberOpticStore.com is a great source for fiber. I buy my LEDs in bulk (50) pre-wired from eBay for cheap ($6 on average for 50). You'll need a cheap soldering iron ($12), thin rosin core solder (cheap) and a source of extra wire (cheap), and a power supply (also cheap, I use 9v cell phone chargers), some plastic tubing and other hobby bench tools.
The FiberOpticStore.com is a great source for fiber. I buy my LEDs in bulk (50) pre-wired from eBay for cheap ($6 on average for 50). You'll need a cheap soldering iron ($12), thin rosin core solder (cheap) and a source of extra wire (cheap), and a power supply (also cheap, I use 9v cell phone chargers), some plastic tubing and other hobby bench tools.
WarpeD
Active Member
If soldering yourself, add flux. Makes a pretty big difference in flowing solder onto assembled pieces. I didn't use flux for years, and then checked out some electronics videos on Youtube and my ability to quickly and accurately solder stuff changed like magic. For the better, that is.
Scarecrow Joe
Sr Member
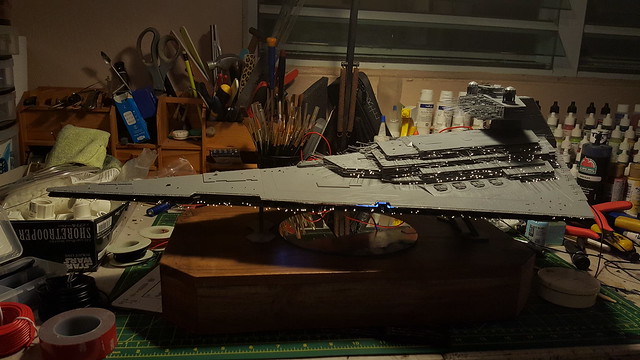
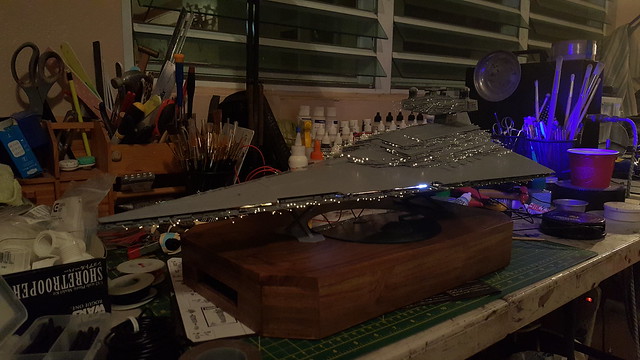
Well after waiting for my FO o come I put aside the SD and did some little projects on the side. Tonight I completed all the soldering to complete the circuits of the upper and lower hull. It all come to a pair of cables that will go to the power source and remote dimmer switch. All the FO work is done. The hulls were paired without gluing and the lighting powered up. Its starting to look like a SD!
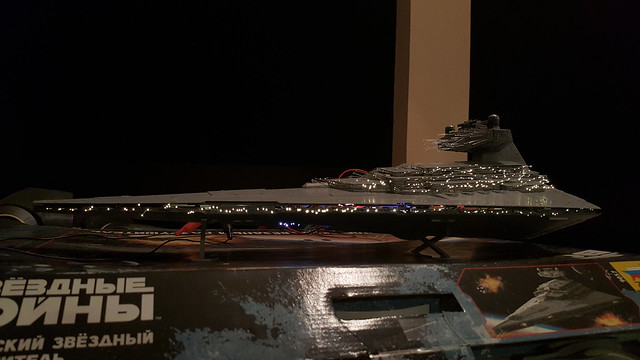 20170318_213129 by Oscar Baez Soria, on Flickr
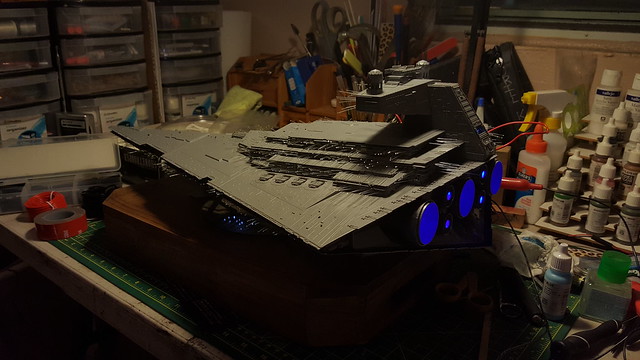
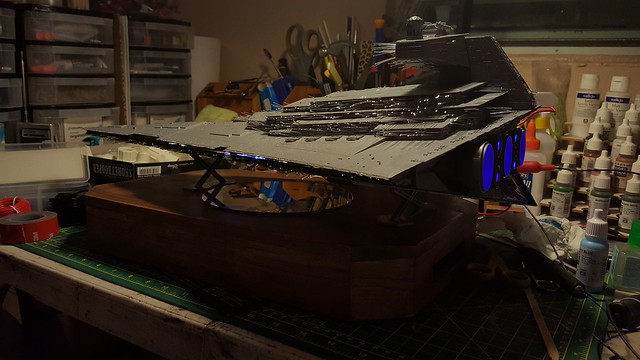
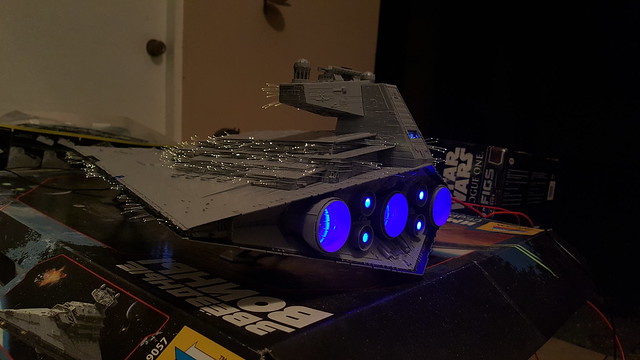 20170318_213153 by Oscar Baez Soria, on Flickr
 20170318_213248 by Oscar Baez Soria, on Flickr
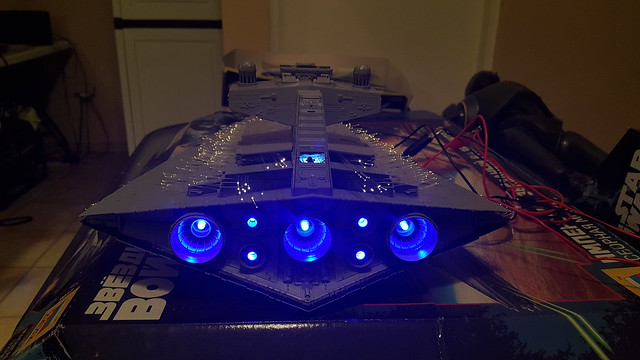 20170318_213222 by Oscar Baez Soria, on Flickr
Base with mirror. Im thinking of adding a nice custom plaque to the base border. Anyone knows where I can find one?
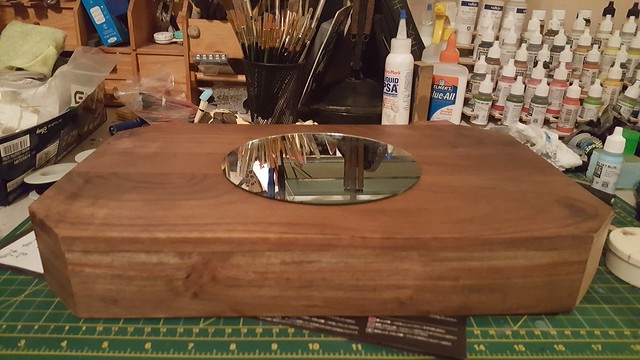 20170318_215600 by Oscar Baez Soria, on Flickr
The ship will be setup higher than in the pics. I will use PVC 1/2 tubing, in all four corners and possibly strong magnets to hold her in place. The wires will run down one tube into the power pack hidden on the base underside.
 20170318_220047 by Oscar Baez Soria, on Flickr
 20170318_220109 by Oscar Baez Soria, on Flickr
 20170318_220137 by Oscar Baez Soria, on Flickr
 20170318_220437 by Oscar Baez Soria, on Flickr
Once its finished a proper set of images will be taken. With cell phone pics the points of light look bigger than what they appear. Im happy with the progress so far. The decision of going with warm white LEDS really makes it more screen accurate. Now comes....PAINTING!!!!! :behaveD :cheers!!!
Any comments welcomed!
20170318_213129 by Oscar Baez Soria, on Flickr20170318_213153 by Oscar Baez Soria, on Flickr20170318_213248 by Oscar Baez Soria, on Flickr20170318_213222 by Oscar Baez Soria, on FlickrBase with mirror. Im thinking of adding a nice custom plaque to the base border. Anyone knows where I can find one?
20170318_215600 by Oscar Baez Soria, on FlickrThe ship will be setup higher than in the pics. I will use PVC 1/2 tubing, in all four corners and possibly strong magnets to hold her in place. The wires will run down one tube into the power pack hidden on the base underside.
20170318_220047 by Oscar Baez Soria, on Flickr20170318_220109 by Oscar Baez Soria, on Flickr20170318_220137 by Oscar Baez Soria, on Flickr20170318_220437 by Oscar Baez Soria, on FlickrOnce its finished a proper set of images will be taken. With cell phone pics the points of light look bigger than what they appear. Im happy with the progress so far. The decision of going with warm white LEDS really makes it more screen accurate. Now comes....PAINTING!!!!! :behave
D :cheers!!!Any comments welcomed!
WarpeD
Active Member
Since this is going to be your first time experiencing the task of trimming the FO, I'm going to pay close attention to your thoughts during and after the process. After Robiwon's related posts, I'm finding confidence in the concept, but the perfectionist in me is going to want to find a way to trim really, really close to flush. Hopefully an "easy" way!
Scarecrow Joe
Sr Member
eBay seller :customplaques2014 sells many different SW plaques. Including several Star Destroyers.
I just bought a few for my projects, and they look fantastic.
I checked him but did not see anything for a Star Destroyer. :unsure
I checked him but did not see anything for a Star Destroyer. :unsure
look through these plaques: http://m.ebay.com/itm/Master-Replic...%3Ae6e4520f15a0a6a5e9b1bdfcfffcaf80%7Ciid%3A4
Scarecrow Joe
Sr Member
I see! Thanks. I need to make some measurements to see if it would fit, or if not what mods need to be done.

Similar threads
- Replies
- 14
- Views
- 2,418
- Replies
- 6
- Views
- 635