You are using an out of date browser. It may not display this or other websites correctly.
You should upgrade or use an alternative browser.
You should upgrade or use an alternative browser.
Randy Cooper Ghost
- Thread starter akumazeto
- Start date
Muzza
Sr Member
My question to you is, have you built resin garage kits before?
This is a great kit and well detailed but with most full resin kits you need a few more skills in you modelling arsenal then if you are just building out of the box plastic kits.
First check all our parts, I was missing two Items that I have decided to scratch build myself rather than getting Randy to send. I know Randy would send them if I told him.
Yes there are air bubbles in some of the resin parts mainly the two large engines and two large ones at the bottom where the two large engines connect to, Randy talks about them in his instructions.
akumazeto
Sr Member
This is my first LARGE model being built with resin. I have built some tanks and such for the board game Bolt Action. I am assuming bubbles just get popped so to speak filled and if there was any detail or panel lines they get re scribed or scratch built. I know step 18 confuses me as I dont know what is to be cut or the end result in that picture. But again I think he is casting my kit this week and shipping out a bunch of stuff he said. So if you have done step 18 please do share. I will post pictures and such when I get them. I am a car body guy so fit and finish is something I do daily. I am excited.
Muzza
Sr Member
This is my first LARGE model being built with resin. I have built some tanks and such for the board game Bolt Action. I am assuming bubbles just get popped so to speak filled and if there was any detail or panel lines they get re scribed or scratch built. I know step 18 confuses me as I dont know what is to be cut or the end result in that picture. But again I think he is casting my kit this week and shipping out a bunch of stuff he said. So if you have done step 18 please do share. I will post pictures and such when I get them. I am a car body guy so fit and finish is something I do daily. I am excited.
Where the bubbles are will need a different approach when filling than the putty and sand method. An easy way to take care is to Drill oit the bubble with a drill and use some styrene rod to fill the hole glue in to place with super glue then trim and sand.
.JPG") is this the stage you are talking about?
is this the stage you are talking about?akumazeto
Sr Member
Thanks for that awesome tip. I just found a store that sells evergreen stock locally so I have picked up some bits already. Yeah thats the image. I know he is saying to cut but his diagram does not make sense and it very well might be because I just dont have the piece in hand to look at. There was another one were he was talking about greeblies for the side of docking rings. There are 4 bits in the lower picture but only one style that is in the upper picture. So I dont know if the others are option pieces or if they go elsewhere and he just used that picture to show the docking ring bits.
Actually wait that is not the image let me go dig it up.
Actually wait that is not the image let me go dig it up.
akumazeto
Sr Member
I guess I dont fully understand the picture you share either but after looking at this one again I get what I need to do. But your please do explain. How deep did you drill?View attachment 702398
Muzza
Sr Member
I guess I dont fully understand the picture you share either but after looking at this one again I get what I need to do. But your please do explain. How deep did you drill?View attachment 702398
I only drill 2mm deep also depending on the diameter of the styrene I would have used 3 sizes of styrene rod to fill the air bubbles it just depends on the size of the bubble. the very large hole Randy describes in picture A ext 0 I used Apoxie sculp, fantastic stuff get it you will use it to death and much better than the fillers the hobby shops sell for most of you filling needs. Don't get me wrong you will also need the putty as well just not as much of it.
akumazeto
Sr Member
I only drill 2mm deep also depending on the diameter of the styrene I would have used 3 sizes of styrene rod to fill the air bubbles it just depends on the size of the bubble. the very large hole Randy describes in picture A ext 0 I used Apoxie sculp, fantastic stuff get it you will use it to death and much better than the fillers the hobby shops sell for most of you filling needs. Don't get me wrong you will also need the putty as well just not as much of it.
Do share any more info you might have regarding this. Seems if people do have this kit nobody is posting about it. Also pictures of your fix would be awesome. I will pickup some putty for sure.
Last edited:
mcusanelli
Well-Known Member
A great way to fill holes and repair parts is with superglue and talcum powder - mix a few drops with some powder into a paste, apply, and in a few minutes, its ready to sand! I like Lock-tite, and dollar store baby powder, works great, sands great, and sticks to many types of resin, vinyl, plastic, and metal.
Great tip with the drilling and styrene rod. I've never heard that one before. Watch out and don't wait too long after the superglue is kicked because it will become harder than the resin. Then you're sanding more resin than superglue. I learned that the hard way. Mr. Surfacer is also one of the best things I've found to take care of pinholes.
Muzza
Sr Member
Great tip with the drilling and styrene rod. I've never heard that one before. Watch out and don't wait too long after the superglue is kicked because it will become harder than the resin. Then you're sanding more resin than superglue. I learned that the hard way. Mr. Surfacer is also one of the best things I've found to take care of pinholes.
Using the styrene rod method you don't have to worry about the hardness of the super glue as it is only attached on the hole and around the rod, plus the styrene it self is much softer than the resin so filing it down and trimming it is very easy.
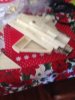
Mr Surfacer is also my go to for resin kit for filling pin holes but not detailed kits only smooth flat surfaces. I find if you use a spray putty on a detailed surface you will lose the sharpness of the casing plus detailed parts are very hard to sand and clean up. I will attach some pictures of the styrene method and show you the best place to use it and why.
Using the styrene rod method you don't have to worry about the hardness of the super glue as it is only attached on the hole and around the rod, plus the styrene it self is much softer than the resin so filing it down and trimming it is very easy.
I was referring to the person above talking about Super glue and talc. It got mixed in with my comment on your styrene top tip!
Muzza
Sr Member
I was referring to the person above talking about Super glue and talc. It got mixed in with my comment on your styrene top tip!
Sweet!


Similar threads
- Replies
- 3
- Views
- 1,096