DC Universe Steppenwolf Figure Re-paint

Nm1cciola

Active Member
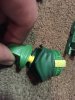
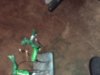
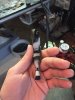
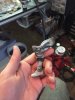
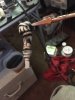
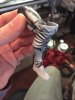
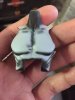
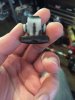
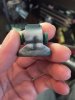
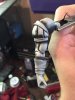
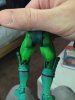
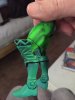
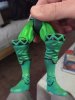
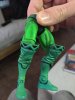
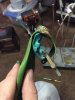
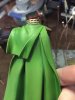
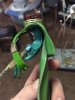
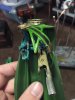
So I am going to be starting this project soon. I plan on repainting him to give him more life than the casting the figure is pretty much perfect I didn't have to add any Apxie Sculpt work to this figure. I just did some work in this cast and already broke him apart. See attached Pictures.
IMG_2320.jpgIMG_2321.jpgIMG_2322.jpgIMG_2323.jpgIMG_2324.jpg
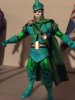
I plan on repainting him to make him more look like his animated self.
steppenwolf-1400.jpg
 
Last edited:
PART #2:
I took the figure apart and did some work on him already to get him set for painting.
IMG_2329.jpgIMG_2330.jpgIMG_2331.jpgIMG_2332.jpgIMG_2334.jpgIMG_2339.jpgIMG_2338.jpgIMG_2336.jpgIMG_2335.jpg
One thing I plan on doing is placing magnets on the hips of the figure so as I can magnetize the accessories that he came with so as I can place them on his belt. Below you see pictured some work some on this figure I already sanded down the joints, took out the disc's sanded those down as well to avoid paint rub.I tried to glue the disc area back in place but that wasn't holding so I decided to cop this tutorial which had me using screws and drilling a hole to tighten the articulation on the disk I also switched the disks inside the body of the figure the skinny disk is now the fat side and vise-versa. Had to do some work to fix that by cutting some sheet styrene and glueing it in place with industrial strength glue. Now just gotta wait for everything to dry to see how it will fit together. Till next time.
IMG_2341.jpgIMG_2346.jpgIMG_2344.jpgIMG_2343.jpgIMG_2342.jpgIMG_2347.jpg
 

Attachments

  • IMG_2337.jpg
    IMG_2337.jpg
    1.7 MB · Views: 174
  • IMG_2345.jpg
    IMG_2345.jpg
    2 MB · Views: 168
Last edited:
UPDATE TIME:
I was able to work on this a little and I was able to underside this as well as paint his face. Hope you like what you guys see.
UNADJUSTEDNONRAW_thumb_30a3.jpgUNADJUSTEDNONRAW_thumb_30a5.jpgUNADJUSTEDNONRAW_thumb_30a6.jpgUNADJUSTEDNONRAW_thumb_30a7.jpgUNADJUSTEDNONRAW_thumb_30a4.jpgUNADJUSTEDNONRAW_thumb_30a2.jpgUNADJUSTEDNONRAW_thumb_3089.jpgUNADJUSTEDNONRAW_thumb_308a.jpgUNADJUSTEDNONRAW_thumb_308b.jpgUNADJUSTEDNONRAW_thumb_308d.jpgUNADJUSTEDNONRAW_thumb_308c.jpgUNADJUSTEDNONRAW_thumb_309a.jpgUNADJUSTEDNONRAW_thumb_3098.jpgUNADJUSTEDNONRAW_thumb_3095.jpgUNADJUSTEDNONRAW_thumb_3099.jpgUNADJUSTEDNONRAW_thumb_3097.jpgUNADJUSTEDNONRAW_thumb_3094.jpgUNADJUSTEDNONRAW_thumb_309f.jpgUNADJUSTEDNONRAW_thumb_309d.jpgUNADJUSTEDNONRAW_thumb_309e.jpg
 

Attachments

  • UNADJUSTEDNONRAW_thumb_308f.jpg
    UNADJUSTEDNONRAW_thumb_308f.jpg
    148.2 KB · Views: 134
  • UNADJUSTEDNONRAW_thumb_308e.jpg
    UNADJUSTEDNONRAW_thumb_308e.jpg
    156.9 KB · Views: 133
  • UNADJUSTEDNONRAW_thumb_3096.jpg
    UNADJUSTEDNONRAW_thumb_3096.jpg
    142.4 KB · Views: 123
  • UNADJUSTEDNONRAW_thumb_3083.jpg
    UNADJUSTEDNONRAW_thumb_3083.jpg
    161.8 KB · Views: 123
Last edited:
PART 2:
Some more WIP progress shots, My only complaint s the face it's kinda dark yellow will have to tinker with that.
UNADJUSTEDNONRAW_thumb_3086.jpgUNADJUSTEDNONRAW_thumb_3083.jpgUNADJUSTEDNONRAW_thumb_3087.jpgUNADJUSTEDNONRAW_thumb_3084.jpgUNADJUSTEDNONRAW_thumb_3088.jpgUNADJUSTEDNONRAW_thumb_3085.jpgUNADJUSTEDNONRAW_thumb_3086.jpgUNADJUSTEDNONRAW_thumb_3083.jpgUNADJUSTEDNONRAW_thumb_3087.jpgUNADJUSTEDNONRAW_thumb_3084.jpgUNADJUSTEDNONRAW_thumb_3088.jpgUNADJUSTEDNONRAW_thumb_3085.jpgUNADJUSTEDNONRAW_thumb_30a1.jpgUNADJUSTEDNONRAW_thumb_30a0.jpgUNADJUSTEDNONRAW_thumb_30a9.jpgUNADJUSTEDNONRAW_thumb_30a8.jpg
See ya Next time
 

Attachments

  • UNADJUSTEDNONRAW_thumb_309d.jpg
    UNADJUSTEDNONRAW_thumb_309d.jpg
    153.7 KB · Views: 133
  • UNADJUSTEDNONRAW_thumb_309c.jpg
    UNADJUSTEDNONRAW_thumb_309c.jpg
    150.2 KB · Views: 132
  • UNADJUSTEDNONRAW_thumb_309b.jpg
    UNADJUSTEDNONRAW_thumb_309b.jpg
    148.3 KB · Views: 114
  • UNADJUSTEDNONRAW_thumb_309a.jpg
    UNADJUSTEDNONRAW_thumb_309a.jpg
    156.4 KB · Views: 119
  • UNADJUSTEDNONRAW_thumb_308f.jpg
    UNADJUSTEDNONRAW_thumb_308f.jpg
    148.2 KB · Views: 123
Last edited:
I finally finished this figure what I will be posting is some WIP progress shots.
IMG_2390.jpgIMG_2396.jpgIMG_2395.jpgIMG_2394.jpgIMG_2393.jpgIMG_2392.jpgIMG_2391.jpgIMG_2388.jpgIMG_2389.jpgIMG_2397.jpgIMG_2399.jpgIMG_2400.jpgIMG_2401.jpgIMG_2402.jpgIMG_2403.jpgIMG_2404.jpgIMG_2405.jpgIMG_2406.jpgIMG_2398.jpgIMG_2407.jpg
 

Attachments

  • IMG_2412.jpg
    IMG_2412.jpg
    1.1 MB · Views: 166
  • IMG_2411.jpg
    IMG_2411.jpg
    1.4 MB · Views: 140
  • IMG_2410.jpg
    IMG_2410.jpg
    1.3 MB · Views: 184
  • IMG_2409.jpg
    IMG_2409.jpg
    1.2 MB · Views: 154
Some more WIP progress shots:
IMG_2409.jpgIMG_2426.jpgIMG_2425.jpgIMG_2424.jpgIMG_2423.jpgIMG_2413.jpgIMG_2412.jpgIMG_2411.jpgIMG_2410.jpgIMG_2427.jpgIMG_2429.jpgIMG_2430.jpgIMG_2431.jpgIMG_2432.jpgIMG_2433.jpgIMG_2434.jpgIMG_2435.jpgIMG_2436.jpgIMG_2428.jpgIMG_2437.jpg
 

Attachments

  • IMG_2441.jpg
    IMG_2441.jpg
    1.3 MB · Views: 144
  • IMG_2440.jpg
    IMG_2440.jpg
    1.3 MB · Views: 152
  • IMG_2439.jpg
    IMG_2439.jpg
    1.4 MB · Views: 147
  • IMG_2438.jpg
    IMG_2438.jpg
    1.3 MB · Views: 141
Last post of some WIP progress shots:
The figure changed a lot in the final phase the collar around his neck I had a hard time dealing wit trying to gather the deal to show so I used metallic gold and dry brushed around his collar to order to bring out the design around his neck. I ask in the final phase coated some of there joints that re going to rub together with super glue to give them double protection then hit the figure with a final phase of dull coating.
IMG_2439.jpgIMG_2443.jpgIMG_2442.jpgIMG_2441.jpgIMG_2440.jpgIMG_2438.jpg
FINAL FIGURE PAINTED:
This is the final figure new to his original one from the factory with the yellow skin, With this paint job I wanted to harken it to the OG comic costume that he donned in Jack Kirby's run. Also the flesh face tone on this figure was change that I chose to carry over from the animated figure the yellow wasn't twerking and it ended up just clashing with the various shade of green that I painted. I think that this shows improvement over the Darkseid figure that I repainted. Some thing I learned while painting this is figures with capes of anything that protrudes from the back or any sort of connective thing on the back of the figure can hinder assembly and create more problems that need mending. Also if using any type of enamel paint on small delineated areas to highlight seams of what not let it completely cure even if it is dry to touch.
IMG_2450.jpgIMG_2449.jpgIMG_2448.jpgIMG_2447.jpgIMG_2445.jpgIMG_2444.jpgIMG_2453.jpg
Figure next to my repainted Darkseid:
IMG_2454.jpg IMG_2452.jpgIMG_2451.jpg
 

Attachments

  • IMG_2446.jpg
    IMG_2446.jpg
    1.3 MB · Views: 145
Last edited:
This thread is more than 7 years old.

Your message may be considered spam for the following reasons:

  1. This thread hasn't been active in some time. A new post in this thread might not contribute constructively to this discussion after so long.
If you wish to reply despite these issues, check the box below before replying.
Be aware that malicious compliance may result in more severe penalties.
Back
Top