300 Helmet (Sgt. Fang) finished - bigger pics added!

KnightAsylum

Sr Member
Not much to say here, Nothing fancy - I got this helmet in the mail yesterday and after a little dremel work and paint, it is done. I was not after any particular character helmet just wanted it to look like it was from the battle.
Thanks, Sarge - for a great sculpt!
****now with bigger pics*******thanks for the tip, Slave1pilot.


Last edited:
Re: 300 Helmet (Sgt. Fang) finished

That looks GREAT!!! :eek

Except for the pitting, I left the actual damage on the sculpt deliberately light so people could do exactly what you did and customize their own.

Can't wait for the bigger pics. :thumbsup

-Sarge
 
Thanks! :)
Having finished it, I now have the urge to get a shield, spear and sword to go with it - seems like the set of 4 would make a cool (if not, large) wall display. The Neca sword looks pretty nice so maybe I sould get one of those next.
 
It's was fairly simple.
I use all spray cans and brushes.
For this project I wanted a Bronze look - So instead of a gloss black base coat (which I use for Chrome, Gold, etc...anything shinny) I used a Gloss Red base instead,over Krylon primer, in several coat - the helmet actually looked cool covered in blood red. :)
Then I spayed one coat of Rust-oleum gold spray paint (only one coat to keep a little of the red in the color.) I let that dry overnight ,then I use Wal-mart (Applebarrel brand paint is $0.40 and the bottle is 3 times the size of model paints) black paint and bush the whole thing with that black paint.
I then immediatly wiped the helmet with paper towels to get all the extra back off (which keeps it in the cracks & pitting) then I took a damp paper towl and ran it over the helmet to clear off any black haze and keep it not looking too dull (Since the Black is an Water-based Acrylic and the gold is not , you can wipe the black off all day without touching the gold under it.)
I usually top any paint job with a Matte or a glossy clear coat, but in this case I have not done that. This helmet actualy has some of both so I didn't want to make it all shinny or all dull, so I think I will skip the clearcoat on this one. That will keep my weathering dull, but ensure it still have some of that shinny metal bronze look to it.
 
Last edited:
Not yet.

By the very nature of being a geek, comic and prop collector I am single (darn parents made me move out of their basement about 19 years ago too so there is no one around to take the picture):lol

And my attempts to do the web popular picture of yourself in a mirror didn't come out so well.

It does fit by big head very well, with some room to spare, and if I can figure out the timer part of my camera I will try and get a shot of the helmet on tonight.:thumbsup
 
Thank you very much. I was thinking of using Rubb and Buff over black primer.

useful technigues thank you.
Turo
 
Do you have any shots of it on someone's head ?

This is the only one so far, I put way too much padding in the top, so I had to crunch it way down and try to get a shot before it worked it's way back up and made me look like a conehead. :lol

Also, I've got my head tilted down and it's making the nasal look longer than it really is. That and the boy kept cracking me up while I was trying to look grim and snap the photo at the same time. :$

007_20A.jpg


KnightAsylum, any chance you could take some shots wearing yours for us?

Thanks!

-Sarge
 
Oh- Here's my painting tutorial from the other thread-

PAINTING TUTORIAL

This will also work for any other aged bronze thing you ever want to do.
smile.gif


YOU'LL NEED
Primer (any color)
Dark Brown spray paint
Bright gold or brass spray paint (brass dries better)
Spanish Copper Rub n' Buff
Antique Gold Rub n" Buff
About a dozen 1.5" squares of velour, foam backed car headliner fabric (any color)

Once you have your helmets all cut out and the edges sanded, wash the whole thing in hot water and Dawn dishsoap to remove any seperator. The stuff I use says it's paintable, but why take the chance?

Prime your helmet a couple coats, then let dry.

When it's dry, give it several coats of the dark brown (really dark, almost black). Let that dry.

When the brown's good and dry, LIGHTLY mist the whole helmet with the brass or gold. What you're shooting for now is just to make it look brown with a few gold sparkles when the light hits it- this will look really good in all the little pockmarks and creases later.

Now this is where the serious detail starts. Take one of your velour headliner squares, and "load" or "pack" it with Spanish Copper rub n' Buff. Take that and wipe off any excess on a piece of scrap material first, then start lightly stroking it over the helmet's surface. DON'T force it down into any tight corners or any of the pockmarks- you're wanting to simulate an almost aged bronze statue look where the low areas are untouched by the polishing cloth.

When that's done, take a fresh velour square pack it with the Antique Gold the same as you did for the Spanish copper, and then just barely brush all the raised detail. Also, don't go as close to the edges w/ the gold as you did with the copper- you want to fade gradually from the dark, gold speckled brown to the Spanish copper, then (sparingly) to the gold in the big areas and sharp edges like the nasal crest, the edges of the rear flange, etc.

When that's done take another clean velour square and lightly buff the whole helmet to help the colors all blend together and get a nice metallic shine!
smile.gif


You can finish you helmet further if you want, but I wouldn't recommend rinsing with verdegris, I didn't see any in my research, and that would make it look like a Stargate prop anyway.
tongue.gif
Also, I wouldn't use any clear coat either, one of the great things with Rub n' Buff is that it gives a great metallic finish by itself and if it ever gets dull, just buff it up again.
thumbsup.gif


For lining/ sizing your helmet, I'd recommend lining it with fake (or real if you want to spend the money) sheep skin to give it that authentic touch.
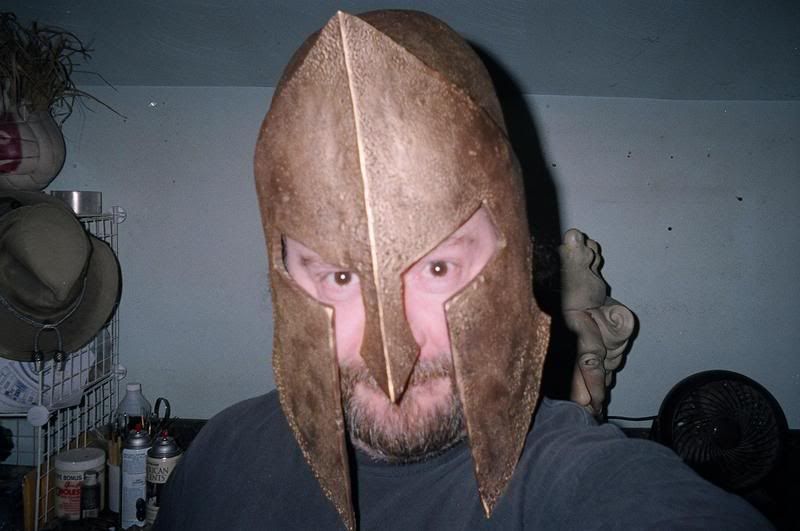
And there you go!

-Sarge
 
This thread is more than 16 years old.

Your message may be considered spam for the following reasons:

  1. This thread hasn't been active in some time. A new post in this thread might not contribute constructively to this discussion after so long.
If you wish to reply despite these issues, check the box below before replying.
Be aware that malicious compliance may result in more severe penalties.
Back
Top