You are using an out of date browser. It may not display this or other websites correctly.
You should upgrade or use an alternative browser.
You should upgrade or use an alternative browser.
Zvezda Star Destroyer-a WIP
- Thread starter Robiwon
- Start date
PHArchivist
Master Member
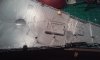
Thanks for sharing the shot of the blockade runner. But almost more cool is seeing the close up detail of the hanger bay. Impressive work from Zvezda.
soulsaman
Active Member
I have 160 feet. Pretty sure I'll use all of it.
Looks great!
I'm aware that this hangar bay isn't as deep as it should be but do you think the Tantive will fit inside ok after you add the clamp?
Sent from my iPhone using Tapatalk Pro
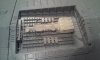
Got all the fiber finished and trench LEDs hooked up. I used almost 160 feet of fiber in this. I need to finish wiring the trench LEDs tomorrow after the glue cures.
Attachments
PHArchivist
Master Member
You make it look all too easy...
Goodtime
Active Member
Great work, Robiwon! I've been working on mine a little over a week now and it's coming along nicely. I've been spending most of the time drilling out holes with a # 80 bit for .25mm fiber. It's been tedious, to say the least.
The one small thing that was driving me crazy was trying to figure out where parts K3 and K4 were supposed to go. I finally realized that they are duplicates of G8 and G9 (bridge sides).
Looking forward to your build progress!
The one small thing that was driving me crazy was trying to figure out where parts K3 and K4 were supposed to go. I finally realized that they are duplicates of G8 and G9 (bridge sides).
Looking forward to your build progress!
Goodtime
Active Member
Yes they are duplicates. Have fun and where are the pictures? Feel free to share them here if you want!
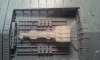
This has been a fun build so far. Up to this point, I have drilled my fiber holes and started assembling the superstructure.


Scarecrow Joe
Sr Member
Yes they are duplicates. Have fun and where are the pictures? Feel free to share them here if you want!
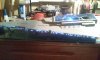
Hope you dont mind...
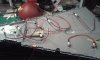
Fiber optic is officially a pain in the *****! LOL! Its just like me to choose a Star Destroyer as my FIRST attempt at fiber optic lighting.
Scarecrow Joe
Sr Member
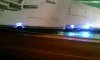
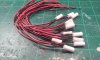
Using 0.5mm. Im thinking of adding a few red points of light here and there to add some variation.
Goodtime
Active Member
Looking good!!!
Thank you! This really is a beautifully engineered kit!
- - - Updated - - -
Hope you dont mind...
Fiber optic is officially a pain in the *****! LOL! Its just like me to choose a Star Destroyer as my FIRST attempt at fiber optic lighting.
https://c1.staticflickr.com/1/446/32354733822_3cee03d6c5_z.jpg20170124_164811 by Oscar Baez Soria, on Flickr
https://c1.staticflickr.com/1/528/32374226042_6ddde6c2e2_z.jpg20170125_203722 by Oscar Baez Soria, on Flickr
https://c1.staticflickr.com/1/426/32147817000_184c2ee90f_z.jpg20170125_203612 by Oscar Baez
Looking great!
That's what I'm going to do as well.
No pics yet, but I removed the trench "back wall" on the upper hull last night. Because fibers inserted in the trench above the halfway mark would interfere with the upper hull back wall. I simply took my side cutter and cut the wall off. I left a little bit at the nose for alignment purposes and then around the two side indentations. Those, along with the inner bracing will align the rear of the hulls along with the engine block.
The nice thing is that the upper hull does indeed rest directly on the trench detail parts. This allows the upper hull to still be glued completely to the lower hull. I'll again use the Testors Model Master liquid glue for that as I'll be able to run a bead down each side of the lower hull trench parts.
Oh, and I've decided to add remote control to my lights. The engines will be on a separate circuit, so I can dim the fibers while leaving the engines at full intensity.
Scarecrow Joe
Sr Member
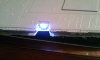
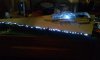
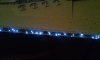
Robiwon, check this out!
I am definitively going warm! In color that is. I had a white warm led from a previous project and did a quick test on the work Ive done on the bridge. I lit up only half of the fibers but, man I do love how it looks. Its very close to the original look in Episode 4.
 20170126_184234 by Oscar Baez Soria, on Flickr
Im running through drill bits too fast...LOL! I just ordered a few (a LOT!). Using #73 bits which provide an adequate tight but also comfortable hold on the 0.5mm fibers.
I am definitively going warm! In color that is. I had a white warm led from a previous project and did a quick test on the work Ive done on the bridge. I lit up only half of the fibers but, man I do love how it looks. Its very close to the original look in Episode 4.
Im running through drill bits too fast...LOL! I just ordered a few (a LOT!). Using #73 bits which provide an adequate tight but also comfortable hold on the 0.5mm fibers.
Similar threads
- Replies
- 14
- Views
- 2,418
- Replies
- 6
- Views
- 635