I've been spending the last couple weeks trying out different paint colors and methods for the windvane section after seeing all of the new photos and videos from the pop culture quest video. I definitely see brown, not so much copper or metallic color, but certainly not just black.
However, after years of looking at stills and reference photos of the V2 I still want to see black. So I set about trying to find a paint that would give me a dark black look from a distance, but upon closer inspection and good lighting would certainly show the windvane to be brownish.
I started out with aged bronze and oil rubbed bronze spray paints but when compared to satin black they appeared kind of gray. I then moved on to espresso and dark walnut spray cans, but those turned out too brown.
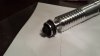
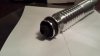
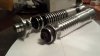
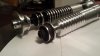
Lastly, I tried out Testors model paint brand color Rubber. I shot it through my $30 badger airbrush and really liked the color but thought it could still be a bit darker. I added in about a half bottle of Tamiya Nato black and wound up with a nice brown color that could easily pass for black in some light, but has a rich brown color under different lighting.
It could probably be a bit lighter and more brown but I feel like I got the balance I was looking for.
I snapped a couple pictures of my 1st run V2 in satin black next to my 2nd run V2 with this paint mixture. The pictures are taken with a 4+ year old phone so they are not the best, but I would appreciate everyone's thoughts and opinions.
Dan
")