hydromatic93
Active Member
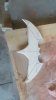
I wanted to redo my BvS batarang from my other posts as it was not very screen accurate and didn't look very blade-like. This time I planned it out much better from the initial steps, I drew out a sketch of how I wanted the blade to appear (more curved), cut it in half so I could just flip it for symmetry and traced it out onto some 6mm balsa wood from a craft store. I cut it out with an exact-o knife and did some shaping with a rotary sanding drum (didn't add any edges, just the outline of the blade), and then made a junk mold with EasyCast resin as it would be easier to sand into shape. From there I just lightly carved some guidelines on where the blade and body met and sanded down the blades to points.


I used the QMX version as a reference point this time, as the screen grab from my last build wasn't very accurate. I feel that it should turn out pretty good, just need to carve in those lines in the body and thin guidelines for the chrome part (so the end paint job is identical for successive castings).
I do have a question about molding though, with the last one I added vents to the bat ears and wing tips and had the pour in funnel on the 'head' and they turned out great, but the wing edges kept catching bubbles, I assume because it would hit the 'roof' of the mold and get stuck. Would it be better to make the bottom tip the pour in funnel and just sand that down every time, or should I try and add very thin vents to the wings and hope they allow bubbles to escape?