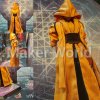
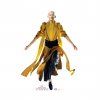
The Ancient One yellow costume and Sling ring prop Planning (Doctor Strange 2016)

AcerRhus

New Member
Hello, This is my first build on the forums, although not my first costume. My aim is to complete this by Montreal Comic Con, July 7th.
It's been hard to get a good look at the costume with all those layers. I would appreciate any feed back on any details I've over looked. I did a technical vector drawing to try to make sense of the layers.
To me it looks like there are 8 hanging panels of fabric from the waistline and two pairs of "scarf" shaped fabric attached from the back of the collar. It's not too noticeable but there are two back cords that are covered in yellow fabric in the middle that wrap around the back of the hood to the waistline. The sash from the front that is tucked into the belt appears to be an extension of the hood that is dyed.
As for the sling ring I've originally planning to get it casted and trimmed by a company such as shape ways but I've been quoted $900 USD for brass and $300 USD for gold coloured steel. I figure it would be vastly cheaper if I bought a bigger ringless ring former and crucible and bought brass myself or machined and trimmed it myself. I could only find 2 photos one form a more still and another from a photo of the SDCC costume display. I haven't modelled all the details yet although I might as well do a wax up by hand if I'm going to cast it myself. The largest ring former I found that is marketed for the machine I have access to (a Centrifugal broken arm casting machine) is 2 inches in diameter I might have to cast the ring in two parts and solder them together.

Thanks for your time.
f546eb7139a6394482d913d4bff103b1 copy.jpgScreen Shot 2016-12-10 at 12.08.59 AM.pngScreen Shot 2016-12-10 at 12.08.29 AM.pngScreen Shot 2016-12-08 at 3.44.04 PM.pngScreen Shot 2016-12-08 at 3.36.56 PM.pngScreen Shot 2016-12-03 at 11.03.34 PM.pngScreen Shot 2016-12-03 at 11.03.15 PM.pngmrd2720.comp_.037590.lvallee_v201.1039.jpghood3.jpgScreen Shot 2016-12-19 at 4.00.36 PM.png
 
tumblr_ogfwrlYQJc1uu8tk1o1_1280.jpgScreen Shot 2016-12-03 at 11.03.34 PM.png????Hottoys?Doctor-Strange?16-The-Ancient-One-?????1.jpg????Hottoys?Doctor-Strange?16-The-Ancient-One-?????2.jpg????Hottoys?Doctor-Strange?16-The-Ancient-One-?????3.jpg????Hottoys?Doctor-Strange?16-The-Ancient-One-?????4.jpg855aa7904cae2c5ce175461014b5f5ea.pngAdvanced-Graphics-Doctor-Strange-Ancient-Once-Stand-Up-2331.jpgbb7acfc65cb0bfb0c6a9c01977905387.pngdoctor_strange-movie-wong-and-the_ancient_one-(563).jpgdoctor-strange-tilda-swinton-ancient-one-209086.jpgthe-ancient-one-does-not-stand-alone-image-marvel-comics.jpgI too am working on the Ancient One's costume. I've worked out the colors for the outfit and are in the process of designing the patterns so that I can begin work on it next month. I will share pictures as I finish parts.
 
Last edited:
Following with great interest! This is a costume I'd like to do too (hopefully for Toronto FanExpo at the beginning of September), but I'm not sure my sewing skills are up to par to do this properly. I'm much more comfortable working from a pattern - I've never done anything freehand before and I don't really know where to start!

I've added a couple of pics I've saved - mostly screenshots from the trailers and behind-the-scenes stuff. Hopefully some of them might be helpful!

doctor-strange-movie-image.jpg Yellow1.jpg Yellow5.jpg Yellow7.jpg

And here are the best shots I've found of the sling ring so far, though I think you have most of them already.

sling ring2.jpg
 
The fabric that I ordered for the pants came in today. I look forward to starting work on them over the next couple of days. I'm using a poly shantung silk blend to give it that fluid look that the pants have in the combat scenes.
 
I have now finished the top with the over lapping panels. I decided to make it as a dickie. It's made of a lightweight artificial silk to cut down on the heat when wearing the costume. 16684314_831138913692186_3040390564389230499_n.jpg
 
Looks really clean! Do you happen to have a tutorial you could share of how to do that?
I don't have a tutorial for how I did this,it took about 3 tries to get it to look like this. But now that it is finished I could go back and make a tutorial for you and anyone else interested in doing the Ancient One. May take a little while to get it done, as I'm currently working on the pants.
 
I don't have a tutorial for how I did this,it took about 3 tries to get it to look like this. But now that it is finished I could go back and make a tutorial for you and anyone else interested in doing the Ancient One. May take a little while to get it done, as I'm currently working on the pants.

That would be fantastic! I don't think I'll be doing this costume any time soon (I need to level up my sewing skills), but having a tutorial would be great. :)
 
It's been a while since I posted on my progress for the Ancient One. I am almost done with her at this point, will be wearing her to Planet Comicon tomorrow. My husband even helped me by making my spell fans! They glow, which is super cool.

All my pics are current loaded up on our Facebook page Twisting Dragon. I'll up load the link later when I have computer access.
 

Attachments

  • 20170423_170415.jpg
    20170423_170415.jpg
    4 MB · Views: 554
Great work you have really inspired me to continue with my take on the costume. The complexity of it gets really scary. The fans are gorgeous.
 
belt.jpgextras.jpgslingring.jpgfight.jpglayers.jpgcollar.jpgshirt.jpgSo where to begin. I went to Comic Con Montreal even with the costume incomplete although I'm going to continue to work on it and go again in a month for Otakuthon. The shirt has two layers of 5' folded pleats and the rest are folded 3 inch pleats each rectangular piece of fabric was layered on one by one without a large piece of fabric under it. for the main part of the "jacket" the first layer used more of a conventional vest with a collar pattern. The 2nd layer was a rectangular folded piece of fabric with fiberfill. Around the apex of shoulders the fabric was folded inward by 2" and tapered down to the sides. The 3rd layer didn't have any visible seams around the top of the shoulders from all the countless freeze frames I did, thus I only used one piece of fabric and folded the edges inward. The collar was extremely difficult. The first layer had iron on interfacing added and folded over the third layer. The First layer was pleated to achieve no seams at the edge. The Third layer was sewed to the first layer under the sulcus of the fold. for the high part of the collar was composed of two pieces folded inward to make a stiff seam of the cuff with interface ironed on the the inner layer. The stiff collar is attached to the rest of the jacket as an extension in a odd hexagonal type pattern as seen above. the collar was pinned inward to create the fold at the neck. the only way I achieve this look was to pin this unfolded in a mirror with a clasp holding the jacket together. I don't suggest pinning this on a friend or a mannequin. I had to re pin this while wearing this since the collar need to go quite high under your chin. From the freeze frames I took I concluded that the lower part of the jacket consists of 7 panels of fabric. From the back two panels (7" in with for me)are sewed on an angle at the midline to merge 9 inches to form a taper. at the top the panels have a narrower with of 5" each. While underneath a wider panel underlaps it (for me 8" in width). From the midline of the front a 7" panel matches a 10" panel with no overlap while the 10' panel under laps the back 8'" panel. under the collar 2 panels of different widths and length are attached. for the time being I only have one set attached. The belt is composed of 4 braids the top braid is a four, 1/2" strand braid the second braid is another 4 strand braid of 1/4" strands in vinyl. After that one 1/2" pleat and three ,3/4" pleats in fabric. Following that a 1/2" 3 strand braid and a 6 multi strand braid formed from 1/4" strands. A 1/2" pleat. a 1/4" pleat in fabric and then a 1/4 pleat in vinyl. making my belt 7" in width. I compared the width of Tilda Swinton's arms to my own as a guide for the width of the belt. The very back has a Taiko matsubi obi look to it, that holds the cords that wrap around the arms to the back of the collar. The "obi knot" I created was 5 1/5" in total width with a 1/4" vinyl pleats at the edges. My cope and drag oil sand brass casts didn't go well so I resorted to recreating the mould in polymer clay and painting it gold. I'm going to try to recast it with a mould with more tapered edges or go for lost wax casting. The bald cap wasn't as sweaty as I thought it would be in 24 Celsius. There are two movie freeze frames mixed in with the photos of my work I hope that isn't confusing, the blurry back shot is myself and so is the photo of myself fighting Lady Loki.
 
This thread is more than 6 years old.

Your message may be considered spam for the following reasons:

  1. This thread hasn't been active in some time. A new post in this thread might not contribute constructively to this discussion after so long.
If you wish to reply despite these issues, check the box below before replying.
Be aware that malicious compliance may result in more severe penalties.
Back
Top