Blade Daywalker Vest build

Malibu139

Sr Member
RPF PREMIUM MEMBER
Hello , I am not sure if this is the proper place but I have seen a couple other really good blade builds in the this area so I will start here.

I was at a Halloween party and had a crossbones build from civil war on and a co worker asked if I thought I could do a Blade set up for him.
I have only made stuff for myself and immediate family and had nothing planned to make in the near future so I said " heck yeah I can."
Well my sewing skills are nominal at best and really didn't think it through before committing but ..... I am a Blade fan so I can get into it.

I checked here and there were a couple really good builds documented by GRMM REAPRR and Jhonny Matiu:
http://www.therpf.com/showthread.php?t=219272

http://www.therpf.com/showthread.php?t=177790


My plan is to make the Vest, Sword, Sheath, EDTA darts, Spikes, 4 Mags for the vest, and the mac10.
I had some leftover pleather from a winter soldier vest build I did so I figured I could dot it fairly cheap from a materials perspective.

I have completed the sword like Jhonny Matiu did and I a single EDTA dart.
I am going to do the 2 chest pieces in foam sealed with plastidip and painted.
The hard part was sizing the freehanded patterns but luckily my brother in law is a similar build and height to the guy I am building for so I have him to size off when needed.

The 2 threads above have helped tremendously and I thank both those members for the threads.
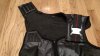
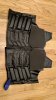
Here are the first few pics. the first few are patterns on cheap felt, then cut out then transferred to the pleather once I determined the size was ok. I am backing them with black wool/felt.
blade1.jpgblade2.jpgblade3.jpgblade4.jpg
For the raised sections I outlined the rectangle except for the back part ,sewing the wool,felt backing to it. then I slid 2 layers of 5 mm foam cut size in between the felt and pleather , then I sewed the last part of the rectangle.
blade5.jpg

I know Blade is old, but I am having fun on this one,

Thanks


blade1.jpg


blade2.jpg


blade3.jpg


blade4.jpg


blade5.jpg
 
Last edited by a moderator:
Re: Blade Daywalker build

A couple more progress pics
I have both side panels complete and the back panel.
The last 2 pics has the 3 mm foam template i size the rest around.

blade8.jpgblade 6.jpgblade 7.jpg
 

Attachments

  • blade 6.jpg
    blade 6.jpg
    5.1 MB · Views: 446
Re: Blade Daywalker build

Thanks gothic! I appreciate it.


For the pockets. I had a leatherman tool pouch that I designed them around.
I cut 4 strips of felt and 4 strips of black fabric 2 3/4 wide by 9 inch wide. I am using 2 inch webbing and with the space on the vest ihave they need to be about 2inches wide by 2.5 high and roughly an inch thick.

I sewed the felt to the fabric , hemmed it, added Velcro to each end so it would close and then folded it to where the size was right.
for the side I cut strips of pleather 2 inches by 1 inch and sewed them in with the leather side out.
I added a little piece of leather to the flap since they looked a little plain.

didn't get any progress pics on these but here are the finals. the first 2 are the leatherman
blade pocket 1.jpgblade pocket 2.jpgblade pocket3.jpgblade pocket 4.jpgblade pocket 5.jpgblade pocket 6.jpg
 
Re: Blade Daywalker build

My first go at a zipper, its not perfect but it works. I wanted it to be hidden behind the trim/edging.
So I sewed it behind the border then sewed the border to the vest.
blade zipper1.jpgblade zipper2.jpg

I bordered/edged the back flap
blade zipper3.jpgblade zipper5.jpgblade zipper6.jpg


Ended up with this and starting to come together some.
just need to make the final chest pieces, the straps and the elastic bands that hold the mags.
that should be everything, then just put it all together.

blade zipper7.jpg

I "think" the hardest parts are done.
 
Re: Blade Daywalker build

straps, and back piece.
for the straps I got some nylon/ stretchy border in red. I sewed that down the middle and then edged them.
for the back piece I lined the straps up and sewed the sliders in using elastic. I sewed these to another piece separately then sewed that to the inside of the back piece.

blade straps.jpgblade straps 2.jpgblade back1.jpgblade back 2.jpg
blade straps 3.jpg
 
Re: Blade Daywalker build

Thanks funyboy1013xx!

Got the chest armor done.
I have used rivets in the past to attach armor to fabric but don't like the idea of not being able to take them off.
So I have used small screws in the before with some success.
I used 3 layers of foam. 2 5mm and one 3 mm on top. I put the screws in the bottom one facing the backside of the armor .
Then I contact cemented the other 2 layers to it.
I burned the edging line in, smoothed up the sides heat formed them, sealed them with plastidip. then painted the outer edge with a flat black and the inside with a hight heat grill paint for an extra flat look.

armor1.jpgarmor2.jpgarmor3.jpgarmor4.jpgarmor5.jpgarmor7.jpgarmor7.jpg
 
Re: Blade Daywalker build

Thanks warrenhouck!

starting to look more like a blade daywalker vest .
I stitched in some Velcro at the shoulders for some adjustment if needed. I can sew them once I know the exact fit.
I need to make the foam mags , sew in the elastic to hold them, sew on the pockets and belts.
then just a few touch ups
then on to the edta darts, spikes and mac10
blade vest 2.jpgblade vest 3.jpgblade vest.jpg
 
Re: Blade Daywalker build

Pockets, belts and buckles, chest pieces, and side mag holders on.
used the screws and Velcro to attach the chest pieces.
I think the chest armor looks a tad large but the fellow this is for is a bit bigger than me.
Still have a few touch up areas but I am liking the way it looks
blade test4.jpgblade test5.jpgblade test.jpgblade test2.jpgblade test3.jpg
 

Attachments

  • blade assembly 4.jpg
    blade assembly 4.jpg
    4.8 MB · Views: 433
Re: Blade Daywalker build

uh... a heated up BUTTER KNIFE?? that's total caveman and I would have never thought of that LOL nice job!! :lol
 
Re: Blade Daywalker build

WOW....... The Blade vest you'r constructing is truly spectacular, "I burned the edging line in, smoothed up the sides heat formed them" Now that was truly creative. Love how the plastidip looks on the armor chest pieces. The vest looks great on you Malibu, all you'r missing now is some Blade TATTOOS? LOL
Thanks GRMM! I really appreciate it. yours is still the gold standard I was shooting for... your buckles though....
it looks decent on me but the guy its for has the build to rock it. might have to find him some tats.
uh... a heated up BUTTER KNIFE?? that's total caveman and I would have never thought of that LOL nice job!! :lol
Thanks funboy it did make a nice defined line,


One thing I am stumped on is the black rivets. Anyone have ideas on where to get those? is there a good application tool ? I don't like the kit I have where you hammer them.
if I am counting right it is about 28 rivets .

thanks
 
Re: Blade Daywalker build

blade vest back.jpg

Here's a pic of the original Blade vest that sold on (The Prop Store Of London). For the rivets, I used this tool I bought at Michaels for $20.00 bucks and it worked out perfectly.

http://www.michaels.com/loops-and-t...pliers/10354207.html#q=fastner+pliers&start=1

As for the rivets, I used heavy duty snaps that come in black size 24-5/8, you get 7 black snaps per packet, and 4 packets will give you the right amount of snaps for the project. You can also acquire these snaps at Michaels. The vest utilizes 27 snaps

http://www.michaels.com/7-black-heavy-duty-snaps--size-24/D010736S.html#q=heavy+duty+snaps&start=2

Here's another pic of the original vest

blade vest back 2.jpg
 
Last edited:
totally off topic but I watched "new jack city" last night and I wonder if Wesley used that performance for his resume for blade. in N.J.C. he uses a cane sword, butterfly knife and a similar hair cut. I was watching it and was telling myself wow. very cool movie to watch in retrospect.. :cool
 
its been a long time since I have seen that funboy, I will have to give it a watch again soon.

GRMM, thanks for pics and the advice I have a good idea now on how I will attach the sheath(would never have noticed it was snaps until you posted that first pic)

I am giving the vest a rest for a bit while sorting the rivets and snaps.
Went back to the sword(I made that first a while back) and the sheath and the EDTA darts
Sword is slightly more than an inch too long and I plan to make another more detailed blade as this one was a quick and easy trial run.
Sword 1.jpgSword2.jpgEDTA.jpg
 
EDTA darts, mac 10 mags, and sheath almost done.
Just need to cut 3 spikes from pvc and make the holsters for the darts and spikes
also waiting for a good couple weather days so I can paint all these up.


darts 2.jpgdarts1.jpgsheath 2.jpgsheath1.jpg
 
This thread is more than 7 years old.

Your message may be considered spam for the following reasons:

  1. This thread hasn't been active in some time. A new post in this thread might not contribute constructively to this discussion after so long.
If you wish to reply despite these issues, check the box below before replying.
Be aware that malicious compliance may result in more severe penalties.
Back
Top