8th Doctor's TV Console - 5.5" Figure Scale

oslm

Active Member
The Intro Stage:

Being a fan of Doctor Who, I noticed that some of the members have made great models based on various props seen in the show. Based on there excellent work, I have decided to try my hand at creating one as well -- I have chosen the console unit from the TV Movie because of it's unique look compared to the original series versions -- Please note, this will not be a scratch build in the traditional way, but one built with the use of 3D modelling and printing --

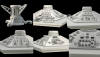
So to begin, I have gathered up the follow reference material to start with (just a few examples shown below)--

Ref Image 1.jpg Ref Image 2.jpg Ref Image 4.jpg

With these, I have been able to work out the basic overall dimensions for the base unit and the top console -- I was also able to find reference for the actual set plans that shows the overall console to be 6' x 3' 6" (width and height) -- The scale I need to match with the 5.5 figures should be 1:12, so I will use that to make my 3D model --

Wireframe of Model.jpg Shaded view of model.jpg

I have been using 3ds Max for all of my modelling for many years now, so hopefully I am able to scale it correctly -- So far I have scaled the model to be 3.5" in height with a 5.5" width -- I have made it only about 3mm in thickness to help reduce the weight and the printing cost -- There are a few parts on the base unit that will be printed solid to help keep the console from tipping --

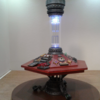
So with the design phase over, I sent the files over to a well know 3D printing company to be done in White Strong and flexible material to help enhance the details -- And after 18 days, this finally arrived today:

Console top view.jpg

Sorry about the quality of the image, the camera being used is over 8 years old -- When I get into the detailing and finishing stages, I will use a better camera to take the photos as I progress with this project --

So next will be to do some cleanup and begin the next part of the model --

If any of you have any suggestions or comments, please feel free to let me know --

Later

Oslm
 
That looks terrific! Can't wait to see the next steps :) I like how they've carried over some of the design elements of this console into Matt Smith's TARDIS.

It's been a long time since it was posted but a few years ago one of the members on this site, who owns the original console, posted a thread showing his restoration project.

Dave
 
Thanks for your comment dcarty. I did see the blog the people who did the restoration of the original posted and I also got a chance to see the actual console at an event a few years ago --

There seems to be quite a few elements from this console that made it into the new series -- The up and down motion of the central time rotor first shown here was used in the ninth's and tenth's console as well --

Later

Oslm
 
Painting of the Plinth --

To start the first stage of this model, I am going to begin painting with the base unit (Plinth) -- First here is a quick look at the reference I am going to be using as a paint guide:

Plinth Ref 1.jpgand here is how it looks unpainted: Plinth unpainted.jpg

I have done a quick wet sanding of the piece to help remove some of the print lines, but I have to say that the White Strong and Flexible polished material prints very cleanly --

So my color choices for this part are going to be a dark grey primer (light coat) followed by folk Art 667 Metallic Gunmetal Grey as the base coat -- After one coat of primer and one of the metallic grey, this is how it looks:

Plinth Base coat.jpg

This gave me a very pewter look to the plinth and I like how it reflects the light so far -- I then applied Folk Art 936 Licorice for the wash effect, followed by Folk Art 401 True Blue for the globes in the claw feet and finally Folk Art 708 Dove Grey for the highlights --

Plinth highlight coat.jpg

I still need to add one additional pass of the highlight color to help tone down some of the dark areas, but overall the effect is starting to look good -- I will be sealing the final paint with a matte finish clear coat -- hopefully, this will help give the piece an overall even appearance and help smooth out some of the high spots I wasn't able to sand completely smooth --

So once this part is completed, I will be moving onto the console top where I am going to be applying an wood grain effect to all of the panels --

Thanks for viewing everyone:

Oslm
 
Last edited:
Final update on the Plinth:

After adding the matte coat and doing one last small round of touch-ups, here is the final look for this part --

Plinth final coat.jpg

Next up is the top of the console, including the designing of the controls for each of the panels --

Later

Oslm
 
Starting the Console top --

With the plinth being done, I have started work on the console top -- While there is a lot of reference material for this part, I am going to be using this one --

Console top Ref 1.jpg

The basic color seems to be a mix of red and some orange (depending on the lighting it seems darker) -- For my piece I will be going with a Burnt Sienna for the base color and a Alizarin Crimson for the shadows --

As with the base unit, I first started with a light sanding to prep the overall surface -- Console top unpainted.jpg

Console top Cap.jpgUsing the same techniques as on the base, I first did the Time Rotor Cap -- Once I was happy with the finish, I added a quick seal coat --

So for the main body of the console, my first thought was to use an art paper with a wood grain and cut and past the individual panels -- After doing a few tests, I started to notice that the paper would get wavey from the glue -- So that idea was scrapped for a painted technique I saw online --

The first thing I did, was to paint in light versions of panel lines and shadows -- Console top Grain painting.jpg

Console top first coat & sand.jpgOnce it was dried, I added a light coat of the burnt sienna and did a light wet sand on the paint -- I repeated this process at least another four times for the top and a few more times for the bottom -- Each time, I would change the grit level of the sand paper to a lighter grit --

With all of the coats applied and sanded, I added the clear coat and came up with this result --

Console top blended.jpg and here it is on the plinth -- Console top and base.jpg

So I still have to do the alizarin crimson and one last dark shadow pass -- But so far the look is starting to come together --

Thanks for viewing --

Oslm
 
Great job so far!
That console was one I had forgotten about- it has a lo tof nice features and avoids the stacked junk appearance of some of the later ones. Are you going to light up the central rotor?
 
Hi Richard,

I have been thinking about doing the lighting of the rotor and I am currently working on it's design -- I should be able to incorporate at least two lights for the rotor, one at the top and one at the bottom --

Thanks for your comment

Oslm
 
Quick Figure Scale Test

With the final coat of red added to the console, I thought I would do a quick check with the figure in place --

Console and figure scale test.jpg ( I really need to find a better camera, as it is about 10% darker in hand )

I am also going to hold off on adding the remaining darker colors until I get the controls designed and placed on the unit -- This way, I should only have to do one shadow / dirt pass instead of several to finish off the main console --

The next part is the designing and printing of the time rods and top rotor cap assembly -- I will also be adding the clear acrylic tube for the central column at that time --

Thanks again for viewing everyone and please feel free to leave any comments or suggestions you may have --

Oslm
 
Working on the Central Column

After a busy week I have begun moving forward with the next stage of the console build, creating the main central column -- Here is a quick Reference image of the actual filming column

Ref Image 3.jpg According to most sources the main column was about 1 foot in diameter and roughly 3 foot in height -- Mine will be based on that scale --

So how was I going to make an acrylic tube? I first tried looking at plastic wholesalers on line to see if I could find one at 1" OD and 0.875 (7/8) ID with an 1/8" wall thickness -- While I was able to find tubing to match the OD and ID, the wall thickness just wasn't working out (the lowest I could find was 3/16") --

My next thought was to see about taking a 1/8" sheet of clear acrylic and wrapping it around an 7/8" dowel and gluing the edge -- After having trouble clamping the piece together and the glue leaving to much spillage I moved onto another idea --

While I was getting the glue for the last step, I checked out my local dollar store to see if they had any small travel tubes (for toothbrushes or lotion) that might fit -- Again, no luck there, but I did find something else that I wouldn't have thought of using --

Central Column Tube.jpg These very cheap headphones came in a case that was exactly the right OD and wall thickness -- the ID is 13/16" but I will make it work --

So after washing off the labels, and using clorox bleach wipes to get the glue residue off I have the following -- Console Cental Column.jpg

It's a perfect fit and it measures 3 inches in height, it's almost like it was specially made for me -- Now that I have this part, it's time to start the design for the central rods --

Using the reference images, I came up with this design: wireframe of Lower time rods.jpg and for the top wireframe of Top time rods.jpg

I have made them slightly smaller then what I think the actual ones would have been because of the smaller ID of the tube -- Hopefully, it won't be too much of a noticeable change to the overall look --

They are being printed right now and once they arrive I will test fit them and be one more step closer to finishing --

Thanks for viewing this thread --

Oslm
 
The Central Column, Part II

After another 9 days of waiting, I finally received the lower rods and upper rods with top cap for the main central column --

Console Cental Column Time Rods.jpg They turned out perfectly when I compared them with the 3D model referenced in an earlier post -- All that was needed was a light sanding to remove some of the print lines and jagged ends on the time rods --

So my color choices for these parts was again to apply the same med grey primer (after taping off the rods) to both parts -- From there I once again applied the gunmetal grey for the base coat to both parts -- Just a quick note, I am really impressed with how well the Strong Flexible material takes paint -- I have found that after about 10 minutes, I am able to handle the part and not have it feeling sticky --

After removing the tape off of the rods, I applied a metallic pearl white to them as well as the support disk -- I am hoping that this will give it a frosted glass tube look -- Of course, after I got started painting these I found out that my local hobby store does carry a 2mm clear rod --

So If I decide to redo these parts in the future I will look at changing these parts to work with the clear rods -- I think that it will make the central column easier to light if I go that route --

With the rods finished, I started doing the same finish for the top cap as I had used on the other metal parts (plinth) -- Since the top cap is part of the main engine or drive train of the console, I wanted to add some extra staining to the piece -- hopefully this will give me a steam engine dirty gritty look to part --

So in addition to the rust color I used before, I made up some liquid black mixed with a mid blue color for making oil stains and a cherry red mixed with the gunmetal grey to make a reddish brake fluid color --

Console Cental Column Time Rods.jpg the parts unpainted vs the painted versions with the staining applied Console Cental Column Time Rods painted.jpg

Console Cental Column & Top Cap.jpgSo as of now, the console currently looks like this when assembled -- I may still go back and added in some more highlights around the edges of the top cap, but for now I am happy with the results --

The next phase of this project will now be the designing and placing of the controls -- I have one panel already done and at the printers, so hopefully I will have an update by mid week instead of on the weekend --

Thanks for all of the views and comments so far everyone --

Oslm
 
The Central Column, Part III

Welcome to 2017 everyone hopefully you've had a good holiday and are looking forward to the new year -- Just a quick update on the status of this project as of today --

First off, I have had a few questions regarding the ability to light the central column -- In order to add a 5mm LED bulb into the upper & lower time rod assemblies I've had to remove a small plug I had placed into them and enlarge the central hole on their bases -- I have also now made the time rod assemblies without the rods fixed in place so that they will now fit a 2.4mm clear acrylic rod -- This will let the light from the LED bulb shine and reflect off them in a more realistic way --

This also has allowed me to redesign the top cap mount to be able to run wires for a battery and to rematch the part to the actual reference --

Revised Column Mount Reference.pngThis new version will now allow the model to be shown either as is or with the six attached support girders (Still to be designed)

Once I have printed the new parts, I will be doing a full lighting test on the central column -- I may even do a video recording of the assembly and testing of that part --

Creating the Control Panels

Next, I have gone ahead with making the initial design for the control panels -- Once again I was able to get a lot of great reference images from multiple sources to come up with the following layout --

Panels 1 & 2 - Panels 1 and 2.png Panel 3 & 4 - Panels 3 and 4.png Panels 5 & 6 - Panels 5 and 6.png

From these initial sketches, I've been going thru each part to make sure that they will fit within shapeways min tolerances for printing --

To make sure that my scale is correct, I printed only one panel for now and this is how it has turned out -- Control Panel 1 Test.png I think I'm on the right track.

So I am currently working on finishing the other panels and creating a sprue for all of them to fit onto -- Once I have confirmed that all of the parts will fit within the tolerances, I am going to look at making two different versions of the top console -- One with the parts embedded into it and one with them as separate pieces -- I have been really pleased with the level of detail I have gotten from the material so far and I think in the long run it will be nice to have the two choices --

So if you guys have any questions about this, please let me know and thanks for viewing --

Later

Oslm
 

Attachments

  • Console Sketches.png
    Console Sketches.png
    845.1 KB · Views: 229
Quick Update - A question about lighting

I am curious to know if anyone has used the Just Plug Lighting System in there models or displays? I like the simple plug and play design of the modules
and the lights come in several different colors and the intensity of the lights can be controlled --

Just Plug Hub control.jpg

Thanks

Oslm
 
Painting & Applying the Control Panels

Sorry for the long delay on this project, but work had me on the go for the last few months -- Anyway, after I last updated this thread I went ahead and purchased the Just Plug Lighting System and decided to use it for lighting the main central column --

I am using a couple of cool white 20 mA lights at the top and bottom of the column -- I also went ahead and replaced the printed version of the time rods with 2.4mm fluorescent rods to help give it a better look to the actual prop --

With that part of the model fixed, I ordered the main console controls from shapeways based on the designs in my previous post and here is how they turned out --

blank canvas 1.png

So now it was onto the best part of any model kit build, paint matching and application --

Since I have lots of photo reference for this, the color matching and application went very quickly -- Here they are as is without any final weathering applied --

Panels 1 & 2 painted.png Panels 1 & 2 -- Panels 3 & 4 painted.png Panels 3 & 4

Panel 5 painted.png Panel 5 -- Panel 6 painted.png and finally Panel 6

All together, I think I matched the colors very closely to the actual prop and I was surprised that everything fitted where it was suppose to go -- Here is a look at the console on its plinth base with the central column lights on --
Assembled and Lighting Test.png

If I was any good at working with fibre optics, I would have used them in conjunction with the colored gems I've placed on the console -- Maybe if I do a version 2 of this build I will redesign the console to have the holes placed for running fibre optics --

The Next Chapter of the build?

So after almost a year of design, printing and painting I have reached the point where either I call this done or continue with the rest of the build -- I do have the designs and some early test 3D models of the following outstanding parts --

- The pull down scanner with its scissors connectors (I hope to make them actually work and not be static)
- The top cap and connectors for the 6 main support beams
- The 6 support beams (which if I do make will give this piece a final height of 15 inches)
- The wooden floor with connections for the lighting controls and display

I am going to take a break from this for a short while and go over my resources and then make my choice -- So thanks to everyone who has viewed this build and if anyone has any questions or wants to see additional images, please let me know --

Hopefully to continue this later,

Oslm
 
Last edited:
Just a quick update to this thread -- It has been a couple of years since I finished the console to this point, but I am looking to start up the thread again and do the next stage of the build.

More updates to follow.
 

Attachments

  • New console photo 1.png
    New console photo 1.png
    1.1 MB · Views: 325
Just a quick update to this thread -- It has been a couple of years since I finished the console to this point, but I am looking to start up the thread again and do the next stage of the build.

More updates to follow.
This is utterly gorgeous work! Easily one of, if not the best console design, and yet it feels almost forgotten in most merchandise. Hopefully, we can get a proper Character Options Hudolin-style box release.
 

Your message may be considered spam for the following reasons:

If you wish to reply despite these issues, check the box below before replying.
Be aware that malicious compliance may result in more severe penalties.
Back
Top