Overwatch Genji's Helmet

OlivierC

Well-Known Member
Hello everyone,

My name is Olivier, I have been subscribed to this forum for quiet some time, but never posted any real work until now. I have learned a lot here, and this is my first serious attempt at prop making. I made some cosplay stuff in the past, but this time I'm really aiming for something that looks accurate and professionally made.

This is what I'm going for, just the helmet part, at least for now:

http://vignette4.wikia.nocookie.net/overwatch/images/7/70/GenjiConcept.jpg


So, first thing, I modeled the helmet in Maya, using the game model as reference and stills from the short movie featuring Genji as well:

Capture.JPG


I only worked on it during lunch break, so it took quiet some time. Many revisions, to make sure all the parts fit together and that you can actually put your head inside. I actually had to scale it up by 45% because Genji has a tiny head. If I had made it according to the game's scale, it would have been child size. Other than that, I tried to be as accurate as possible.

I own an Ultimaker so I'll print some parts myself, but for the bigger ones, I am going through Shapeways, to avoid 40+ hours prints and having to slice it in many parts that may wrap and not fit together correctly.


So this is the first big part I had printed, looked like this when I received it from Shapeways:

IMG_0805.jpg


To be honnest, it looked better than I expected. Because of the size and cost, I had to go with the lowest quality they had, so I was worried. But it turned out ok. It's not great, but not as grainy as I thought.

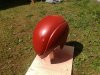
So then came the fun part. Lots of priming, filling, sanding... rinse and repeat. I honestly lost count of how many time I did it.

IMG_0813.jpg


IMG_0814.jpg


IMG_0815.jpg


After many hours, working only during the week ends or whenever I have 10 minutes for myself, I finally got to a point where I'm happy with it:


IMG_0838.jpg


IMG_0839.jpg


IMG_0840.jpg


IMG_0841.jpg


IMG_0843.jpg


IMG_0844.jpg


That's all for now. I just ordered the jaw part from Shapeways yesterday and the "ears" are ready to print at home

I'm planning to mold and cast it. I have been practicing mold making on smaller parts and so far it worked great. This one is not going to be easy to mold because the shapes are pretty complex, but I have been planning it for quiet some time and I think I got it figured out. I want to make at least two of them, but if there is enough interest, I might do more, but I'll keep it very limited, I don't want to mass produce it.

The visor will be vacuum formed (need to build a small vac forming machine first :) ) and I will add an LED strip for the "eyes"
 
Last edited:
thank you guys. the next big part is ordered (the jaw). Delivery estimated around Nov 13. it will be a long wait. In the meantime, I might try molding this big boy with silicone if I have time.
 
Small update just to say it's not one of those projects that die just a week after they begin :) I received a new part from Shapeways. Also, I did a little bit more of sanding and filling on the forehead because I was not 100% happy with it

IMG_0845.jpg


IMG_0846.jpg


IMG_0847.jpg


IMG_0848.jpg
 
Update time. I got all the parts printed ! Lots of sanding and filling to come.

Don't even start asking how much it cost to print everything, it was ridiculously expensive! I did however got a decent discount from shapeways for black friday, that's why I ordered all the missing parts, but still it's was quiet a lot to shovel at once.

Also, even though scaled it up to make it wearable (genji actually has a tiny head), it's won't fit everyone. I did not want to oversize it too much either so I only scalled it what I thought would be just enough, using my own head mesurement, but it turn out I was not able to squeeze my head in without risking to break it or getting stuck, the "cheeks" are blocking my head to go through while there is actually plently of room inside the helmet. My girlfriend however has a smaller head and was able to put it on. Since it would not fit me only by a very little, I hope that once I cast it with smoothcast 65D, which is a bit flexible, I'll be able to pull the cheeks aside and be able to squeeze my head in. But if I try that with 3d print, I might break it.
Wearing it was not the primary purpose, it's more of a display prop, not for cosplaying. But still, since I made it bigger than it's supposed to be only so it could be worn, it would be a bummer if it does not fit me in the end.

Edit: I did 3d print the visor but I'm not boing to mold and cast it with clear resin. It to complicated to get a clean cast without bubbles, don't want to invest in a pressure pot (yet). Instead I'll use it as a master to vaccum form it with transparent plastic. I have yet to build the vaccum forming machine :)

IMG_0873.jpg


IMG_0874.jpg


IMG_0875.jpg


IMG_0876.jpg


IMG_0877.jpg


IMG_0878.jpg


IMG_0879.jpg
 
Last edited:
yup, you're totally right. It was unnecessarily expensive and if I had to do it again, I'd probably go with pepacura, foam carving or straight clay sculpt.
I'm a n00b and this is my first prop. I come from the 3d animation industry so I'm a lot more comfortable with 3d modeling. I know it's better practice to learn new stuff, but there is already a lot of new things for me in this project, including molding and casting (first small scale tests are promissing though) So yeah for this first try I played it safe and prefered paying a little extra $$ to avoid a lot of frustration.

However, I hollowed out my models as much as possible, they are not solid, only a few millimeters thick. This litterally saved me several hundereds of dollars on the bigger parts, and made the smaller parts like the antennas under $20.

EDIT: oh and of course, I got it printed with the cheapest material avaible. It was the only one available for items of this size anyway

For future reference, try 3dhubs.com and look for a local 3D printing service. Usually the prices are half that of Shapeways and a local venue means that communication is wonderful. Sure, you'll have a rougher model, but you can always clean them up yourself with 600 grit and filler primer.

It's often ludicrous how much Shapeways charges. A 2x3x5mm visor for a figurine out of PLA costs $40 on Shapeways. It cost 16 cents at a local hub.
 
A 2x3x5mm visor for a figurine out of PLA costs $40 on Shapeways.

This is indeed very expensive, I don't undestand how you got such a high price with PLA. I could understand if you selected their super high detaild frosted plastic, but PLA... for instance, the antena that I have here, is approximately 27*9*9mm is "only" $18 if I select PLA.

I did not know 3dhub, it's is indeed very interesting, I just uploaded my biggest part, the bucket, and the first quote I get is about a third of the price I paid :( . Now that's just an estimattion, maybe the final cost would be different for such a big object

I assure you, with the cost of handling, which is usually 5 bucks for most places, combined with shipping, there should be no more than a 15-20 dollar price increase. I've used it for years.
 
This is my own, modeled in maya using the game's model as reference. I went to check at do3d's version, it look alright except for some pinching caused by bad topology. That will require some bondo and sanding to get a smooth surface. Also, looking at the full body shots, it looks like they did not resize the head, it's tiny, like on the game model. If that's really the case and try to print it "as is", then good luck trying to put it on, unless you're 8 years old :) But overall it looks ok, just needs to be scalled up a bit
 
Hello, I'm bumping this thread because I got back to work on this last week. Not an impressive update to look at, but it actually was a lot of work, to get a smooth finish on all those parts.

IMG_0957.jpg


IMG_0960.jpg


IMG_0964.jpg


IMG_0961.jpg


Except for the bucket itself which still early wip, all the other parts are ready to mold (just need to sand them one last time with 1000p grit to get a super smooth finish)

More to come soon.
 
Update Time!

It's been a long time since I worked on this project. I had shelved it for a while because I was working on other things. But now I'm back, and I'm pretty much done with the master, it's ready to mold, which is the next big step. I don't have much experience with mold making, I only did a few test on small scale stuff, so I'm a bit anxious.

IMG_1122.JPG


IMG_1125.JPG


IMG_1126.JPG


IMG_1127.JPG


IMG_1128.JPG


IMG_1129.JPG


IMG_1130.JPG


IMG_1131.JPG


I'm going to have to put it on hold for another week or two because of work, but I'm happy of the progress I made in just three days, while it's been seating here untouched for the past three months
 

Attachments

  • IMG_1126.JPG
    IMG_1126.JPG
    1.1 MB · Views: 270
This thread is more than 5 years old.

Your message may be considered spam for the following reasons:

  1. This thread hasn't been active in some time. A new post in this thread might not contribute constructively to this discussion after so long.
If you wish to reply despite these issues, check the box below before replying.
Be aware that malicious compliance may result in more severe penalties.
Back
Top