propmaster2000
Sr Member
Hey Drac,
Just checking in to see the progress.
You mention ways to trigger the toaster effect either by momentary push button switch, touch activation on the metal casing, movement or
even clapping your hand together (clap on/clap off).
Maybe a single channel key fob remote control? That way the effect doesn't activate prematurely by motion when you enter the room.
You can control it covertly with the key fob in your pocket when others are near....
Looking forward to the finished prop.
Make a video :^)
.
Last edited:
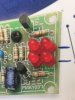
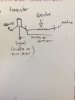
") do you have a diagram or something to show how you laid it all out? Not sure if I could figure it out lol cheers also that's not hard wired to the sound pick up I take it? It's a sound to light module isn't it?
do you have a diagram or something to show how you laid it all out? Not sure if I could figure it out lol cheers also that's not hard wired to the sound pick up I take it? It's a sound to light module isn't it?