6 Week Halloween Build: BvS Armored Batman for my 8yr old

indiefilmgeek

Sr Member
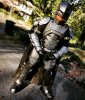
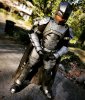
After being HULKBUSTER last year, my 8yr old wanted to do another armored suit for Halloween 2016. Unfortunately, I've been extremely busy at work and only ended up with ~6 weeks to construct his requested Armored Batman from Batman v Superman. [how could I say no, right?]

Before diving into the build, I'll show you what it ended up looking like.
30462400896_1aedb04107.jpg


THE BUILD:
I started off by buying a hi-res pep file from AZTLAN, but with my limited amount of time I simply couldn't afford to build the peps AND then convert them to foam templates for the construction... So, I abandoned the peps and just free-handed most of the pieces.

Like with the Hulkbuster build, I started with the boots and worked my way up... I took a pair of boots he could fit and I didn't mind destroying and then gorilla glued a base of floor-mat foam onto them with enough clearance that normal walking would keep the foam exterior off the ground.
30425876241_93bc3490aa.jpg


After roughing out the boot armor I damaged it up with a wood-burning tool and prepped it for plasti-dip/paint/finishing.
30425869111_d66d9c47fb.jpg


I then started in on the leg units. I would make paper and duct tape templates from straight off of my 8yr old son's legs and then build up the armor to look like the images of the suit online. I had a rough pep of the upper leg to work off as well (for reference).
30214303040_7871ba321c.jpg


With both legs done, we did our first test-fit.
30214298330_be7475e770.jpg


More WIP pics to come...
 

Attachments

  • 30462400896_1aedb04107.jpg
    30462400896_1aedb04107.jpg
    80.7 KB · Views: 137
  • 30462400896_1aedb04107_z.jpg
    30462400896_1aedb04107_z.jpg
    110.7 KB · Views: 129
  • 30462400896_1aedb04107_c.jpg
    30462400896_1aedb04107_c.jpg
    143.8 KB · Views: 145
I took some measurements and then basically free-handed the cod-piece and belt.
30214301710_9a7310b855.jpg


30425872071_8174067ebc.jpg


Before starting on the arms and chest, I had to bulk my 8yr old up a bit... So, I built him a little muscle suit for under the armor.
30512512835_86ea03c9c8.jpg


Looks pretty good once his under-armor is on. :)
30214212490_1fb9d04728.jpg


Then I started on the forearms... I free-handed these as well.
30214289570_d6a36c3447.jpg


And shoulder armor...
30214279180_048e38c3cf.jpg


And then, finally, his chest armor...
30425848461_f7888d41d8.jpg


30214275790_a1f7edbbb4.jpg


Helmet and Painting pics coming up next...
 
I did pep the helmet (had to do THREE of them to get the size right). Then I cut it up into foam-friendly templates.

30425844241_83c37fdca1.jpg


30425843171_5b48d41b44.jpg


And the test-fitting...
30396026762_f7246391d2.jpg


Painting...

I still use the old school method I've used for years. Better options are now available, but I'm a creature of habit. lol

- 2-3 coats of plasti-dip
- 2-3 coats of Adhesive Promoter
- 2-3 costs of final enamel paint
- weathering

Step One: Plasti-Dip
30512501935_3457742543.jpg


Step Two: Adhesive Promote (nothing to see really - it goes on clear)

Step Three: Final Paint - in this case it's a Krylon 'Metallic Shimmer'
30476146006_acaee0acfe.jpg


Step Four: Weathering - in this case, I did a few things.
- Dry brushed the whole thing (to simulate brushed steel)
- Painted in grease/dirt spaces
- Added just a bit of rust coloring to some of the damaged areas
30425840311_fd46fb433c.jpg


Overall, I'm thrilled with the effect. Here are the other pieces in their basic paint.
30214280540_829edcf121.jpg


And here they are finished...

Boot close up
29881710354_50f67c199c.jpg


Shoulder piece:
30425830621_fe463a208e.jpg
\\\\

Forearm piece:
30214254020_97b1dbf53a.jpg


Lower Leg:
30214250170_fbe09aa57d.jpg


And helmet...
29881705674_e78bd2edd5.jpg
 
May I ask how many pieces you used for the bottom leg part? like mine is to squareish idk how to do it rounded did you use only a blade? also what glue do you use?
 
May I ask how many pieces you used for the bottom leg part? like mine is to squareish idk how to do it rounded did you use only a blade? also what glue do you use?

Two pieces. Lower leg (with the knee piece attached to the lower leg), and then the upper leg. The lower leg is supported by sitting on the boot. And the upper leg is supported on the lower leg. They are not 'attached' to each other - the upper leg just sits on the lower leg.

I leaned very heavily on the tutorials that STEALTH did on his build. He's using Gorilla Glue branded Super Glue rather than hot glue. I used the same thing for this build (which allows me to use a heat gun to help form some of the shapes (as hot glue would just melt and come apart if you used a heat gun).

Thanks,
IndieFilmGeek
 
This thread is more than 7 years old.

Your message may be considered spam for the following reasons:

  1. This thread hasn't been active in some time. A new post in this thread might not contribute constructively to this discussion after so long.
If you wish to reply despite these issues, check the box below before replying.
Be aware that malicious compliance may result in more severe penalties.
Back
Top