You are using an out of date browser. It may not display this or other websites correctly.
You should upgrade or use an alternative browser.
You should upgrade or use an alternative browser.
Disney's Haunted Mansion Candle holding grotesque sculpt/mold/cast build thread
- Thread starter Hand-Schaub
- Start date
Pretty much finished up the sculpt and added some details. Overall I'm pretty happy with it. There are some slight discrepancies but I have to remember the intended goal of this is to have a very close replica for display in our own mansions. So slight size and proportion adjustments have been made.I will attempt to make a multi part mold as to retain the integrity of having a single cast model. Yeah, I know what some of you mold guys might think but I know this can be done... so I slathered him in a coat of rubber to get the party started.


The mold progresses on! Also an mportant development- candles!!! 

Gargoyle butt covered in rubber. So I am taking my time to make a strong mold by building up the mother mold walls and having the rubber be part of the registers so that the rubber doesn't slip out from the mother mold. This should enable me to work in sections so that the mold will be able to cast a single unit rather than separate parts that need to be assembled later on.

Also, Because my candle sticks easily accommodate AA batteries as far as candle solutions, my ideal situation would be to have a flicker candle that is battery operated and remote controlled.
then I see these!
https://www.amazon.com/Top-Race-LIT...rd_wg=xxt0I&psc=1&refRID=VMW706AG34E5GE2DXBDT
Also, Because my candle sticks easily accommodate AA batteries as far as candle solutions, my ideal situation would be to have a flicker candle that is battery operated and remote controlled.
then I see these!
https://www.amazon.com/Top-Race-LIT...rd_wg=xxt0I&psc=1&refRID=VMW706AG34E5GE2DXBDT
It's been a little time but progress marches on! With vacation and Christmas I had only a few days to work on this. As far as the mold is concerned I'm about half way. Again, I'm trying to make it so that the whole figure can be cast in one piece with an armature in it. This way there is less finishing and less likely to have parts break off.
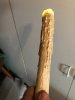
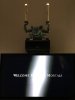
The candles are about done. I ordered some of those single battery tree candles and they seem to work real nice. Since they are so bright and I wanted to subdue them with a blob of silicone. A little paint and they look pretty close to the park versions. they do not photograph too well though but you can get the idea.
Hopefully in a few weeks I will have a complete gargoyle casting ready to show.
Attachments


Been a busy few weeks with few updates. But... there is a mold. Even with 20 plus years of experience a mold is never easy to make. Buts it's pretty much done.
I think i will do gel coat as a skin layer then rotocast resin to strengthen it followed by foam fill backing. Of course an armature will be needed. With any clay based sculpture mold the master never survives. But it looks kind of cool
It's been awhile since I posted but LOTS of new developments to show off coming soon.
It's been awhile since I posted but LOTS of new developments to show off coming soon.
Lookibg forward to seeing a cast
")
TheBabadook
New Member
I'm at the beginning stages of making this gargoyle. That being said, what should I use for the skeleton to hold its shape?? Also i'm considering using something more lightweight: Crayola Model Magic. Any tips or suggestions??
Hauntedpirate
New Member
So Awesome! I have a few of the ones that were offered as kits years ago but I Love the design of yours. If or when you decided to offer any I would definitely be interested.
GREAT WORK!
GREAT WORK!
Finally a big update for this project.
Casting:
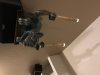
Here is the first beast being cast. I use tinted gel coat for the impression layer. I followed it with fiberglass and resin. Arms, feet and ears filled with casting resin completely encasing the armature.


the copper armature (shown with no gel coat for reference)

Body is filled with expanding foam (seen here coming up the neck) the white crap is extra casting resin I spilled around.

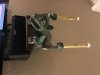
The rough cast:

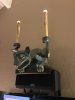
A few pics of it being cleaned up and some cool candle test shots...


the cleaned up casting being painted.
First coat antique bronze spray:

white and phthalo green for patina. I used some thicker paint with phthalo blue. then finally dry brushing some metallic antique bronze acrylics.


and some final shots in the full daylight.


Each beast come equipped with a tail that can be used to tie down in back for installation (these guys are front heavy - especially with the resin candles)

And some pictures of mine above my TV Yes - I actually watched the movie too (I don't see why people didn't like it - I thought it was pretty neat)
Shown in next post because of image limit... wait... never mind - I can't seem to delete these attachments. Oh well. You can turn your head I guess.
Final measurements for this guy is 20" head to tail, 19" arm to arm and 27" tall with candles. I would say about 85-90% actual size. Perhaps someone with a 'real' casting can confirm that? I just remember being in Disneyland this last December and realizing I was not at 100%... but in a typical house it sure has 100% presence.
I will also add that I am not sure I like the paint job. With the light wall behind and too many house lights on the beast looks too shiny. I think I will darken the overall look of it for my personal viewing preferences.
Casting:
Here is the first beast being cast. I use tinted gel coat for the impression layer. I followed it with fiberglass and resin. Arms, feet and ears filled with casting resin completely encasing the armature.
the copper armature (shown with no gel coat for reference)
Body is filled with expanding foam (seen here coming up the neck) the white crap is extra casting resin I spilled around.
The rough cast:
A few pics of it being cleaned up and some cool candle test shots...
the cleaned up casting being painted.
First coat antique bronze spray:
white and phthalo green for patina. I used some thicker paint with phthalo blue. then finally dry brushing some metallic antique bronze acrylics.
and some final shots in the full daylight.
Each beast come equipped with a tail that can be used to tie down in back for installation (these guys are front heavy - especially with the resin candles)
And some pictures of mine above my TV Yes - I actually watched the movie too (I don't see why people didn't like it - I thought it was pretty neat)
Shown in next post because of image limit... wait... never mind - I can't seem to delete these attachments. Oh well. You can turn your head I guess.
Final measurements for this guy is 20" head to tail, 19" arm to arm and 27" tall with candles. I would say about 85-90% actual size. Perhaps someone with a 'real' casting can confirm that? I just remember being in Disneyland this last December and realizing I was not at 100%... but in a typical house it sure has 100% presence.
I will also add that I am not sure I like the paint job. With the light wall behind and too many house lights on the beast looks too shiny. I think I will darken the overall look of it for my personal viewing preferences.
Attachments


Last edited:

Amish Trooper
Sr Member
That thing is amazing
RobertH
Well-Known Member
Very, very well done!
As to paint have you tried ModernMasters Metal Effects paint? They have an excellent bronze with bronze powder in it so with a reagent it actually patinas. They have a blue and a green patina option. I use it all the time and most recently on my Haunted Mansion Snake Door Handle project.
As to paint have you tried ModernMasters Metal Effects paint? They have an excellent bronze with bronze powder in it so with a reagent it actually patinas. They have a blue and a green patina option. I use it all the time and most recently on my Haunted Mansion Snake Door Handle project.
Very, very well done!
As to paint have you tried ModernMasters Metal Effects paint? They have an excellent bronze with bronze powder in it so with a reagent it actually patinas. They have a blue and a green patina option. I use it all the time and most recently on my Haunted Mansion Snake Door Handle project.
I have used that before. I guess I like the control of acrylics. The dry brushed bronze is metal flake paint though. I love how your handles came out.
The for sale thread if anybody wants one. I do all kinds of deals - I would love for a few of these guys to make it out into the world...
http://www.therpf.com/showthread.php?t=274189
http://www.therpf.com/showthread.php?t=274189
Optimistic Geom
Member
Nice project! It's great to see the sculpting process from start to finish. Would love to learn how to sculpt like that someday. Great work hope they sell wel
Similar threads
- Replies
- 5
- Views
- 839
- Replies
- 28
- Views
- 1,433
- Replies
- 4
- Views
- 646
- Replies
- 2
- Views
- 390