Disney's Haunted Mansion Candle holding grotesque sculpt/mold/cast build thread

Hand-Schaub

Sr Member
RPF PREMIUM MEMBER
Greetings talented mortals!! ~~

I wasn't sure if I should put this in the sculpture forums or here but since I am trying to replicate the Haunted Mansion grotesque as accurately as possible I thought this was the appropriate place.

I'm one of those life long fans of Disneyland (and I am partial to Disneyland because I grew up in L.A. and still frequent there). I have seen the park go through many changes in the last 4 decades but one thing that is constant is the ever glaring and starring eyes of the stretching gallery grotesques. Many call them gargoyles even though they do not spout water. Even with Jack messing around in the mansion they still are perched up high with their skinny arms and whimsical smiles.

I realize this project has come and gone a few times and even accurate castings have been offered. First and foremost I started this sculpture for my own amusement and enjoyment. When posting a few pics I realized more had an interest in this and I thought I would share my progress as a way to push myself to finish it fully (this includes the molding and casting stage).

So without further waiting...
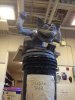
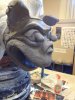
the goal!

haunted-mansion-gargoyle-x2.jpg

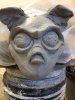
The start! I knew this would be made with water based clay so I needed a strong armature

IMG_9308 (2).JPGIMG_9311 (2).JPG

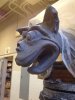
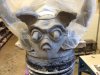
session 1 of building the clay model - he clay is nothing fancy. In fact I don't recall the name of it but it has a strong adhesion and nice elasticity.

IMG_9312 (2).JPGIMG_9313 (2).JPGIMG_9314 (2).JPGIMG_9315 (2).JPG

Session 2 - getting the feet a bit more resolved and planning out the head

IMG_9320 (2).JPGIMG_9318 (2).JPGIMG_9348 (2).JPG

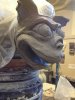
session 3 - fixed a few spacing issues and worked the hands (source mages are hard to tell what is really going on with the hands.

IMG_9495 (2).JPGIMG_9494 (2).JPG

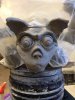
session 4 - started to see where to bulk up the arms and legs.

IMG_9546 (2).JPGIMG_9551 (2).JPGIMG_9540 (2).JPGIMG_9542 (2).JPG

Session 5 was today. There are a few shots in the attachment below but I exceeded the limit so they are turned. I will post a new reply to fix that.
 

Attachments

  • IMG_9570.JPG
    IMG_9570.JPG
    968 KB · Views: 314
  • IMG_9563.JPG
    IMG_9563.JPG
    912.8 KB · Views: 283
  • IMG_9562.JPG
    IMG_9562.JPG
    977.1 KB · Views: 289
  • IMG_9561.JPG
    IMG_9561.JPG
    991 KB · Views: 291
  • IMG_9555.JPG
    IMG_9555.JPG
    1 MB · Views: 295
  • IMG_9552.JPG
    IMG_9552.JPG
    1 MB · Views: 307
  • IMG_9556.JPG
    IMG_9556.JPG
    2.1 MB · Views: 345
Last edited:
Session 5 - 10/19/2016 a few hours used to resolve some face proportions and deal with the nose and eyes. Started the ears as well as figure out whay the mouth was not really working. I see now that the curl of the lip is too big and I will slim it down pushing the teeth a bit higher too.

IMG_9556.JPGIMG_9567.JPGIMG_9569.JPG

Please keep in mind that I keep the clay surface rough and unfinished because as I work on one area I notice how it affects the others so I want to keep the work flow fluid and changing. As I tell students of mine - don't fall in love with the sculpture otherwise you wont be able to fix problems.

So at this point I think I know what needs to be done to fix problem areas as well as perfect the sculpt all around. I feel like I have about 3 more session before finalizing all aspects. Input is welcomed but again, I realize there are still things to fix on it. For example - the lower jaw is not really dealt with because the upper mouth is not right yet. I also have to deal with the board that is in between his legs (an oversight which will ultimately help in the molding process when fixed)

thanks for looking!!
 

Attachments

  • IMG_9561.JPG
    IMG_9561.JPG
    991 KB · Views: 242
Last edited:
Hmmm....somewhere I've seen this before ;) ....an my opinion still stands! Exceptional work! You got skillz :D


Sent from my iPad using Tapatalk Pro
 
IMG_9574 (2).JPGIMG_9573.JPGIMG_9571 (2).JPG

I wanted to have a Halloween update but I was busy with family. But a small move towards being done. I 'fixed' the upper lip and spaced out the teeth. The teeth are just in place and not incorporated. I think the new lines are pretty close to good - well not quite.. a lot more refining. What says you guys?
 
The progress looks great. Given your work with Bronze... I can only imagine this cast in solid bronze and just how heavy it will be. :lol
 
That's looking great!
I'll add that you shouldn't worry about any one else's opinion of your work. If you ask, we'll nit-pick and give contradicting advice till the cows com home.
Do it the way that looks good to you. You're the one who's gonna enjoy it the most.
Nice work!
 
That's looking great!
I'll add that you shouldn't worry about any one else's opinion of your work. If you ask, we'll nit-pick and give contradicting advice till the cows com home.
Do it the way that looks good to you. You're the one who's gonna enjoy it the most.
Nice work!

Thank you. Yes, I think that is good advice to anybody on this forum. Over the past few years I have been making helmets and props for my enjoyment and not for the 'approval' of the board. It's true - I do enjoy them more that way. However I do want to preserve the integrity of the originals as best I can. With that said I did a bit more work today ay reworking the fangs and did some general finishing to the surface. I want to keep it somewhat rough because I think the ultra smooth version I've been seeing looks odd. Plus when painting I want the verdigre be able to stick to something. Next up is dealing with the block of wood between the legs (laugh it up), because it will cause fitting issues later with the castings if I don't deal with it now. Then mold time!
Here are today's pictures:
IMG_9660.JPGIMG_9661.JPGIMG_9662.JPGIMG_9663.JPGIMG_9664.JPGIMG_9665.JPG
 
A quick but significant update on this... the troublesome armature stand that was between his legs has now been removed! Kind of a scary operation but all is well that ends well. Now he sits flush as well as proportions being improved in the belly area. I did notice one foot was different from the other so I will be fixing that (although it kind of adds character). Pretty close to calling it ready for mold!

IMG_9692.JPGIMG_9693.JPGIMG_9694.JPG
 
A quick but significant update on this... the troublesome armature stand that was between his legs has now been removed! Kind of a scary operation but all is well that ends well. Now he sits flush as well as proportions being improved in the belly area. I did notice one foot was different from the other so I will be fixing that (although it kind of adds character). Pretty close to calling it ready
I'm also interested if you do offer castings of the gargoyle.
 
Absolutely awesome. I have been watching this website for over a year waiting for a gargoyle casting to become available. 100% count me in for one if you decide to make these available. The skills that you and others have on this site are amazing.
 
Kind of an odd update but I made a candle! No mass market one would do in size or sculpt so I'm going to cast my own. Probably bore it out to accommodate a thin battery powered candle or if anybody has the mad electronics skills to make something that would work (say battery powered remote controlled then I'm all ears.
IMG_9735.JPG
 
This thread is more than 3 years old.

Your message may be considered spam for the following reasons:

  1. This thread hasn't been active in some time. A new post in this thread might not contribute constructively to this discussion after so long.
If you wish to reply despite these issues, check the box below before replying.
Be aware that malicious compliance may result in more severe penalties.
Back
Top