Blood Bowl Orc Player

equib

Member
download.jpg With my previous (and first) Comic Con time cosplay mainly consisting of standing at the side whilst people took pictures of my Girlfriends Pyramid Head outfit, it was a challenge to make something to blow her out of the park. But I struggled to think what I could do as my maiden project (I went as a Division Agent last time so hardly much making), but having seen the SKS Props Orc (he has practically responsible for half this build so far), I knew a Blood Bowl Orc was perfect for me. A little obscurer than something from WOW or even the parent games (Warhammer etc) but I like that..

When it comes to the armour sections (yet to be made), the re-release of the board game in coming months will assist me to develop the builds own identity, blending old reference images with the Video game and the new miniatures. Living in the UK and doing this alone, RPF has been an invaluable tool and a key factor in this build ever going ahead, so cheers!

For those who don't know, Blood Bowl is set in an alternate version of the Warhammer Fantasy setting, populated by traditional fantasy elements.. that like nothing more than settling their differences with a good game of ultra violent American Football-eque antics, Sometimes they even score Touchdowns!

On with the build..
images.jpgWhen I started the build I was working with old images for inspiration but as it was my first project, I did lean heavily on the Orc Build by Steven at SKS Props, the difference is many of the materials are different due a lack of availability in my area. "Foam Skin" in the UK is verrry expensive and lacking in any kind of quality control and I also struggled to find firm foam that would offer support under my feet when I made the platform boots, this is where I used something we picked up on when doing the Pyramid Head Outfit...

unnamed.jpg

Expanding foam was laid onto a soft yoga mat creating very peculiar lumpy blob on the floor which was then carved with upholstery foam below the shoe to help raise the heel and provide comfort. This was all done before my EVA Mats (the Black Eva is approx 8mm across the build) arrived. Perhaps a couple of them would have been ideal to build up the heel, but that's hindsight. The expanded foam was then covered in thin layer of paper mache for protection

Like the SKS Prop, I then built up the skeleton of the boots, before covering in a smaller foam (3mm). As I lacked foam skin, I used combination of real leather (that given away to me and pleather, as I soon realised, the boots and gloves cover alot of surface area!

unnamed (2).jpg

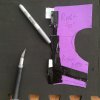
The outside of the boots is quite haphazard which is fitting for the outfits needs, without the mass produced work lines a Horde might benefit from, the outfits may be made by the player themselves (or a pesky goblin with nimble claws). The shin guards were created out of EVA with a template out of craft foam to make it symmetrical. A trim was added to both of the main pieces, and the toe cap with built with 3mm foam. Buckles etc were moulded out of Plaster of Paris, using liquid latex to make the moulds. Further fine details were added later on and I will go over this another time.

unnamed.jpgunnamed (1).jpg

The gloves/ gauntlets were made at the same time in a similar way to the boots and the SKS Prop, I wanted to have one hand open to hold a Spiked Pigs Skin. I will talk about that in a further post, for now here is a picture of the gloves and Pascal for size comparison.

unnamed (2).jpg

Next up is the helmet!
 
Last edited:
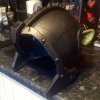
The Helmet caused me all sorts of problems, I followed the very good video guide on the Evil Ted Youtube channel but as i was working on my own using a polystyrene mannequin head, the first version was only big enough for the dog and needed to be far bigger. The second one was again too small so I added a couple of strips to make it wider. This made the helmet much bigger than i originally expected. Even with foam strips on the inside, my eyes were blind to the front of the helmet. I made this work though and when I considered the scale of the build, I felt a small helmet wouldn't work anyway and as this is a Blood Bowl (further referred by as BB) Orc, I am going for the big American Football-esque helmet.

unnamed (3).jpgunnamed (4).jpgunnamed (5).jpgunnamed (6).jpg

Ear holes were cut into the helmet using a craft foam template, and Orc ears are ready to be poked through at the very end of the painting. I did test this to make sure they looked right but no image of that. Faux rivets again out of plaster of paris were moulder and added at regular intervals. I went through about a dozen designs for a crude jaw like mouth guard but I never came up with one I truly loved. Maybe I can come back to this or make the helmet as sleek as I can to contrast a typical Orc helmet to a BB Player. I used Acrylic Caulk in the foam gaps, sanded with 240 and 400 grade sandpaper, with several coats of PVA/Water using a foam brush to try level it all out.

The Orc mask.. it's a crime of the highest order to use a mass produced mask I know I know. It started off as a place holder, great value of £6, the more I see it the more I'm tempted to keep it as my skills severely last when it comes to make things, especially sculpting masks. That said it does need a few modifications to get to my standards.
The jaw sticks out quite alot from my face and could be done with pulling back a little and tightening up. The beard was over a foot long and needed to be cut...it now needs more hair adding on as it's a little short. It gives me a reason to add more hair to the mask behind the initial line that was put on by the manufacturer to make it look more realistic. Silver-lining and all that. If i do use the mask, I am going to rebuild the teeth in a different material as the last thing i want is a floppy fang.

unnamed (10).jpg As I said earlier, everything had rivets put on, adding to the detail, as well as this, the right gauntlet had a Orc Glyph added on which was hand cut with a x-acto knife from the 2nd 3mm eva camping mat. The 2nd gauntlet will have short spikes on on inside as well as the player number. With better-than-average knowledge of american football compared to many in the country... I am still at a loss for a number that not only looks aesthetically pleasing but also suitable for the Orc's position.. suggestions on a postcard please!

I will update on the BB Ball on next post, any feedback, suggestions or advice for advancing further will be greatly appreciated. Muddling through on my own, learning new techniques and finding the wrong way todo things is all part of the experience. Perfect example I had was thinking i didn't need a dremel due to the cost. Well I was wrong there and happy to say so.

Didn't mention previously glue I'm using is the Evo-Stik Contact Adhesive and I need to re-illiterate, it says 5-10 minutes for a reason, don't be too keen to bring the pieces to together early as it's usually messier, and you'll probably have to re glue it back on. Same goes for hot glue gun, It was far messier and seams have been opening since.

Thanks for reading!
Lee
 
So... blimey, been a while. Christmas was an enforced break but like most people, life takes over and been struggling to get more than a hour at a time to work on the project. With the nature of it, wasn't really something could pick up here and there.
Onwards anyway..

Between posts, Blood Bowl has returned in a big way and it has been great to see the new models, getting hold of them in my hands and seeing all the associated artwork to go with the release, which certainly helps build an individual identity, away from the SKS Props basic build guidance my build was shamefully ripped/ inspired by.

The last image was the gauntlets, having looked at the new figures its all about extreme 'Knuckledusters' so spikes that were cut out of 3 layers of eva foam yoga mats were used to give a more prominent spike that I originally envisaged.
IMG_7617.JPG
Once both the hands & feet were done, they were spray platidipped and left to dry..

IMG_7236.JPG

Next up was the body suit. I decided I couldnt do without a dremel and this was used to shape the foam after being cut out using a carving knife. I tried to follow a muscle proportions of bodybuilders/ Orcs online, I think I got the spirit of it, but a B grade for me really, Once happy with the foam positioning and definition, was time to add the fleece.

IMG_7159.JPGIMG_7179.JPGIMG_7307.JPG
IMG_7365.JPGIMG_7580 (1).JPG

The material I had wasn't big enough to cover the whole arm, or whole chest so had to be done in sections, the latex will cover up the seems but certainly made it more time consuming.

Once the fleece was added on, it was time to work on the standard Blood Bowl Orc Issue "uniform", with suitably spiky shoulder pads. Again layered Eva foam, with a thinner easy to cut out foam on the left hand shoulder where the spikes could be set into. The gap in the left shoulder pad towards the bottom was filled with caulking and sanded. The end plate closest to the head was attacked liberally with the dremel and drawn into a pointed end.

FullSizeRender (2).jpgIMG_7596.JPG

The Orc will be carrying a ball (like most of the BB figures seem to be, but that's another story..). I showed this off elsewhere, but will go through that on the next post.
If you read this before I've figured out why the images have decided to rotate themselves, then I apologise..

Lee

IMG_7617.JPG


IMG_7159.JPG


IMG_7179.JPG


IMG_7307.JPG


FullSizeRender (2).jpg


IMG_7106.JPG


IMG_7580 (1).JPG


IMG_7365.JPG


IMG_7596.JPG


IMG_7236.JPG
 
Last edited by a moderator:
As you can see with the last image, the ball is made from a standard size American Football with a ring of eva foam along each side. These have spikes made out of latex stuck into them. Leaving the latex to cast into a spike (over 24 hours) meant I could be confident the spikes would be relatively uniform in shape and size, but also have a little bit of flexibility, which would help the ball with the rough and tumble of the field (and/or the inevitable knocks it would get over the course of its life.

This was then sprayed with plastidip, before being primed and painted.
IMG_7220.JPGFullSizeRender (1).jpg
The line under the sponsor needs touching up, but once that is done, a little bit of dry brushing and a varnish and it's pretty much good to go!

One thing I didn't show in last post was in regards to the felt covering the bodysuit. If I can't make it as clean as I wanted, I could at least ensure the zip on the back was covered up correctly. Even if this would be covered by a tabard or some sort out fabric, owed it to myself to do a good job where I can, but also opened possibilities that maybe a tabard wouldn't be needed...all being well. Where it does show the black zip on image is just where the material has been creased over the couple weeks it's been on and leant again the wrong thing..Does give you a chance to see how the back looks too.
IMG_7620.JPG

The helmet is done and awaiting painting, see the Orc ears to pop through, just to emphasise this isnt just a bulky human but a unique creature. The Helmet is relatively plain and I considered a jaw like cover around the mouth area. Might be too late but all depends how the face works out I suppose.
FullSizeRender.jpg
The RPF is a immeasurable tool for advice and inspiration, I thank you all. If you're reading this, cheers!
 
IMG_7773.JPGI was getting a little bogged down in the armour, so over the past few days, It's been about painting the "bodysuit" I watched a few youtube videos and went with turps painted onto the suit on its own with a chip brush then rubber cement, oil paint and a little bit of the turps to thin it all down dabbed on again with a brush (don't have a airbrush and wouldn't know how to use one anyway.. Started over a base layer of brown (made up of liquid latex and brown tint), the equivalent of 5-6 layers with 3 different shades of green resulted in the below.

IMG_7780.JPGIMG_7782.JPG

I loved it, but I wanted it a bit more vibrant and less, well less pooey (sorry for the crude comparison!) That's when disaster struck, almost!
Because I was struggling to get away from the brown I followed an alternative rubber cement paint technique (RBC & Turps then Oil Paint & turps). it was only then that I realised how opaque the paint was and it was going to cover what I had done already! I tried to thin it out as much as I could once it was on. Then left it to dry.

After it dried outside (my god it reallly stinks), it got rained on :( But.. when when, look how awesome it looks! It needs a bit of a wash and edges highlighted, and it certainly looks more.. natural? I liked how it was, but it was a little bit too varied. A mix of the two would be ideal, but there we go!
IMG_7785.JPGIMG_7790.JPG
 
SO, since the update four weeks ago, I had to add a extra drop shoulder guard to the right shoulder guard as it looked..well.. garbage. My expectations have gone up since I started this project months ago so felt I deserved better. It's not much but I like it much better. I curved the drop guard more than the full guard so it would be tighter to the arm.

FullSizeRender (4).jpg
FullSizeRender (5).jpg
The Left shoulder (I even swapped hands to show you), has already been uploaded but is now Plastidipped and has the rivets added just like the gloved
FullSizeRender (6).jpg
Finally the Orc's WWE belt, I mean Blocking belt is a WIP, the jaw is taken from a resin model, the face however is cast from the same model with plater of paris and glued onto a polystyrene skull with the front chopped off, helps with the weight. Sorry for picture.
FullSizeRender (7).jpg
Think I'm going to be going back to the helmet and making it bit more, Orc'y, with some small fangs built into the top of the helmet, but I'm not quite sure yet, once I do it, I cant go back.
 
In this weeks edition of talking to myself, I'm presenting everything done so far. At least everything other than the helmet which is due to have some more work done on it to make it look a little more gnarly and well.. Orc'y!

Gloves have been sprayed, painted, touched up, touched up again, then a mars black wash.
FullSizeRender (8).jpgFullSizeRender (9).jpg

Same with the boots
IMG_7834.JPGIMG_7833.JPGIMG_7830.JPGFullSizeRender (12).jpg

FullSizeRender (10).jpgFullSizeRender (13).jpg

Finding the outfit needs more colour so will be making the skull on glove a bone colour, or gold, currently undecided. The old Blood Bowl figures
use alot of yellow, which nowadays looks a little jarring and cartoony, so thinking of using gold as a "realistic interpretation". Though, what's more orc than
a skull coloured skull motif. Answers on a post card card.

And I am very very pleased to end post with my body double "Stefphen" completed. Enjoy

img_7818.jpg
 
Last edited:
Nice work :)
Why thank you!
-
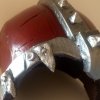
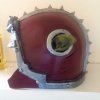
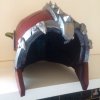
As alluded to previously, the helmet didn't get painted as I felt it lacked something, after adding on "metal tooths" to make the helmet a little more orc'y, I'm much happier with it. Being a Blood Bowl/American Football helmet, I wanted to maintain the look of sports equipment but the added extras make it look a bit more rough and ready. The pieces were cut out of scrap eva foam with a xacto knife and then hit with dremel to create uneven hammered look. I could have got away with not needing to re plastidip the whole helmet, except I used a heatgun on the underneath of the helmet to try smooth out more uneven parts.. and that lifted a little part of the coating...which all had to come off. Feels like a popped ballon when it's in a pile on your coffee table.
FullSizeRender (15).jpgFullSizeRender (14).jpg

Ears will be popped out of the side holes to further reinforce I will be a Orc, if the big green face and upper body doesn't give it away. A logical step really, helps the Orc hear the calls and fit their heads in the puny 'uman bash hat.
IMG_7856.JPGFullSizeRender (16).jpg

Here by thy' ears. They will be repainted to match the bodysuit above. (The last image has off colour balance)
Unsure how much I want them poking out. either a) subtle and poke out only a little or b) poke out much more noticeably, but perhaps not look as good.

Helmet has base layer of red and silver with Mars Black wash and now up to where the rest of the painting is.

Still to finish:
Skull Belt Buckle and belt

Still to start:
Straps for shoulder pads :/

red tabard - should be doddle
leg day trousers, considered extended tabard and visible green Orc legs gs but plain old trousers would be easier.
 
looks cool, how study is the expanding foam boot base. looking to make large oversize boots for a project never seen anyone use expanding foam before
 
looks cool, how study is the expanding foam boot base. looking to make large oversize boots for a project never seen anyone use expanding foam before

First time using it too. Girlfriend suggested It after making a Pyramid Head sword out of the stuff. After a year its still as strudy as ever. Because it dries really hard on the outside, needed to cave away with craft knife into the shape you want. There will be some air pockets but not many and due to the nature of what it's meant to be used for, it keeps its shape, but is really light and strong. Born out necessity as I had no other options to raise me up. Alternatively would have been 5 plus mats on top of each other with the cutting and gluing to go with it.
 
cool, yeah i was thinking the EVA mat option. cost wise there the same so its just practicality i guess

All depends what you're after. For me the expanding foam worked as it was really light, easy and quick to cut, but then I put eva foam on the bottom to protect the expanding foam and to maintain grip. I also used the off cuts of the expanding foam to stuff the bodysuit dummy. Can see you live in Uk, I got my expanding foam at a really good price at Screwfix (the no nonsense brand)
 
Looking great. I'm enjoying this read as I've thought about making an Ork of my own.

Sent from my SAMSUNG-SM-N900A using Tapatalk
 
Looking great. I'm enjoying this read as I've thought about making an Ork of my own.
Thanks Cayoke. This is my first ever outfit so I've learnt things during the process I wish I knew at the start. They do say necessity is the mother of invention don't you know.
Not exactly experienced but if I can be of any help to people on this thread, all good!
 
Bit of a bridge post really. These past few weeks I've been working loads on my website (WArringtonMusic.co.uk) coverage of the 3 day music festival in the town at the end of the month. If you fancy listening to/ downloading free music from 15 great artists do so from here: https://warringtonmusic.bandcamp.com/album/wam-festival-compilation-2017

Onwards, I really wanted to try everything together to get a look of things and what needs to be changed.I asked my lovely girlfriend to zip me up and take some photos and i soon realised how hard it would be for me to look after myself at a con. Also discovered i'm going to be pretty darn hot, and will not be able to see much. So, standard! Realised I will need some sort of fake bandaging at the bottom of my arms as the gloves are held lower than I anticipated. Either that or move the handle closer down the fist. Worried I would look lanky but Happy so far..just leaving the full picture off until I'm sorted there.

orc 0.JPG

Keen eyed may see that my left shoulder pad is on incorrectly. Something only noticed afterwards (hence, the above where visibility is a issue)
orc 2.JPG
Also took the opportunity to draw onto my old jeans where the books will meet the bulked up legs. I go Turkey next month so may try get some cotton trousers made (only for attaching the muscles onto). Anything to reduce weight and heat!!

orc.JPG

Orc mask has been hit with couple layers of liquid latex and brown hint and will start painting it to match the bodysuit very soon! I don't want the beard to be as long as it is so will be chopping it down and re-threading through the mask to hopefully make a much fuller beard. The even more eagle eyed will see a lack of ears. I just forgot them..

Love to know peoples thoughts as things start to come together
 
SO, after a two week holiday and a month spent focused on Warrington Music Festival (*plug here* WArringtonMusic.co.uk *plug ends*), it is time to focus on stephen. Last pictures showed the bodysuit painted but the mask was still a mucky brown. Well, now painted the same way, certainly didn't take as long as the bodysuit, makes me wonder if I missed a stage out but I'm happy with it for now. The beard will need to have a slight touch up, then will start the process of punching in the hair to make it fuller, and longer.

unnamed.jpg

I've started painting on the fine details onto the armour/uniform, I don't have a picture of the left shin guard so won't spoil the reveal, but below is the back of the shoe with my Orc's first endorsement! Not finished, still needs a final white to make it stand out, but I'm happy with it. A few lines will need to be gone over with red to clean them up, but the red sections are due one more coat of paint to really pop, so not too concerned.

unnamed (1).jpgunnamed (2).jpgunnamed (3).jpg

For those not au fait with Warhammer Lore, Nurgle is the Chaos God of Disease, Decay, and Destruction, and I
don't know about you, but based on some of the takeaways I've been to, it only makes sense he has a burger joint or two.

There is a Comic Con in Manchester at the end of July, I think it's about time to buck up my ideas and aim for then (is there
anyone from the UK on this site?!), realistically it's possible, expect more regular updates!

Lee
 
There are plenty uk people here ...some even from warrington itself .
Your build is looking fantastic, well done . It would be great to see it at mcm next month .
 
This thread is more than 5 years old.

Your message may be considered spam for the following reasons:

  1. This thread hasn't been active in some time. A new post in this thread might not contribute constructively to this discussion after so long.
If you wish to reply despite these issues, check the box below before replying.
Be aware that malicious compliance may result in more severe penalties.
Back
Top