spgfx
New Member
I had a friend request a set of these daggers as screen accurate as possible made from resin so they could take them to a con. They have a really cool blade design and it would make a great build. This build would also include a custom designed fitted sheath since one did not exist.
There are a few nice replica pieces made from metal and I used a combination of these and the limited screen shots for my build. I use a design from the Orcrist sword sheath as a basis for the Tauriel Dagger sheath.
The daggers are built from laser cut hand sanded hardwood.
The individual pieces and layout seemed pretty straight forward at first but my first attempt was a fail. I had a few issues with where the "metal frame" parts meet the wooden handle and when rough sanding found that some of the details were to small and when the sanding the actual form would these features would be gone.
Back to the drawing board -
I went about breaking out the individual pieces in a different manner and though about the way the actual dagger and handle would be created. Making the handle "metal frame" details in one piece that would capture the handle. I also made the handle from oak so I could have the actual wood grain in my final cast piece.
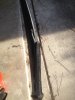
Here is the blade and handle with one side glued on. In my first attempt I was trying to make this with as few seams as poss. but that did not work out. The outer handle "metal" piece was made in 2 pieces with the oak handle insert fitting inside.

Here is the handle all glued to the blade and ready for sanding.


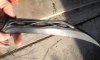
The details on the side of the blade are laser cut and glued to align with the cutouts in blade. These are the profiles were sanded and then the detail lines were re-lasered to the actual forms.

Here is the fully assembled dagger rough sanded and ready for the initial coat of primer.

The handle will be masked off so the oak wood will retain it's natural grain for molding and casting.
The sheath was fabricated in the same fashion as the dagger, from laser cut hardwood.

Once the pieces were cut. They were glued together on different levels to create a 3d profile.

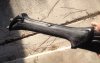
Test fit the sheath to the dagger.

Here is the sheath with the profiles rough sanded to shape.


There are a few nice replica pieces made from metal and I used a combination of these and the limited screen shots for my build. I use a design from the Orcrist sword sheath as a basis for the Tauriel Dagger sheath.
The daggers are built from laser cut hand sanded hardwood.
The individual pieces and layout seemed pretty straight forward at first but my first attempt was a fail. I had a few issues with where the "metal frame" parts meet the wooden handle and when rough sanding found that some of the details were to small and when the sanding the actual form would these features would be gone.
Back to the drawing board -
I went about breaking out the individual pieces in a different manner and though about the way the actual dagger and handle would be created. Making the handle "metal frame" details in one piece that would capture the handle. I also made the handle from oak so I could have the actual wood grain in my final cast piece.
Here is the blade and handle with one side glued on. In my first attempt I was trying to make this with as few seams as poss. but that did not work out. The outer handle "metal" piece was made in 2 pieces with the oak handle insert fitting inside.
Here is the handle all glued to the blade and ready for sanding.
The details on the side of the blade are laser cut and glued to align with the cutouts in blade. These are the profiles were sanded and then the detail lines were re-lasered to the actual forms.
Here is the fully assembled dagger rough sanded and ready for the initial coat of primer.
The handle will be masked off so the oak wood will retain it's natural grain for molding and casting.
The sheath was fabricated in the same fashion as the dagger, from laser cut hardwood.
Once the pieces were cut. They were glued together on different levels to create a 3d profile.
Test fit the sheath to the dagger.
Here is the sheath with the profiles rough sanded to shape.
Last edited: