WINGNIT
Well-Known Member
Hello All,
Here is a 1/24 Y-wing I'm working on. Originally, I had planned to strip the details off that were built onto the master by eyeball, and replace with authentic greeblies to accurize this kit a bit more. Although it's a great attempt at "Studio Scale", it has been a the topic of debate based on measurements, etc. After laying hands on it, and measuring know kit parts against it, I can attest to the fact that it is off in size (but only by a few mm in most parts). So first off- big props to the kit creator for eyeballing this to the level that was done with what appears to be no original kit parts as a jumping point.
After scrapping my idea of replacing all the details with original parts, I decided to just go with a basic Y-wing, using the elements I like most from all Y's. The paint will mainly be based on the Ladd Y. Some original kit parts will still be used where it can look right without throwing the look off or where the resin is soft (in that case, it had to be removed).
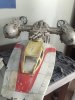
There was some serious warping in the neck, but as I mentioned, the resin was soft in places so I was able to heat and clamp to get some semblance of straight (at least from the top). The cobra head had some soft spots too where it wouldn't take paint or primer after multiple cleaning attempts. After the replacement never came, I decided to drill out those spots and backfill with apoxie sculpt, then smoothed with putty and sanding.
After adding some greeblies to the body, I developed too much of an itch to paint, so decided to test the paint on the head. Although fun, the resin is still pretty soft, and there are some small places where the paint and primer are already coming up (some where it works, some where it doesn't). I may have to make a cast of the cockpit myself and go with a clean slate.


http://i450.photobucket.com/albums/...3-A133-4A22-9537-9E9D3E65D8A5_zpsvovvevo7.jpg


Here is a 1/24 Y-wing I'm working on. Originally, I had planned to strip the details off that were built onto the master by eyeball, and replace with authentic greeblies to accurize this kit a bit more. Although it's a great attempt at "Studio Scale", it has been a the topic of debate based on measurements, etc. After laying hands on it, and measuring know kit parts against it, I can attest to the fact that it is off in size (but only by a few mm in most parts). So first off- big props to the kit creator for eyeballing this to the level that was done with what appears to be no original kit parts as a jumping point.
After scrapping my idea of replacing all the details with original parts, I decided to just go with a basic Y-wing, using the elements I like most from all Y's. The paint will mainly be based on the Ladd Y. Some original kit parts will still be used where it can look right without throwing the look off or where the resin is soft (in that case, it had to be removed).
There was some serious warping in the neck, but as I mentioned, the resin was soft in places so I was able to heat and clamp to get some semblance of straight (at least from the top). The cobra head had some soft spots too where it wouldn't take paint or primer after multiple cleaning attempts. After the replacement never came, I decided to drill out those spots and backfill with apoxie sculpt, then smoothed with putty and sanding.
After adding some greeblies to the body, I developed too much of an itch to paint, so decided to test the paint on the head. Although fun, the resin is still pretty soft, and there are some small places where the paint and primer are already coming up (some where it works, some where it doesn't). I may have to make a cast of the cockpit myself and go with a clean slate.
http://i450.photobucket.com/albums/...3-A133-4A22-9537-9E9D3E65D8A5_zpsvovvevo7.jpg
Last edited: