Captain America: TFA Bucky / POW Rescue Suit with Off-the-Shelf Parts

Mike J.

Master Member
Might as well get started posting; I've been working on this for at least two months already :)

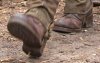
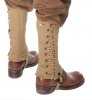
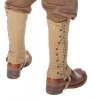
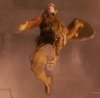
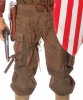
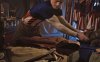
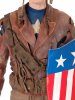
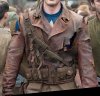
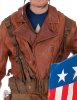
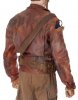
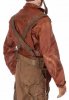
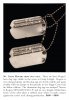
I am assembling a Cap costume, from the Bucky / POW Rescue / Hydra factory sequence, using as many off-the-shelf or off-the-rack components as possible.

Why? I thought that particular costume would be a little more forgiving for those of us not built like super soldiers, and I like the ability to acquire parts piecemeal, and modify them or swap them out later. Additionally, since this costume is supposed to have been thrown together by Steve using supplies he had on hand, much of it is closely based on real WWII US gear, and hence can be found as modern reproductions. Since my fabrication experience ends at spray paint and superglue, and my sewing experience maxes out at replacing buttons, this is also an attractive option for me: I can put together a suit that looks a damn sight better than a $40 piece of printed polyester from China, while requiring minimal modifications.

I am especially indebted to the members posting in the following threads:

The $250 Bucky Rescue

First Avenger

Hopefully, if you are so inclined, you can put together a good looking outfit in the three months left until Halloween, and save some money by learning from my mistakes.


-MJ
 

Attachments

  • CA+BB.jpg
    CA+BB.jpg
    798.7 KB · Views: 797
Starting from the bottom up:

Boots on the Ground

Rogers wears WWII US Army-style leather boots (likely ankle height), or possibly paratrooper ‘jump’ boots. The boots on film are most likely modern repros, with modified (modern) soles (Mini-Vibram soles, apparently, going by the mid-jump screen cap).

The accurate repro boots are about $140 or more. However, since the boots will likely attract the least amount of scrutiny, you can substitute almost any modern ankle-length boot with a dark brown color and probably get away with it. I had my eye on two passable pairs of such boots on Amazon for about $35, but ended up going with a $20 (tan) pair from Wal-Mart. With a generous application of brown shoe polish ($5) no-one should be the wiser. Your boots will need to be very thin at the ankles and above to fit under your pants and leggings. Many modern boots have padding around the ankle or top. I actually slit mine open along the inside of the ankle padding & pulled out the stuffing, since they’re really for costuming only, not daily wear.


-MJ
 

Attachments

  • Capboots1.jpg
    Capboots1.jpg
    114.7 KB · Views: 344
  • Capboots2.jpg
    Capboots2.jpg
    108.7 KB · Views: 413
  • Capboots3.jpg
    Capboots3.jpg
    113 KB · Views: 380
  • Capboots4.jpg
    Capboots4.jpg
    109.9 KB · Views: 331
  • Capboots5.jpg
    Capboots5.jpg
    128.1 KB · Views: 358
  • Knife 1.jpg
    Knife 1.jpg
    234.5 KB · Views: 296
Do the Stanky Leg(gings)

For his rescue mission, the Cap is wearing a pair of US M1938 Dismounted Leggings. The Captain's pair is an early-war, khaki colored pair. Late-war leggings had half the number of eyelets, and were also made in olive drab. Note that in the photos from the auction catalog below, they have been laced incorrectly.

Original leggings can be found online, as can cheap replicas and nicer replicas. I originally purchased a pair of the cheap (~$20) replicas from Amazon. They were unmarked as to size, and manufactured incorrectly (missing eyelets), and used thinner, flimsier metal parts for the buckle. If those had been the only problems, they might have sufficed, but they were also too small to fit well. I later purchased a nicer, more expensive ($40) pair of US-made repro leggings, in a large size (4-R). They fit better and are mfd. correctly and with thicker metal for the buckles.

Because the leggings are going to go over the tops of your boots and the bottoms of your pant legs, I do recommend a larger size, if you're on the fence. I'm wearing a 4-R pair over a pair of modern work boots and pants, and I'm not a huge guy, either (US men's street shoe size 10.5, height 5' 5", weight about 160 lbs).

Lacing up, putting on and taking off the leggings is not terribly complicated, but it is time-consuming and unfamiliar. I recommend these two reenactment sites for legging tips:

The 90th IDPG

WWIIMedic.com


-MJ
 

Attachments

  • Capboots5.jpg
    Capboots5.jpg
    128.1 KB · Views: 324
  • Capboots4.jpg
    Capboots4.jpg
    109.9 KB · Views: 316
  • klaw Cropped.jpg
    klaw Cropped.jpg
    827.4 KB · Views: 340
Mack the Knife

A lot of the Cap's gear for this sequence appears to be US paratrooper gear, which is fitting, since he's jumping out of an airplane.

On his shin, he appears to be wearing a US M6 sheath with an M3 knife. This may switch sides during the escape from the Hydra factory.

Replicas start at about $20. I've not decided if I'm going to get one of these or not.


-MJ
 

Attachments

  • Knife 1.jpg
    Knife 1.jpg
    234.5 KB · Views: 303
  • klaw Cropped.jpg
    klaw Cropped.jpg
    827.4 KB · Views: 278
  • Knife 2.jpg
    Knife 2.jpg
    416.3 KB · Views: 286

Sing the Praises of Pants


Rogers is wearing a pair of reinforced US paratrooper pants: M1942 'jump trousers.' Cheap versions can be found for $40, nicer versions for $60 and up. I have a cheap pair, made in China. Not entirely happy with them, but I'm reluctant to drop more money on a nicer pair that I'll frankly get very little use out of. It's worth noting that these have a button fly. Not a zipper, and not snaps: buttons. It seems Rogers may be missing the tie straps for his left leg. Allegedly, the 101st used a strip of webbing for the ties, while the 82nd used a strip of OD canvas instead. Rogers' appears to be the canvas. Rogers also wears a plain, khaki web belt with these pants.

A hypothetical alternative: Find a pair of khaki cargo pants, and with careful application of canvas cloth or masking & spray paint, add the contrasting-colored reinforcements. Almost certainly half the price of any replica pair. Anybody willing to try that? It might look OK.


-MJ
 

Attachments

  • Knife 2.jpg
    Knife 2.jpg
    416.3 KB · Views: 349
  • klaw Cropped.jpg
    klaw Cropped.jpg
    827.4 KB · Views: 318
  • Knife 1.jpg
    Knife 1.jpg
    234.5 KB · Views: 324
  • Pants & Belt.jpg
    Pants & Belt.jpg
    819 KB · Views: 320
  • Pants & Belt 2.jpg
    Pants & Belt 2.jpg
    157.6 KB · Views: 315
  • CapPants1.jpg
    CapPants1.jpg
    247.6 KB · Views: 414
Looking forward to seeing how this turns out. I'm hoping to make this costume at some point in the future myself, although I might not be able to afford to be as accurate.
 
Thanks for the interest! I don't have a crazy amount of money to drop on this, which is why I started months early, and why I'm mentioning prices and alternatives :) If you were to budget for purchasing one component or two a month, you could have this ready for 2017, I think. Rogers & Bucky wear nearly identical boots, so that's in your favor.

It's still gonna be expensive, the most I've ever spent on a costume, but even $250 doesn't hold a candle to some costumes on this board. I'm usually pretty cheap when it comes to costuming.

Shirts vs. Skins

Rogers is wearing his USO show costume top under the leather jacket, tucked into his jump pants. I will be using a Amazon-bought 'classic' Cap costume cotton shirt, which I got for about $18. It's a short sleeve, navy blue shirt, without a star on the back, but aside from that, it's quite close enough for me, especially since it'll barely be visible through the front of the jacket. Rogers' USO shirt is sewn together from multiple pieces of colored fabric (I think), with an embroidered star, and the Amazon shirt is similarly constructed.

If you really want to save some money, you can just make a white star for a royal or navy blue shirt you have on hand. I made a quick & dirty Clark Kent costume by cutting the metallic "S" shield off the Batman v. Superman cereal box and taping it to a blank navy shirt. Wear a long sleeve shirt & tie over it, unbuttoned, and pull them open for photos. Worked like a charm, and dirt-cheap.


-MJ
 

Attachments

  • Pants & Belt.jpg
    Pants & Belt.jpg
    819 KB · Views: 316
  • shot0094.jpg
    shot0094.jpg
    515.3 KB · Views: 320
  • Cap.jpg
    Cap.jpg
    501.1 KB · Views: 758
Full Leather Jacket

Over his USO show shirt, the Cap is wearing a stylish brown leather jacket. "Biker" style jackets like it apparently go back to 1928. Note that auction photos of the Cap's jacket show it as orange-ish, while on screen it looks much brown-er.

If you don't have a brown leather jacket like it, you may be able to find one at a thrift shop / consignment shop / used clothing store / yard sale / garage sale / etc. Those will probably be your cheapest options. Since we're approaching winter / fall / autumn, the selection may be getting better. I had a very difficult time finding any leather jackets locally when I last searched a couple weeks ago in July. Otherwise, it's eBay or Etsy, or purchasing new.

I ended up buying a replica jacket from an overseas manufacturer from eBay. I chose vinyl (about half the price of leather, ~$70, including shipping). Accuracy is pretty good. The zipper pulls are not exact, but only we would notice. The vinyl / pleather is quite thin, and I'm worried about my ability to 'weather' it at all without destroying it or ruining it. I may leave it totally 'undamaged.'


-MJ
 

Attachments

  • Cap.jpg
    Cap.jpg
    501.1 KB · Views: 347
  • shot0094.jpg
    shot0094.jpg
    515.3 KB · Views: 250
  • CA+BB.jpg
    CA+BB.jpg
    798.7 KB · Views: 333
  • klaw Cropped.jpg
    klaw Cropped.jpg
    827.4 KB · Views: 294
  • BeltSusp1.jpg
    BeltSusp1.jpg
    283.2 KB · Views: 907
  • BeltSusp3.jpg
    BeltSusp3.jpg
    315 KB · Views: 372
  • JacketSusp1.jpg
    JacketSusp1.jpg
    1 MB · Views: 282
Thanks for the interest! I don't have a crazy amount of money to drop on this, which is why I started months early, and why I'm mentioning prices and alternatives :) If you were to budget for purchasing one component or two a month, you could have this ready for 2017, I think. Rogers & Bucky wear nearly identical boots, so that's in your favor.

True. And I do already have an identical pair of WWII US gaiters for another cosplay and I'll be able to use the same pistol as for Bucky, so that's a couple fewer things to buy. The main problem is I've got a lot of other projects already planned. Just depends on what I decide to prioritize I guess.
 
Belt & Suspenders

Over his jacket, Steve is wearing a M1923 cartridge belt, with a pair of M1936 suspenders (sort of), and an additional strap with two pouches on it.


Repro M1923 cartridge belts start at about $20. Steve’s cartridge belt appears to be unmodified, aside from weathering. I have a cheapie one from eBay that's surprisingly hardy, given the usual quality of the 'cheap stuff.' The snaps are a bit stiff, but since I'm not going to be keeping anything in them, it's a non-issue. I plan to pick up some foam rubber or styrofoam sheet to stuff the pockets with, since Steve's seem to be full. Attached to his cartridge belt on his right side is a brown leather US M1916 pistol holster (containing a M1911A1 pistol). The holsters start at $30 on Amazon, for real leather repros.


Suspenders: Repro M1936 suspenders start at about $25, however: what Rogers is actually wearing is slightly different. His appear to be based on the ‘standard pattern’ M1936 suspenders, but with wider straps reaching all the way down the back, and an additional D-ring sewn to the front of his left shoulder. I have a cheap pair of suspenders from Amazon ($27), though I did replace the original friction buckles with nicer, thicker repro buckles ($1 each). As I lack a sewing machine or skills, I'll not be adding the extra D ring. Somehow, during the end of the rescue mission, Steve loses one suspender.


Rogers is also wearing a US map case strap diagonally across his chest, with two US compass pouches strung on it. Cheap compass pouches can be found on eBay for $10 each, and nicer repros for $20 each. The repro map case straps start at $20, however, Steve’s is again slightly modified at the lower end.


-MJ
 

Attachments

  • JacketSusp1.jpg
    JacketSusp1.jpg
    1 MB · Views: 507
  • BeltSusp3.jpg
    BeltSusp3.jpg
    315 KB · Views: 390
  • BeltSusp1.jpg
    BeltSusp1.jpg
    283.2 KB · Views: 322
  • shot0094.jpg
    shot0094.jpg
    515.3 KB · Views: 301
  • BeltSusp4.jpg
    BeltSusp4.jpg
    181.8 KB · Views: 295
  • BeltSusp2.jpg
    BeltSusp2.jpg
    218.5 KB · Views: 360
The Gloves Come Off

Rogers is wearing what appear to be WWII US paratrooper-style tan leather gloves. Somewhere in Europe, there's a US paratrooper missing almost all his gear...

Modern repro paratrooper gloves go for about $30. I picked up a $10 pair of yellow-y leather work gloves from the local hardware store. After a generous treatment with baseball “glove oil,” a little light sanding with 2000 grit sandpaper, lightly punching a brick wall, an application of tan shoe polish, and a second application of glove oil, I’m pretty satisfied with their current 'used' appearance and feel. Mine are not exact replicas, of course, but they're close enough for my needs.


-MJ
 

Attachments

  • shot0094.jpg
    shot0094.jpg
    515.3 KB · Views: 244
  • CA+BB.jpg
    CA+BB.jpg
    798.7 KB · Views: 340
  • glove1.jpg
    glove1.jpg
    89.7 KB · Views: 251
  • glove2.jpg
    glove2.jpg
    84.2 KB · Views: 288
Helmet Laws

Steve ‘borrows’ one of his USO show girls’ helmets for the rescue mission. This is a US M1 type helmet. It consists of a shell, a liner, helmet chin straps, a liner chinstrap and paratrooper yokes and leather chin cup (and the suspension / sweatband / webbing inside the liner). Cheap repro helmets start at $40 on eBay, everything else substantially more than that.

I, however, purchased a plastic ‘costume’ helmet from Amazon for about $15, and have since purchased repro & surplus straps to add to it. Frankly, the additional gear brings mine up to $35 at least, plus the blue spray paint ($5?), and the epoxy I got to mount the straps to the interior ($5?).

No matter what you get, you will need to repaint your helmet blue and add a white “A.” I am additionally dabbing plain white glue on the exterior surface of my helmet with a cheap, broad brush in an attempt to simulate the rough surface texture of the real thing (which was apparently ground cork mixed into a binding agent?). It's a bit better, but not as effective as I'd hoped. Additionally, my plastic helmet had some ejection pin marks / sprue stubs which I felt compelled to fill with putty and attempt to texture.


-MJ
 

Attachments

  • shot0094.jpg
    shot0094.jpg
    515.3 KB · Views: 223
  • Cap.jpg
    Cap.jpg
    501.1 KB · Views: 336
  • shot0062.jpg
    shot0062.jpg
    711.2 KB · Views: 266
  • shot0061.jpg
    shot0061.jpg
    461.5 KB · Views: 301
  • shot0057.jpg
    shot0057.jpg
    581.6 KB · Views: 275
  • Helmet 6.jpg
    Helmet 6.jpg
    305.4 KB · Views: 340
  • Helmet 4.jpg
    Helmet 4.jpg
    246.1 KB · Views: 279
  • Helmet 1.jpg
    Helmet 1.jpg
    215.5 KB · Views: 273
  • captain_america_11012011-A.jpg
    captain_america_11012011-A.jpg
    879 KB · Views: 279
The Goggles Do Nothing

For his parachute jump, Steve is wearing a pair of WWII US Army Air Corps AN-6530 goggles. They are crazy expensive. I bought a $12 pair of cheap, all-plastic, vaguely-similar looking goggles from Amazon. They will need to be painted, at least, to simulate the tan padding and strap on the real googles. Oddly enough, you can find replica / replacement straps for the real goggles on eBay for about $25.


-MJ
 

Attachments

  • Helmet 1.jpg
    Helmet 1.jpg
    215.5 KB · Views: 268
  • Helmet 4.jpg
    Helmet 4.jpg
    246.1 KB · Views: 258
  • Helmet 6.jpg
    Helmet 6.jpg
    305.4 KB · Views: 253
  • shot0062.jpg
    shot0062.jpg
    711.2 KB · Views: 249
  • captain_america_11012011-A.jpg
    captain_america_11012011-A.jpg
    879 KB · Views: 232
  • Cap.jpg
    Cap.jpg
    501.1 KB · Views: 288
  • shot0094.jpg
    shot0094.jpg
    515.3 KB · Views: 232

Moral Compass


Captain America carries a lensatic compass with a picture of Agent Carter inside the lid. This is apparently a scrap torn out of a newspaper, suggested by the screened photograph. The screencaps suggest at least two compasses were used: one with a black rear sight (in the black & white newsreel footage) and one with a bare brass rear sight (the color screencaps).

Modern (and mostly metal!) repro compasses can be bought for as little as $10, and they are close to the originals in design.

Enhancement of the newsreel image reveals the manufacturer of Rogers' compass. The dial appears to be marked: the top line, ending in a "Y" and the bottom line ending in "U.S.A." Because there were very few manufacturers of these compasses during WWII, this gives us our maker: The William and Lewis Ephraim Gurley company, of Troy, New York. They made precision instruments, lab instruments, surveying equipment, etc. from 1845 and still do today.

And no Cap compass would be complete without a picture of your best girl! This image should be printed at "actual size" / 600 dpi / 2.083 inches wide & tall.


-MJ
 

Attachments

  • Newspaper 1.jpg
    Newspaper 1.jpg
    847.3 KB · Views: 213
  • shot0102A.jpg
    shot0102A.jpg
    813.9 KB · Views: 249
  • shot0102B.jpg
    shot0102B.jpg
    166 KB · Views: 263
  • shot0101.jpg
    shot0101.jpg
    300.3 KB · Views: 257
  • shot0101A.jpg
    shot0101A.jpg
    120 KB · Views: 261
  • s-l1600 copy.jpg
    s-l1600 copy.jpg
    485.7 KB · Views: 259
Tag – You're It!

Steve Rogers also wears a pair of US dog tags. His appear to be the second or third type, based on his induction date (June 1943?) & the data on the tag. Note that, as shown on the tags and on his paperwork, Steve has no next-of-kin. This site has a lot of info on US WWII dog tags, including how the data was formatted:

https://www.med-dept.com/articles/u-s-army-ww2-dog-tags/

Steve's tags are only seen during the Camp Lehigh sequences, I think.

You can order tags online for about $10. I lucked out and had a military surplus store within driving distance, and got a pair made for me, on the correct WWII type blanks, for $8.50. Now, because I had only typed the data on Steve's tags in my 'shopping list' of accessories & whatnot, when I filled out the form at the store, I formatted it wong. Eventually, I'm going to have to drive back over there and have a new pair made, so here's my advice to you: print out this picture of Steve's tags, and take it with you if you're having them done in person, or refer to it if you're ordering them online.


-MJ
 

Attachments

  • Dogtags.jpg
    Dogtags.jpg
    356.8 KB · Views: 326
  • shot0014.jpg
    shot0014.jpg
    619.2 KB · Views: 234
  • shot0016.jpg
    shot0016.jpg
    351.3 KB · Views: 254

Costume Test 1


Threw this on just now real quick. Left off some stuff (gloves, holster, one legging). Obviously there is still plenty of work to be done: helmet, shield, etc.

Where this is most useful is comparing my setup to the real costume: my ammo belt is riding too high, the pouches and suspenders should be darker, jacket zipped too high, etc. Additionally, I needed to lengthen the belt & suspenders due to the increase in my dimensions when I'm wearing the jacket. That's why we test fit.

Before this shot was taken, I'd already dyed the leggings, pants and the cartridge belt. Their stock color is a lighter khaki / olive drab than this photo. On film, Steve's gear looks brown. So I'll mix up another batch of dye & re-do the web gear.


-MJ
 

Attachments

  • Comp 1 - Aug 7 2016.jpg
    Comp 1 - Aug 7 2016.jpg
    544.7 KB · Views: 413
Miscellaneous Data 1

Printed out my compass pic – very happy with it. Looks like a keeper :)

A few words regarding dyeing fabric: I did re-dye my belts & straps & pouches last night. And I should have put a bit more thought into it. Last time I ran the dye bath, I was dying the leggings, the cartridge belt and the pants. This time it was just the belts & pouches, which was certainly far less fabric than before, but I added about the same amount of dye and let it soak for longer. This was a mistake. The suspenders darkened a bit; I suspect they're synthetic or a blend. The compass pouches, map case strap and cartridge belt darkened substantially. Too dark, in my opinion. Even after looking at them after drying all day today. So, I've taken the suspender off and I'm now soaking the remainder in common laundry detergent to try to remove some of the dye. If this isn't satisfactory, there is bleach, hydrogen peroxide, even a Rit dye remover to try, though those all seem very harsh and risky.

It's easier to go darker in smaller steps than it is to 'take it back,' and try to remove the dye job.

They don't look terrible, they just look ... chocolatey brown; a bit too dark for my tastes. The final addition of some fuller's earth will lighten them up a bit as well. Upon further consideration of the helmet, I'll have to de-saturate that a bit as well. Fuller's earth and / or maybe some gray washes. We'll see. Plenty of time. I've started looking around for some EVA foam to make the shield with. I'd also like to pick up some of the hard insulation foam to carve into pocket stuffers: Steve's cartridge belt and pants pockets look pretty full, but I want something waterproof and light, hence the foam.


-MJ
 

Attachments

  • IMG_0332-A.jpg
    IMG_0332-A.jpg
    317.6 KB · Views: 209
This thread is more than 7 years old.

Your message may be considered spam for the following reasons:

  1. This thread hasn't been active in some time. A new post in this thread might not contribute constructively to this discussion after so long.
If you wish to reply despite these issues, check the box below before replying.
Be aware that malicious compliance may result in more severe penalties.
Back
Top