Revell Republic Star Destroyer, Venator Build with heavy mods'n upgrades

Freeliner

New Member
I've been building working on this build for over a year, and every time I think I see the end in sight, I find something else I want to do it.

Over the next couple of weeks I'll start to post some of the progress I've already made, and hopefully catch up to where I am.

A few goals I'm trying to accomplish with this build;
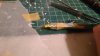
1. Light the model. Ill be using a mix of different LEDs, mostly 3mm and 5mm prewired for a 9V power source. I'll use a combination of straight LEDs, fiber optics, and backlit windows made from Micro Krystal Klear. I may use a couple of SMT LEDs on the flight deck.

2. Replacement of the existing hanger bay on the lower hull with a 3D Printed upgrade from Shapeways. I also have a set of 3D printed engine nozzle inserts.

3. Using small gauge brass/aluminum tubes/rods, and small gauge magnetic wire, add additional details/piping to the engines and heavy turbolaser recesses.

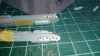
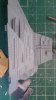
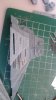
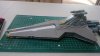
4. Scribe additional panel lines to the hull, and scratch build up the hull using styrene sheets and shapes.

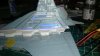
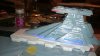
5. The most ambitious part, which could make or break the build, modify the upper hull to display an open flight deck, complete with full squadrons of ARC-170s, ETA-2s, LAATs, V-wings, clone war Y-wing, v-19 torrents, Jedi starfighters. Flight deck will include Fighter and vehicle hangers.

I started out with two bottom hulls and no top hull (don't ask) but I was able to obtain a top hull half. Some of the early pictures show my first attempt at scratch building the top hull.

I also don't know why I chose the bridge lighting to be Red, chaulk it up to the flight deck being open and squadrons about to take off.
 

Attachments

  • DSC_0021.JPG
    DSC_0021.JPG
    3.3 MB · Views: 668
  • DSC_0027.JPG
    DSC_0027.JPG
    3.3 MB · Views: 674
  • DSC_0038.JPG
    DSC_0038.JPG
    1.4 MB · Views: 661
  • DSC_0039.JPG
    DSC_0039.JPG
    1.3 MB · Views: 639
  • DSC_0042.JPG
    DSC_0042.JPG
    3.1 MB · Views: 552
  • DSC_0049.JPG
    DSC_0049.JPG
    2.6 MB · Views: 859
  • DSC_0058.JPG
    DSC_0058.JPG
    3.1 MB · Views: 1,824
  • DSC_0104.JPG
    DSC_0104.JPG
    3.1 MB · Views: 1,631
Going to attempt to use photobucket for the first time. If this works I'll post more tonight when I'm not work and I can use my laptop, doing this using my phone is a pain.

DSC_0083_zpshsjvjgpy.png
 
Nice work.... I know how you feel, I'm always doing way more detail than I originally intended. My biggest issue is building a part or a section, not liking it, then rebuilding it....sometimes 3 times. I have SO many "first try" parts I've scrapped. Anyway, can't wait to see the lighting. I'm currently at that stage too on my x-wing.
 
Here are a couple of shots of the engines.
I wired them with blue flickering LEDs, the kind used in restaurant tea candles.
Gonna prime then black then build up the colours from there. I'll use a sanding stick on the added pipes to scuff them up a little and get the metal to come through. Also had to sand the inner diameter of the engine nozzles in order to get the 3d printed nozzle inserts to fit.

I'll post pictures of the engines lit up soon.

DSC_0086_zpsp35r0bnv.png


DSC_0085_zpsfktysinb.png
 
Here are some picture of the 3D printed parts from Shapeways. I was able to get all the fighters in 1/2256 scale. They're small enough that I can get a couple of squadrons on the flight deck of each type. I was able to get them in both flight modes and landing modes, so some of them will hopefully be in the process of taking off.

I made the flight deck out of styrene sheet, and then made the entrances to the vehicle hangers from two styrene square tubes glued together. Once they set I cut out the centre out and filed down the nubs to make the entrances. I've been experimenting with using micro Krystal Klear to fill in these entrances to simulate the atmospheric shield between the vehicle hangers and the flight deck. We'll see...

The lower hanger bay:
DSC_0259_zpsxff5q2uf.jpg


The engine nozzle inserts:
DSC_0260_zpsq6mmn89a.jpg


The 1/2256 scale fighter:
DSC_0261_zpsxgqqlv6o.jpg


Fighters on Deck:
DSC_0001_zpsmk48ov1h.jpg
[/URL]
 
I was going to post more sooner, but life happens, and I busted my phone that had a lot of work in progress photos.

Here are some updates:

The engines and nozzle inserts before painting:

DSC_0086_zpsp35r0bnv.jpg


The engines painted a glossy black before an application of Alcad II Stainless Steel.

DSC_0136_zpsrd3e0yfm.jpg


DSC_0135_zpsnfmooswj.jpg


DSC_0133_zpsfyroeplc.jpg


DSC_0134_zpso99zmu8o.jpg


Sent from my SM-T560NU using Tapatalk
 
Last edited:
And skipping forward, upper hull has been primed and painted, turbo canon barrels replaced with brass/aluminum tubes, runway lights have been run using fiber optics and the runway painted. The flight deck doors have been painted but I haven't permanently attached them and yet.

DSC_0139_zpsne8jbve1.jpg


DSC_0140_zpsjreglfec.jpg


DSC_0142_zpsiudc30ej.jpg


Sent from my SM-T560NU using Tapatalk
 
It looks absolutely incredible. Just started building one and would be happy if it looked half as nice. Amazing job.
 
WOW!!! That is just the most awesome! Where did you get the all the star fighters?

Sent from my SM-T230NU using Tapatalk
 
And skipping forward, upper hull has been primed and painted, turbo canon barrels replaced with brass/aluminum tubes, runway lights have been run using fiber optics and the runway painted. The flight deck doors have been painted but I haven't permanently attached them and yet.

DSC_0139_zpsne8jbve1.jpg


DSC_0140_zpsjreglfec.jpg


DSC_0142_zpsiudc30ej.jpg


Sent from my SM-T560NU using Tapatalk
AWESOME! I recently did a Venator myself and got another one because I want to mod it how you've done yourself with the fight deck open. May I ask how you removed the upper flight deck? Really need the advice and tool tips!
 
This thread is more than 4 years old.

Your message may be considered spam for the following reasons:

  1. This thread hasn't been active in some time. A new post in this thread might not contribute constructively to this discussion after so long.
If you wish to reply despite these issues, check the box below before replying.
Be aware that malicious compliance may result in more severe penalties.
Back
Top