Y Wing based on the Dave G open source project

Scott Graham

Sr Member
RPF PREMIUM MEMBER
Hi all. I've decided to try following the Ladd Y on which Dave based his proportions.

Here is my progress so far on this build. I've ordered the shapeways parts for the neck so I can continue on that soon, after a good primer job.

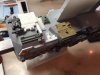
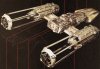
I've contemplated removing a cylinder from the Hurricane engines in order to not extend the wing forward, but that'll probably not work out so well - it would be too noticeable. So I'll next be extending the wing leading edge between 1/8" and 3/16".

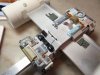
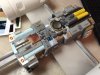
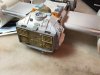
I found the fit of most parts on the bottom to be tight but acceptable. To the side of the mount area I didn't add a smoke stack from the 1/1200 ship (can't remember the name right now). The part is supposed to fit next to what is a tool rack from the fujimi jagdpanther. I also had to shave down the big Yamato bridge piece that sits along the centerline. No biggie.

One interesting part of the bottom pieces is that they go right to the end of the frame at the back of the fuselage. You can see on the actual Y in the underside view I've attached. This Y seems to have a shorter rear end than the other Ys, so that's why the parts go all the way to the end.

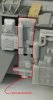
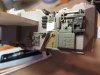
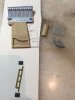
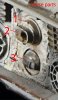
Decorating the sides of the fuselage has been pretty swift once I started casting some of the Centurion parts that are used all over this Y. I also cast the Nichimo i-19 and Morgan plus 8 parts so I can release them again into the wild. I'm using silicone putty for the molds so far. It seems pretty simple and easy to use for parts that just need a one sided mold. White parts in the photos are cast.

It's been fun and quick so far, but some tough IDs are slowing down progress quite a bit.

Thanks to Dave G without whom I couldn't have dreamed of making a Y. And thanks to S and D for the help and the parts castings!
 

Attachments

  • IMG_2240.JPG
    IMG_2240.JPG
    517.8 KB · Views: 635
  • IMG_2241.JPG
    IMG_2241.JPG
    572 KB · Views: 763
  • IMG_2242.JPG
    IMG_2242.JPG
    447.8 KB · Views: 648
  • IMG_2243.JPG
    IMG_2243.JPG
    457.8 KB · Views: 649
  • IMG_2245.JPG
    IMG_2245.JPG
    198.9 KB · Views: 592
  • Screen Shot 2016-07-15 at 8.54.56 PM.jpg
    Screen Shot 2016-07-15 at 8.54.56 PM.jpg
    3.8 MB · Views: 676
Last edited:
Thanks Hammer.

A shot of the rear. I still don't know the donors that go where the holes are in the center. If anyone can help me out there or sell me castings, I'd appreciate it.
 

Attachments

  • IMG_2246.JPG
    IMG_2246.JPG
    484.7 KB · Views: 478
  • Y back panel parts ID needed.jpg
    Y back panel parts ID needed.jpg
    2.1 MB · Views: 442
Last edited:
Thanks so much for sharing! I love the view of the underside of that Y you have. So cool to see a closeup of all the parts so tight together and fitting so perfectly. Much better than just seeing the black and white MoM scans posted in the parts ID thread! Awesome work Scott!!!
 
I have this one from stu I think it is from the Tamiya 1/35 Panzer III . Also some pics from the rear of my red jammer to show that bottom part better.

IMAG0232_zpsbwrxxyam.jpg


IMAG0231_zpsqga9usse.jpg
 
Last edited:
Great work So far Scott !

I dont understand the Ladd being shorter than the other Ys ?

It is exactly the same length that the other, it has a pyro body (exactly the same than the MOM Y) which was made after a casting coming from the same mold than Red Jammer and Gold Leader with a few extra parts added to it. Length was not modified.


The bottom piece is a turret from the Tamiya 1/700 Yamato/Musashi


Sent from my iPhone using Tapatalk

No the 1/700 Tamiya parts are too small, it's from the same 1/600 Yamato used all over the Y-Wing.

- - - Updated - - -

You used a Quad Gun (or 25 pounder) parts on the starboard side (tan part), it should be from the Tamiya Centurion.
 
Great stuff Scott. Gold 2 is the one I'm aiming for once I've crippled my finances on the donor kits. I'll be following this one with keen interest.
 
Thanks guys for the compliments and parts help!

I have the Panzer III M/N and the Yamato parts (that someone kindly cast for me). I feel a little stupid having not noticed I had the parts already! :)

Julien: maybe it's that I keep looking at red jammers that I feel that there are different length hulls. It's just that it seems the parts on yours and Steve's Ys seemed to me to end before the rear rectangular "ring" is added to it. The ring usually has no parts going to the edge on the bottom. I just noticed your latest build has the parts all the way to the edge, like this one. I'm still a little confused, but it works out.

Regarding the 25 pounder parts: they're on the port side like they should be. Maybe you weren't seeing that in the pics when you looked at them. :)
 
Yeah Red Jammer butt is different for some reason !
Instead of in setting the Jagdtiger mount cover plate inside the hull, into the original surround, they framed that plate and glued it on the original casting surround (and off center with that ! :D). That's why it looks longer, however Red Jammer body casting is exactly the same that any other, and DaveG Y is correct so no worry if you're sticking to the Ladd Y !

Regarding the 25 pounder part, it is not used on any Y :)
Red Jammer has a piece of the cockpit bulkhead (that many think it's from the 25 pounder), cant remember the part used on Gold Leader (Im at work), and it's from the centurion on any other Y for the good reason that it is not an added part but part of the master/casting. The Ladd and MOM have this pyro body with that Centurion part.
 
Oh, I forgot about the quad/25 piece down there. I was following one of Steve's pics for that. Thanks for posting the pic!
 
I said starboard, not port side :)

Still regarding the starboard side, those centurion parts were not used on the triangle part (2 small centurion brackets were though). Same as port side, a piece of the back cockpit casting was used.
 
Are these parts part of an assembly? Are they Centurion parts, or is this the color of your casting resin? If Centurion parts, I can't find any in the kit that resemble them.

I'll try to find a shot of that triangle piece. I don't have much photo reference of the port side. Again I was following Steve's build in order to move things along...
 

Attachments

  • tox starboard.jpg
    tox starboard.jpg
    1.4 MB · Views: 394
Are these parts part of an assembly? Are they Centurion parts, or is this the color of your casting resin? If Centurion parts, I can't find any in the kit that resemble them.

I'll try to find a shot of that triangle piece. I don't have much photo reference of the port side. Again I was following Steve's build in order to move things along...


Yes it's a casting of the cockpit back plate. Several pieces are heavily used on both flanks of the Y pyro body (used on the Ladd Y)

I can assure you the pyro body triangle does not have these details.
Maybe on Gold leader which used a previous generation body casting that did not have details on the flanks.

- - - Updated - - -

[edit] Oops, what you circled is actually a piece of the cockpit backplate casting (top). The bottom is Centurion, same than the one used on the opposite side.
 
This thread is more than 6 years old.

Your message may be considered spam for the following reasons:

  1. This thread hasn't been active in some time. A new post in this thread might not contribute constructively to this discussion after so long.
If you wish to reply despite these issues, check the box below before replying.
Be aware that malicious compliance may result in more severe penalties.
Back
Top