Custom MK 1 dalek build

FreddySchramm

Active Member
Last year I Wanted to go about building a replica Dalek from Doctor who. I thought this would make a great portfolio piece and would be an excellent item to have at my Art school's Junior year review. I got My resources from http://www.projectdalek.co.uk/mainsite/index.php/dalek-plans

They provide the most accurate blueprints for each version. I decided Since I was on a tight schedule to build the Mk1, since it's considered the most simple design. I put my own spin on it however.


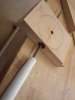
I CNC'd the skirt frame, this month I didn't feel like cutting it all out by hand so I just transfered the measurements from the plans provided into Solidworks and made sure to cut it so it had a nice Chamfer to help the panels line up nice and snug.

13578612_10205387417958618_1274760405_n.jpg


Cut the panels One by one to line up with the Base
13576590_10205387418238625_1638610815_n.jpg13578483_10205387419438655_1318894999_n.jpg13599089_10205387417518607_492718154_n.jpg
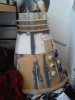
Just to save some money and a trip to Douglas and Sturges, I only fiberglassed the corners of the inside. I didn't see a need to do the full interior since Structurally I only need to focus on the corners. Saves alot of weight too.

13578656_10205387419678661_2048145918_n.jpg


After that I applied Bondo to the edges to make them nice and seamless.
13595436_10205387419278651_464499579_n.jpg13595428_10205387418678636_2074928300_n.jpg


I had to make sure that the hemispheres were perfectly leveled all around. I had to do my own measurements since I put the panels before drilling the holes. Good thing I didn't forget all that Trigonometry !!
13589206_10205386998188124_1766803017_o.jpg


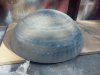
For The Hemispheres I ordered a bunch of 4 inch in Diameter Vending Machine capsules from China. I regret not ordering them all in one batch. I originally ordered 20 first to see if they would be the right way to go. then a few months later when I wanted the rest of them I found out no one manufactured them anymore and had to settle for a Hemisphere that was 3.75 inches in diameter, also made of a different plastic.


13563530_10205387419238650_1237027448_n.jpg13595543_10205387417878616_2123287806_n.jpg


Gave it a spray of Primer to make sure I had all those Spots filled up


13576586_10205386998228125_1187993241_n.jpg
 
Here are the shoulders . While I made the frame I noticed I might have lined up the top and bottom halves of the skirt wrong. When the shoulders and skirt are together the front and back should be noticeably lined up and follow a certain flushline. I didn't want to go back and have to redo the skirt so I just modified tho position of the shoulder frame to have it flush with the rest of the Dalek body.


The Gunbox was difficult to get right I went through a lot of iterations using foamcore to get it just right. I modified it to follow the angle of the skirt and cut slits down the middle of the body halfway through to have it slide into the center support of the shoulder frame.


If I haven't mentioned before I am mostly building this out of MDF. The shoulder frame is plywood

13563542_10205387420078671_1740402880_n.jpg13595674_10205387099270651_331356313_n.jpg13578747_10205387099150648_1368452492_n.jpg


Dalek builders usually make the shoulder body "skin" out of mdf by soaking it in water and bending it all around the frame. I didn't have the time of patience to work with the material in that way so I used the next best thing. I had afew large sheets of 6mm Foamcore PVC (Sintra) laying around in my material bin so I decided to use that instead.


I made a template of the shoulder "skin" first by wrapping a large sheet of Chipboard around it. I wanted to cut out the Gunbox slots as close as I could to not waste alot of bondo so I just cut a massive hole in the board and taped cardstock on it to surround the gunbox frame. Got a pretty good shape for it. I added a half inch to the templates edges so I would have a lip on the top of the shoulders, this I would just shave away with a box cutter and a palm sander.


I traced the templates I made onto two large pieces of PVC, for the front and the back. I started with the front section. This was pretty hard but it was doable.

I Sanded the edges of the PVC away to get rid of the painted sign that was on it, this was to help the adhesive I was using and hear to it properly. After that I drilled the sheet in the center peg of the support. Then I took a heat gun and slowly but evenly started to heat up the plastic . As I made my way around the frame bending the plastic around, I drilled it in place to help it hold it's shape.


I used liquid nails adhesive on the inside edges of the PVC, this stuff bonds really welw to MDF and PVC, perfect choice. I also drilled a lot of screws along the edges to hold it in place for the glue to cure.

Then all I had to do was slid in the Gunbox. and Glue that in.


13563613_10205387099030645_659908630_n.jpg13565339_10205387099110647_1528512481_n.jpg13576331_10205387099070646_1293324688_n.jpg


The arms are a ball in socket joint. All I needed to do for this was make a panel with a 3.75 diameter hole, add a sphere, and sandwich it between another 3.57 diameter hole and wallah!!

The Gunbox was made with two 3.75 inch holes and then I just drilled in four smaller holes around the joint hole. I did this to two 6in by 6in panels for the inside of the Dalek as well. This was so I could install 4 5 inch long screws in the smaller holes, so when the panels sandwich the ball joint in between, I can screw on wing nuts to hold the ball arm in place.


For the ball arm I used a 4 inch chrome sphere I bought from a garden store.


With the arm joint installed, I lasercut a top panel to go over it, just to it covers up the screws . Plus it looks alot nicer with these vents.


13578747_10205387098710637_1466980626_n.jpg13579035_10205387098950643_1340951320_n.jpg


Now time to bondo! Had to do alot of layers around the Gunbox edges to get it just right.
Little tip, use primer after you sand the bondo to help find all the low spots you missed.

The Gunbox arms look pretty good, I like the way the screws look on them so I think I'm going to keep them there.


13588807_10205387094470531_260814159_o.jpg13575450_10205387006828340_920451477_o (1).jpg13555730_10205387006788339_48488752_o (1).jpg


I'm going to be welding the gun arms together , not much to know about that.

For the Collars I decided to use aluminum, I made a template the similar way I went about making the shoulder shell, with chipboard around the shell.

I glued some scrap PVC to the sides of the shoulders to have tho collars "float"
, quick and dirty way to do it. I wanted to make these removable so I just drilled holes in places that seemed aesthetically acceptable and installed bolts.


13549319_10205386998548133_1408580670_o.jpg13565402_10205387098350628_824035616_n.jpg
 
Last edited:
The Neck Is abit more complicated than I thought. I cut out the MDF rings in the proper diameter and then put them on a router to give them a nice chamfer. I had to cut squares in the rings to line up the pegs, this was the hard part because if I was just slightly off on one it would make the whole neck seem offset. Had to line them up just perfectly and then sand the inside of the square cutout at an angle to help guide the pegs in the proper place. This took me afew days to get right. After that I built the neck support to hold the neck cage in place, this is what's going to hold the dome up.


13565402_10205387098830640_465796396_n.jpg13595637_10205387098590634_1363607566_n.jpg13576582_10205387098630635_1036520776_n.jpg
View attachment 641411View attachment 641406View attachment 641407View attachment 641409


I wanted the neck to be more like the 2005 Dalek neck. Unlike the MK 1 Dalek, this one looks more bulky with it's use of pegs and chamfered edge instead of dowels .These little guys go all around the neck , making it look more bulky. I made one out of wood and just superglued a battery to it to make it alittle more customized. I made a mold of it and made 24 of them to cover the peg holes
13563198_10205387094670536_1091412933_n.jpg


To get the right hight in between the neck rings, I just cut blocks to hold up the rings while I attached the pegs to the rings, this gave me a consistent even hight. For the neck cage I bought some mesh wire just like the original Daleks used. I didn't really like this look, you could see right through it. I was eventually going to swap this out for some perforated aluminum.


13563692_10205387417758613_115796272_n.jpg


I started to make the swivel for the dome. I had some extra chair wheels laying around do I just drilled three of them onto one of the circles I cut out of the Dalek ring and then centered it by having a central screw to hold the whole thing onto the neck cage, allowing it to turn while keeping it centered. More of a jury-rig approach rather then a lazy Susan.


13595703_10205387095670561_56957569_n.jpg13578981_10205387095630560_792939824_n.jpg


I spayed some primer on the neck then sanded it down with 400 grit to help it smooth the rough spots of the MDF, there was still some noticeable "fluffy" patches on the rings that wouldn't go away with just sanding, the primer filled that up pretty well.

13548726_10205387005988319_1530555374_o.jpg


An early test of the new neck cage wire
13570325_10205386957787114_1226734397_o.jpg
 

Attachments

  • 13563720_10205387096390579_1015408785_n.jpg
    13563720_10205387096390579_1015408785_n.jpg
    90 KB · Views: 191
Last edited:
So here's the dome.... this part I put off for a while because I knew it would be the most difficult. I've read that a lot of people made the dome from plaster, and then a mold is made from there. Like I said before, I didn't have the time, patience, or shop space to deal with that. I thought the best way to go about this was to make a Dome from CND'd MDF and then make a fiberglass mold of it. I made a really quick model in Solidworks and popped it in the CNC. I glued together layers of MDF to get a nice thickness to it, when It came out of the CNC I glued the remaining layers together to make it one piece, then took a palm sander to it to get out all the tool marks. Kinda reminds me of an ice cream cone with all the multicolored layers of brown.


13576565_10205387097830615_1834643757_n.jpg13595727_10205387097430605_2044047914_n.jpg


While I got rid all the tool marks I couldn't get rid of the layer lines. A combination of hand sanding, bondo, and spot putty took up most of my weekend.

13566229_10205387097150598_1702980662_n.jpg

13565525_10205387096990594_1124191599_n (1).jpg


I still kept getting these microscopic lines , I experimented a bit with Krazy glue. Applying it on the layers and waiting an hour before sanding it off. This worked like a charm!


13563351_10205387096710587_526310634_n (1).jpg
Wayyyyyyyy More spot putty.


13595707_10205387097070596_1338009170_n.jpg

In between layers I sprayed primer to help find the high and low spots.

13563664_10205387097310602_630856614_n.jpg

More Primer. At this point I got all the low spots I could and I feel that all the imperfections will be taken care of with the next step.


13563641_10205387096670586_952249143_n.jpg


To completely seal the Dome and make it water tight I covered it in 3 layers of Polyurethane Varnish. What dalek builders recommend is a certain type of pond sealer . However this works just as well at about 1/3rd the cost.


OOOOOOOOOO SHINYY

View attachment 641497

13599081_10205387096630585_1871082718_n.jpg


To prepare the plug, I waxed is with some floor wax for about 5 coats, then brushed on 2 layers of PVA release film. This stuff is great. Originally I was going to water it down and spray it on with a prevail Sprayer found here : https://www.summitracing.com/parts/...se1-_-preval&gclid=CLi0zeSP4M0CFc9ffgodxY8HCg

This thing can work wonders for paint, but it didn't evenly cover the dome plug so I decided to use a sponge brush instead. I could see afew brush marks but nothing that can'r be fixed with some work to the mold.


I bought a gallon of Black Gelcoat from Douglas and Sturgess for about $50. This was the first time I have ever worked with this material, or made a fiberglass mold. I wanted to make the first time count so I did a lot of research.


I mixed up a batch and brushed it on. I made sure to evenly coat the entire plug and give it a lip. I made sure no spot had too much gelcoat so I could prevent some shrinkage. I waited the recommended time to go over it again with another lighter gelcoat to catch any missed spots. After a while I applied some fiberglass resin and started covering the gelcoat in fiberglass.


I got in trouble for doing this on school grounds so I made sure to finish the final couple coats under the cover of night. I had a total of about 4 layers of fiberglass, maybe one or two more to give it some extra strength to pull out.


Once the resin was fully cured I drilled a hole in the center and gave a few bursts from the airhose to have it pop out. This didn't really do the trick. I tried the edges carefully with a screwdriver to pull it upward, then I got a this hose in between the cracks and ran hot water between the mold and the plug to help the PVA release. After about a day of trying it finally came loose .


It came out fantasctilcy well for my first ever mould. A few small imperfections. I sanded the inside with some 400 grit and then it was perfect.
13578447_10205387096590584_32105836_n.jpg


13553329_10205387096350578_1714885094_n.jpg


Now I had to cast the dome. This was fun to me now that I knew what I was doing.


Before I applied the wax and the PVA, i cut a strip of Styrene and heat formed it to the dome shape and krazy glued it in place. This was going to make a guide for the eye "slot". gives me a little more definition than just cutting it out by hand.


I repeated the process like I did for the mold , wax, PVA, then fiberglass. I did 2 layers of fiberglass for this dome because I didn't want it to be so thick that it wouldn't fit on the neck rings. When everything was fully cured I just ran some hot water down the cracks in between and it floated right out. It was perfect some shrinkage in the front by the slot, but I covered that up with some bondo and it was as good as gold

I had to go back and add some extra layers of fiberglass though, the dome itself was strong, but kinda flimsy. wanted to correct that.


13595787_10205387096270576_67259088_n.jpg13563720_10205387096150573_1099507202_n.jpg13563400_10205387096190574_733352910_n.jpg


Now that the dome was made I just needed to cut out the slot and It was all set. It came out fantastic!


13556068_10205387096070571_910583550_o.jpg


For the eye stalk, I made the rings out of lasercut acrylic and the eye out of an old flashlight head. The flashlight head wad the exact shape of the original Dalek eyes, only .5in smaller. I took it apart and placed some neopixles on the inside and ran them thought a cut pipe to the eye pivot.

I found a really neat thing that I used to cover the end of the flashlight, i like the floured out look! no Idea what it is though. under that I cut a bunch of zip ties and glued them around the flashlight to give it a " track " look. But those were covered up by tho " Flower" end.


13563318_10205387095190549_1816223100_n.jpg 13565438_10205387417798614_1594880922_n.jpg13565340_10205387419598659_1698421481_n (1).jpg


And Wallah!!!!!! The head is just about made. Still need to do more work but It came out great so far!

13563507_10205387095510557_1580179089_n.jpg

13595405_10205387095390554_1726873362_n.jpg
 

Attachments

  • 13563325_10205387097190599_1526211464_n.jpg
    13563325_10205387097190599_1526211464_n.jpg
    112.3 KB · Views: 213
  • 13565387_10205387095710562_648404815_n.jpg
    13565387_10205387095710562_648404815_n.jpg
    88.5 KB · Views: 190
Last edited:
This thread is more than 7 years old.

Your message may be considered spam for the following reasons:

  1. This thread hasn't been active in some time. A new post in this thread might not contribute constructively to this discussion after so long.
If you wish to reply despite these issues, check the box below before replying.
Be aware that malicious compliance may result in more severe penalties.
Back
Top