DIY tools and stuff...

Teddz

Sr Member
RPF PREMIUM MEMBER
From rotocasters, vacuum formers and degassing chambers to jigs, setups and CNC equipment, if you've built it to facilitate a build, post it. You can include as much info on the build as you wish...
b08d32ce5c565d742f54584b75e47c5e.jpg


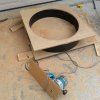
Here's my offering... My CNC Router
23631692449_9b2325d57d_z.jpg


way overbuilt, with heavy-duty steel frame, 2cm thick aluminum plates, 25mm & 20mm roller bearings, 2.2kW water cooled spindle controlled via VFD and Mach 3. It cost me roughly $1700 in parts and materials and took a month to build. The design was based on other routers I saw online and modified to my needs... the work envelope is (X)500mm x (Y)600mm x (Z)210mm. I don't have normal blueprints for this as I just used basic sketches to fabricate it. There was an issue of backlash that I traced back to the flexible coupler. I made a solid coupler and resolved the issue. The dedicated PC is running windows XP and is completely isolated from any internet connection.
 
Good job on the CNC router.
What software are you using as a controller and to generate the G-code?
And what Stepper motors did you use?
I'm working on a vacuum former myself at the moment.
 
Thanks...

Controller software: Mach3 with a specific plugin for the variable frequency drive for the spindle control.
Software to get the G-code: ArtCam 8, but I also use SheetCAM for other layouts that require it.
Steppers: NEMA 34 1232oz. Like I said, overkill, but I had them sitting around since the project they were intended for was scrapped.
Lead screws: 16 05 on Z and Y axis, 20 05 on the X axis.

Eventually I'll add a 4th axis to do rounded objects, but for now, it's not necessary.
 
Those are the most impressive things I've seen, and that I'm considering on making a couple of toosl, which includes this $3 Disk Sander, an el-cheapo drill press and maybe even a vacuum former.
 
Man the things we could do around here with a cnc router. All the homemade tools we have here are just some stuff dad modified for blacksmithing. We buy cheap clamps and such since they're always getting mangled or melted. Better to spend the money on the hammers. We do have a 30 year old tabletop grinder that my dad put a drill chuck onto and uses it as a disc sander.
 
I saw that same sander when browsing not long ago. My only thing is using that rechargeable drill. I would rather have gone with something that plugs into the wall so there's no dealing with a battery that's in need of a recharge.

In my old shop there were tools that had been modified to suit a need. It's always a good skill to be able to modify existing equipment so you can get a job done rather than shelling out more money on equipment that you may not have the space for (my current situation).

There are still a couple pieces of equipment I need to build when time and money permits, one of which is an 80 watt CNC laser cutter/engraver and a small drill press. I'm also planning on building a 3D printer, but that will probably be sometime next year.
 
WOW the bar is really high with that CNC.

Here is my Vacuum Degassing System.


attachment.php


The chamber was made from 10" PVC pipe and I had a local plastics fabricator weld it up for me. The pump (in this image) cost a whole $103 on eBay. It was a small single stage, 3cfm unit which I have since replaced with this monster 2 stage, 9cfm pump. Funny thing about the big pump was the seller listed 0 sold, 20 available, price $1100. So I added it to my watch list and checked it every few days. As he sold pumps, the price dropped. When I got this one, the listing was 18 sold, 2 available, price $217! After double checking another site that also had them at $1100, I couldn't hit the BUY IT NOW faster.

attachment.php

attachment.php


The old pump took the best part of 3.5min to evacuate all the air from the chamber. This new pump reaches a full vacuum in just under 1min as you can see on the video above.

Non degassed on the left and degassed on the right. Both cups contain the same amount and type of resin.
attachment.php


Then I got to thinking, what else could I do with this vacuum chamber and pump?

I had attempted to make a vacuum forming rig a while ago and always had issues with either heat or seals. Then after watching videos on "female tooled" vacuum forming, I decided to run some tests.

Test pulls
attachment.php


These are made from 3mm Perspex. Look at how sharp the angle is on the base of the second pull and how high that dome is. I simply used the chamber as the female tool.
Now the cool part about this method is that you can make the seal first, then apply heat. This means that you are not rushed to make the pull like with male or positive tooled vacuum forming. I used the fan forced heater from a table top cooker to heat the plastic and increased the suction as I went. This meant the pump didn't need to run all the time either.

In traditional vacuum forming, the plastic flexes towards the heat and I have burned a few sheets this way. By having the sheet sucked down first, as soon as the plastic softens, it is pulls into the tool, not towards the heat source.

Because I was so impressed with how well and how easy this was to do, I decided to upscale the project to this.
attachment.php


I really need to take some action on this and finish the job. I want to replace the MDF with aluminium plate.
 

Attachments

  • New Vacuum Chamber 2.jpg
    New Vacuum Chamber 2.jpg
    100.6 KB · Views: 1,447
  • 12494814_10153874954978841_5113160901567872412_n.jpg
    12494814_10153874954978841_5113160901567872412_n.jpg
    66.7 KB · Views: 1,431
  • 12508879_10153874955048841_8502352158820894455_n.jpg
    12508879_10153874955048841_8502352158820894455_n.jpg
    58.6 KB · Views: 1,429
  • 20151016_224208.jpg
    20151016_224208.jpg
    198 KB · Views: 1,441
  • 20150427_162029.jpg
    20150427_162029.jpg
    125.1 KB · Views: 1,434
  • DSCF4075.JPG
    DSCF4075.JPG
    340.2 KB · Views: 1,455
Last edited by a moderator:
That's awesome!! The degassing is night and day in it's results and those pulls are great. Well done!
 
That's awesome!! The degassing is night and day in it's results and those pulls are great. Well done!

Thanks, it is night and day. And I degas everything - plastics (epoxy and high shore polyurethane) and rubbers (both silicone and flexible polyurethane). I've tested so many things, including the high pour method and nothing compares to actually pulling the bubbles out.

Yesterday I saw someone else's work without degassing. They had made a 2 part mold using the same silicone I use and theirs was full of bubbles. Not good.

Also, can't wait to get this vacuum former up and running. I think I have the heater sorter. 4 x 500 watt (we are on 240V in Australia) halogen lights. I'll add a small fan and this thing will cook - literally.
 
One thing when working with vacuum is that you can introduce a 'reservoir tank'. Using a valve to isolate the tank from the target vacuum volume, draw down the tank using the pump, then when you need your pull suction, use a high volume suction device (like a shop vac) to first pull the vacuum chamber to ~3.5 inches, then open the suction to the higher vacuum tank to finish things off... it does take a flapper in the suction pipe to automatically allow the change-over. This is useful when pulling thick pieces that resist the vacuum with a fair amount of force or trying to get fine details 'impressed' in the female mold.

R/ Robert

Yeah I have given that some serious thought.

I also did some testing and found out some interesting things. It seems the very best vacuum cleaners only pull a max of 5 to 6"HG.

Most people build DIY vacforms from MDF and use a vacuum cleaner. As it turns out, MDF is porous at 6"HG. Basically a vacuum pump will suck air right though the MDF meaning 6" is the best you can pull. Laminated MDF on the other hand will comfortably handle 20". I've not tested beyond that, so it may even handle a full vacuum.

So initially, I was going to seal the MDF parts in liquid glass and make my own silicone ring seals. Still might because it is fairly cheap to do. I am not sure if the MDF (after it is sealed) will handle 29.5" though.

So the idea was to run a hose from the 30LTR vacuum chamber to the new vacuum form. Place a suction on the whole system, then shut off the hose to the vacform letting the pump pull a full vacuum to the chamber, then shut the pump off. Once the plastic heats and begins to be sucked in by the preloaded suction, open the valve to the chamber and give the vacform a surge of suction. Not sure 30ltrs will be enough though and didn't really want massive tanks due to lack of space.

Point being, I don't need to run the pump continuously like you do with positive forming.

I am also looking at a 200 weight expanding foam for my female tools. Unlike male tools, the walls of a female tool are just a stopping point and do not need to take the pressure of the full force of the suction like happens with traditional male tooling. To make these tools still requires me to make positive parts first though, so it is a double work load, but once the tool are made, they should store easier as they will be big biscuits with hollows. They should just stack and be fairly light weight. Being female, there is no sticky out bits to get broken off.

This is also where raw MDF also comes in handy. If I make a shape from MDF and leave the "end grain" exposed, the vacuum pump can pull air through the material. I don't need to drill holes.

With the foam, I am guessing many of my tools will be 2 parts. The interface will not have a seal, so the air should just be pulled right through that.
 
I am also looking at a 200 weight expanding foam for my female tools. Unlike male tools, the walls of a female tool are just a stopping point and do not need to take the pressure of the full force of the suction like happens with traditional male tooling. To make these tools still requires me to make positive parts first though, so it is a double work load, but once the tool are made, they should store easier as they will be big biscuits with hollows. They should just stack and be fairly light weight. Being female, there is no sticky out bits to get broken off.

Maybe it's me or the deliriousness kicking in from being up 32 hours working, but I felt that whole paragraph needed a Barry White soundtrack, candles and some massage oils. :lol
 
Yes, that's it Teddz! ;^P
Cavx, that is an interesting point about MDF. Just keep in mind the thickness you're forming, that is really what 'drives' the amount of vacuum needed. Vac'ing plastic apparently has a whole lot more to it (such as moisture absorption rates by various types of plastics, for example) but I'd wager like many practical exercises, you learn a lot by just doing it...

I'd read somewhere that various plasters also allow suction through them, which would be nice since I intend to use reinforced cast female molds. This will take some experimentation, as always...

Since higher levels of vacuum equate to more expense, it behooves one to carefully consider just how much vac is needed unless the goal is to see just how far you can take it - bwah-hahaha!

Regards, Robert
 
Maybe it's me or the deliriousness kicking in from being up 32 hours working, but I felt that whole paragraph needed a Barry White soundtrack, candles and some massage oils. :lol

That is probably because this project needs a bit of loving :)

Yes, that's it Teddz! ;^P
Cavx, that is an interesting point about MDF. Just keep in mind the thickness you're forming, that is really what 'drives' the amount of vacuum needed. Vac'ing plastic apparently has a whole lot more to it (such as moisture absorption rates by various types of plastics, for example) but I'd wager like many practical exercises, you learn a lot by just doing it...

I'd read somewhere that various plasters also allow suction through them, which would be nice since I intend to use reinforced cast female molds. This will take some experimentation, as always...

Since higher levels of vacuum equate to more expense, it behooves one to carefully consider just how much vac is needed unless the goal is to see just how far you can take it - bwah-hahaha!

Regards, Robert

ABS is certainly hydroscopic. Not sure about Perspex or Polyprop. The beauty of female tooled vacuum forming is you can use thicker plastic. Ever seen the way they vacuum from spar baths? Very cool stuff.

Because my new chamber (the vacuum forming rig) is 800mm OD, 706mm ID, I need to keep the weight down or I'll need a gantry just to move the tools around. The foam I am looking at has both strength and is light weight.

Well with a 9CMF pump, I think suction is all sorted. Kind of wish I had bough both when they were listed.
 
Update on the foam. 1 cubic meter is supposed to weight in at 150KG! And the stuff is hard, like I could not dent it with my finger nail.

Back to DIY tools. Didn't some one make a lathe using a drill?
 
I've used my Dremel (ne. Craftsman) rotary tool as a quick lathe by strapping it done on the bench (was sanding a radial engine gear case made from stacked disks...)

It worked well because I had a speed control rheostat to set the proper speed for the plastic I was using.

R/ Robert
 
I am in the process of making a small router table for my trim router.

I used my laser to cut 3/8 thick acrylic for the table. Cut holes with laser and then countersunk them with drill press.

Grand total in materials right now is about $20.

IMG_3367.JPGIMG_3368.JPGIMG_3371.JPGIMG_3372.JPG
 
That router looks great.

My trim router died after 15 years of use and abuse :cry I had made a smaller version using clear perspex to extend the base to make it easier to use.
I actually have a full working table top router set up in a box somewhere.
 
Anytime you can get more than a couple years use out of tools today, you'll be lucky. My landlord had come over to change out a glass & fence cover for the light shaft at the apt and he was using an angle grinder. Every time, without fail, when he was done cutting, he would stop the grinder by pressing the locking button.:eek :facepalm Every time I heard the grinder grind to a stop, I cringed. I talked to him and he said that was his 5th! He said they were "cheap" and all of the ones he's gone through over the years had the same issue. Say what you will, but there's a term for people like him... but I'll refrain.. ;)

Anyway, here's something that's about 18 years old. My father had made the base with the motor for some other tool that was just sitting around and I needed to sharped some drills and carbide. So I cannibalized his machine for the motor and the base and made the rest. At the time I also had a nickel plating machine so that's nickel plate on the main pivot, not chrome. I use this to sharpen my engraving bits, masonry bits, HHS drills, carbide, End mills, and anything else that needs sharpening. I just change out the wheel to different grades of Diamond and stone. It uses collets that are the same as the ones used on my old lathe. They were some of the duplicates my father had, so I used them for this.
27967915655_4806961c31_z.jpg


27354265163_ea3cba0caf_z.jpg


I'm going to reinforce the drawer with that thick laminated particle board, cut the opening for the dials and shorten it. I'm then going to put it in the closet along with the lathe. Since I also have the CNC now, I'm going to engrave the center pivot with hash marks for the angles so I'll be able to more precisely grind the angles needed for various bits. I'm also going to add a vacuum to this for the dust, a mist and give it a repaint.
27866486632_c4fbb1b443_z.jpg
 
This thread is more than 7 years old.

Your message may be considered spam for the following reasons:

  1. This thread hasn't been active in some time. A new post in this thread might not contribute constructively to this discussion after so long.
If you wish to reply despite these issues, check the box below before replying.
Be aware that malicious compliance may result in more severe penalties.
Back
Top