MPC Millennium Falcon Upgrade Kit Mk.II, HH

totally right!? these are awesome!, but, if you're like me and want to light the docking collars, you need to either hog out the inside, or drill large holes almost all the way, then pin holes for your fiber optics...just use a drill press pre-set depth! I've also got some tiny styrene rod stock from the hobby store to finish them even more...be looky just like the pic you posted. I have to admit, I'm borderline giddy about this build!! LOL

Package arrived today. I won't be doing a full "piece by piece" review, but let me just give one of many, many examples of how astonishing and intricate this kit is engineered.
First I'd like to say that it is totally mind-boggling at the level of detail that the original "ILM" team built into the original 5 FT. Falcon model (which most you never see on film).
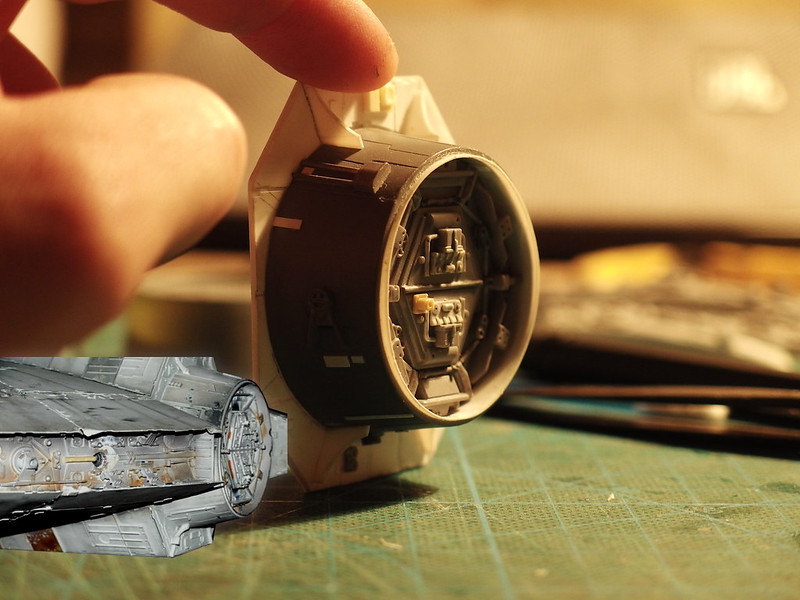
Secondly, I'd like to congratulate HH Miniatures for faithfully replicating the designs of "ILM". Just have a Look -
(I also have a side-by-side comparison of stock kit parts)

View attachment 727354View attachment 727355View attachment 727356View attachment 727357
 
totally right!? these are awesome!, but, if you're like me and want to light the docking collars, you need to either hog out the inside, or drill large holes almost all the way, then pin holes for your fiber optics...just use a drill press pre-set depth! I've also got some tiny styrene rod stock from the hobby store to finish them even more...be looky just like the pic you posted. I have to admit, I'm borderline giddy about this build!! LOL

Thanks for the heads up about the approach to lighting and yeah, It felt like Christmas today!
 
sure thing brother, I've had my HH kit for a while now, but I did get the cockpit cone today from Shapeways...you're right, way better than stock. the rest of the ones I ever build will also get this piece. Don't know if I mentioned but I get these 11.00 sound modules from Radio Shack and put in these too. it's another 3 to 4 hours work to fit them, but it makes for a great feature if you're showing off your work, or for folks who buy them. I've only sold one so far, but I expect I can sell more and for more dough once I figure out how to link the video to an Ebay listing. falcon sound module.JPGI don't get this with the pics, I'm taking them with the phone straight up and down, and some just load sideways...argh


Thanks for the heads up about the approach to lighting and yeah, It felt like Christmas today!
 
again, thanks my friend...most kind. it was suggested by an old-time radio shack guy who has been most helpful with the lighting...unlike the people who work there these days...young dips who know nothing about nothing. The sound bite I like is, "what a piece of junk!,...she'll do .5 past light speed, etc", but since I do all my Falcons with the ESB extra landing gear, that's not exactly correct. Thinking on editing down the clip in the ice cave where he tell Chewy, "try it! and stuff starts shorting out...shut it off! shut it off!" LOL

Oh, now that is a nice touch, I can only imagine movie engine and laser sounds and what-not or even chewie howling. Awesome work!
 
hey fellas...

needed a change of pace so I built the rear landing gear over the weekend. I spaced the struts down 3mm because all my other falcon's looked too short. and, this was the first time using PE parts, what a difference! I'm a fan now. I also added more hydraulic hose to get a more proper look. before I had only run a hose to each strut, but I went with the hoops hanging this time. along with the gear strut baffles (PE) parts and the addition of a bunch of greeblies up in the wells, grates, hydraulic cylinders, general busy stuff and a hose junction, this is my best landing gear to date. I also later put lights at each end of the gear well. falcon 5 landing gear1.JPGfalcon 5 landing gear2.JPG
 
IMO, the HH sidewalls are the best that are out there. The factory MPC walls are for krap, to say the least. you can do delicate surgery on them to shorten up, but it takes a whole day and then some...and on to of that, not enough greeblies. The Shapeways walls are very nice, however they're extremely fragile and they are taller than HH. I've used all three now and while you have to give every credit to TonyRR for the exquisite creations...they'll cost you. Also, you use those and you have to gently wash with warm soap and water and a soft tooth brush. they come with a waxy residue on them that doesn't let paint dry. another method is to use rubbing alcohol and your tooth brush then rinse with warm water, and dry with a blow dryer on WARM only.
But these walls, right out of the box, nice and busy, (greeblies) and durable. you're not gonna break these. The only thing I would say is, the short panel behind the cockpit and the rear quarter walls are of course poured resin or plastic and are thick in the center, so you have to shim up the backside. I used as is in this build, but next time I'm going to take the scroll saw on low and trim it out so the walls are the same thickness from one end to the other. No, big deal. The other issue is if you are going to light your ship particularly the docking collars, again is the thickness from the casting. I used a drill press with a preset depth and drilled 3/8 holes from the back side, then drilled the micro holes for the fiber optics from the front. again, no big deal.
All said and done, these are the walls to use. two thumbs up to Haystack!!
another thing I thought I'd mention about these kits...the newer the kit the krappier the quality. the current built I'm doing has a stamp on the lower inner hull, right side, you guys know where it is right? get this...1977., that's right, one of the first ones out. you know how much flash trimming I've had to do on this one...next to none. the early one's have the best casting and the crisp detail. I've got some 1989 kits that look like krap in comparison. so if you're shopping for one of these, ask the seller what the dates are, and if the box is still sealed, look for a kit that has the thick corrugated cardboard bottom of the box. that's a sign of an earlier version and should be a better quality. harder to come by but you'll be happier with it. now there are some kits in the later thin bottom box that are pretty good, but it's a hit and miss. I think I've got a dozen of these left in the closet and I think I've only got a few that are the lower quality castings, so I got pretty lucky.falcon sideswalls2.JPGfalcon sidewalls 1.JPG
 
Sorry I’m late to the conversation, and I really hate to point this out, but the docking cones are way too cylindrical, IF you are trying to emulate the “5 footer”. Although short on detail, the more conical original kit parts are much closer to the truth.

I’ve been seeing this more cylindrical style of docking cone showing up in other threads too, which is most disturbing. All you have to do is look at the more telling pictures of the original “5 footer” to see this. Even the CGI version from TFA reveals the more conical docking cones. The Bandai kit has this feature much closer if not completely correct.

I’m not sure how this all started, but I finally went to the Shapeways site and discovered that a person whose handle is “308 Bits” makes what he calls “MILLENNIUM BANDAY 1/144 DOCKING RINGS 5 FOOTER”, with the comment that “These docking rings have been carefully designed following all the details of the 5 foot Falcon. Totally screen accurate.” I challenged this statement by calling the images he had into question as possibly distorted but also noting that if not then the parts are inaccurate. He graciously said he would check the design, though I have seen no activity to date. I included a pic of the CGI Falcon from TFA as an example. I didn’t include any of the plethora of “5 footer” pix as these have been around for a long time, and I would have expected someone who claims such accuracy in their efforts to be aware of these pix. Maybe my expectations were too high.

The more cylindrical docking cones are a feature of the “32 incher”, which for some strange reason was based on the “full sized” studio sets’ cones. One must remember that the studio sets‘ cones (and indeed, the entire sets) were designed with forced perspective since they were really undersized when compared to a “real” full sized Falcon.

Mark
 
Late? not at all, I for one very much appreciate hearing other builder's perspectives and I by no means know the for-sure on any of this stuff myself. I would venture you know quite a lot more than I do and I do know that you aren't being critical, just pointing things out to those of us who don't know. As far as what is available for the MPC/ERTL there are only so many choices of parts. I'll admit I've never had my hands on a set of Blue Moon parts from Starship Modeler, but I'd like to.
I got off track...I totally see what you are saying about the docking collars and I agree. But when you compare the stock MPC pieces to the upgrade parts it's easy to see which direction to go. the stock pieces are awful but for their shape. I'm almost ashamed that I've built 4 previous birds with them, and even more sorry I built 3 with the cut down stock sidewalls. My knowledge on these is growing all the time, each one better than the last, but I guess for myself, I'm more concerned with what it looks like to the average person looking at it on the shelf, rather than screen accuracy, but there is nothing wrong with those who are, not in the least. I had a teacher once who used to say, strive for perfection even if you never get there, you made the effort.

Cheers brother!

Sorry I’m late to the conversation, and I really hate to point this out, but the docking cones are way too cylindrical, IF you are trying to emulate the “5 footer”. Although short on detail, the more conical original kit parts are much closer to the truth.

I’ve been seeing this more cylindrical style of docking cone showing up in other threads too, which is most disturbing. All you have to do is look at the more telling pictures of the original “5 footer” to see this. Even the CGI version from TFA reveals the more conical docking cones. The Bandai kit has this feature much closer if not completely correct.

I’m not sure how this all started, but I finally went to the Shapeways site and discovered that a person whose handle is “308 Bits” makes what he calls “MILLENNIUM BANDAY 1/144 DOCKING RINGS 5 FOOTER”, with the comment that “These docking rings have been carefully designed following all the details of the 5 foot Falcon. Totally screen accurate.” I challenged this statement by calling the images he had into question as possibly distorted but also noting that if not then the parts are inaccurate. He graciously said he would check the design, though I have seen no activity to date. I included a pic of the CGI Falcon from TFA as an example. I didn’t include any of the plethora of “5 footer” pix as these have been around for a long time, and I would have expected someone who claims such accuracy in their efforts to be aware of these pix. Maybe my expectations were too high.

The more cylindrical docking cones are a feature of the “32 incher”, which for some strange reason was based on the “full sized” studio sets’ cones. One must remember that the studio sets‘ cones (and indeed, the entire sets) were designed with forced perspective since they were really undersized when compared to a “real” full sized Falcon.

Mark
 
Thanks for the kind words, gt350pony66.

I’m afraid my comments also apply HH's docking cones. But beyond that, his parts are georgeous, and I commend his efforts.

Mark
 
Sorry I’m late to the conversation, and I really hate to point this out, but the docking cones are way too cylindrical, IF you are trying to emulate the “5 footer”. Although short on detail, the more conical original kit parts are much closer to the truth.

I’ve been seeing this more cylindrical style of docking cone showing up in other threads too, which is most disturbing. All you have to do is look at the more telling pictures of the original “5 footer” to see this. Even the CGI version from TFA reveals the more conical docking cones. The Bandai kit has this feature much closer if not completely correct.

I’m not sure how this all started, but I finally went to the Shapeways site and discovered that a person whose handle is “308 Bits” makes what he calls “MILLENNIUM BANDAY 1/144 DOCKING RINGS 5 FOOTER”, with the comment that “These docking rings have been carefully designed following all the details of the 5 foot Falcon. Totally screen accurate.” I challenged this statement by calling the images he had into question as possibly distorted but also noting that if not then the parts are inaccurate. He graciously said he would check the design, though I have seen no activity to date. I included a pic of the CGI Falcon from TFA as an example. I didn’t include any of the plethora of “5 footer” pix as these have been around for a long time, and I would have expected someone who claims such accuracy in their efforts to be aware of these pix. Maybe my expectations were too high.

The more cylindrical docking cones are a feature of the “32 incher”, which for some strange reason was based on the “full sized” studio sets’ cones. One must remember that the studio sets‘ cones (and indeed, the entire sets) were designed with forced perspective since they were really undersized when compared to a “real” full sized Falcon.

Mark

While I'll be the first to admit my pieces are not the 100% like-for-like recreation of the Five Footer components we all desire them to be, 'disturbing' is hardly the word I'd use in this situation !

 
While I'll be the first to admit my pieces are not the 100% like-for-like recreation of the Five Footer components we all desire them to be, 'disturbing' is hardly the word I'd use in this situation !

[url]https://c1.staticflickr.com/5/4156/34702063205_7100bb50fe_c.jpg[/url]

Hi HH. I really don’t mean to offend. As I said, your parts are gorgeous. “Disturbing” refers to the trend I am seeing in many “5 footer” renditions of late.

Regarding your pic, I would point out that the angle your cone is held at is not the same as the “5 footer” image you show next to it. Yes, as shown, the angles appear to be quite close. However, if you were to rotate your cone to match the angle of the “5 footer” pic, the cone angle would diminish noticeably. What you have demonstrated here is the effect of perspective foreshortening.

I would also point out that on the “5 footer”, in general, the larger diameter of each cone’s “base” is jammed into the corners of the fore and aft angled “plates” affixed to the side walls and top & bottom hull plates. Yours and other folks’ renditions reveal gaps between the base of the cones and the corners. This can only lead to less of a cone angle, assuming the “height” of the cone hasn’t changed. In other words, the base of each cone should come right up to the vertical edges of the octagonal plates, front and back. Again, I would recommend you and anyone else look at any of the myriads of photos of the “5 footer” on the net to see this geometry.

Mark
 
Last edited:
So, you may have not made one sale, opinions vary, big deal. I think you docking collars are the bomb. I really thought he was talking more about the Shapeways, which ARE pretty "straight tube" in their appearance. I have a set, but have not used them, and probably won't. particularly since I have yours! much better conical shaping. You hit the home run IMO

While I'll be the first to admit my pieces are not the 100% like-for-like recreation of the Five Footer components we all desire them to be, 'disturbing' is hardly the word I'd use in this situation !

https://c1.staticflickr.com/5/4156/34702063205_7100bb50fe_c.jpg
 
So, you may have not made one sale, opinions vary, big deal. I think you docking collars are the bomb. I really thought he was talking more about the Shapeways, which ARE pretty "straight tube" in their appearance. I have a set, but have not used them, and probably won't. particularly since I have yours! much better conical shaping. You hit the home run IMO

Haystack, Your kit is super-crisp detailed, and that's really what should matter. You could have done a 100% accurate representation but it would not have mattered if it were not as "sharp" as your current offering. On a side note, The hulls are comin' along. I've installed the rear engine deck turbines and grill covers. My son was watching me build this portion and said "kinda looks like Boom-Box speakers". Now that's an Idea! A Millennium Falcon MP3 speaker where the six engine turbines are actual little speakers!
Speaking of "308 Bits" Shapeway Parts, I think his quad Laser cannon package is gonna do nicely.
P.S - Gonna look into very, very, very carefully dry-brushing some "Neutral Grey" over those grill covers...They almost go "invisible" due to how I painted the "Fans".007.jpg009.jpg
 
man Im telling you, that paint work is great, I'm going to have to use yours as a reference for my current build. this will be the first time I'll be doing a black acrylic wash and wipe for filling the cracks so to speak. I've been using a fine mechanical pencil to fill in on others the lightly brushing on powdered black artist chalk. We learn as we go, right? and youtube doesn't hurt either. I've picked up a lot of stuff there as well. I still use rattle can for most everything but I think I'm finally going to have to break out the air brush kit that was gifted me some time ago. it's a pain, but the results are well worth it.

also looks like I'm going to have to get so 308bits quad lasers. I've not really looked close at any that are finished and kept using the stock parts. but seeing yours, gotta have em.
its certainly easy to sink a lot of money in a kit isn't it? not to mention time.
thanks for posting those pics, I'm inspired to do better. post more pics when you can, so I can see what else I can do better than I've been doing.

thanks Buckey

Haystack, Your kit is super-crisp detailed, and that's really what should matter. You could have done a 100% accurate representation but it would not have mattered if it were not as "sharp" as your current offering. On a side note, The hulls are comin' along. I've installed the rear engine deck turbines and grill covers. My son was watching me build this portion and said "kinda looks like Boom-Box speakers". Now that's an Idea! A Millennium Falcon MP3 speaker where the six engine turbines are actual little speakers!
Speaking of "308 Bits" Shapeway Parts, I think his quad Laser cannon package is gonna do nicely.
P.S - Gonna look into very, very, very carefully dry-brushing some "Neutral Grey" over those grill covers...They almost go "invisible" due to how I painted the "Fans".View attachment 729410View attachment 729411
 
man Im telling you, that paint work is great, I'm going to have to use yours as a reference for my current build. this will be the first time I'll be doing a black acrylic wash and wipe for filling the cracks so to speak. I've been using a fine mechanical pencil to fill in on others the lightly brushing on powdered black artist chalk. We learn as we go, right? and youtube doesn't hurt either. I've picked up a lot of stuff there as well. I still use rattle can for most everything but I think I'm finally going to have to break out the air brush kit that was gifted me some time ago. it's a pain, but the results are well worth it.

also looks like I'm going to have to get so 308bits quad lasers. I've not really looked close at any that are finished and kept using the stock parts. but seeing yours, gotta have em.
its certainly easy to sink a lot of money in a kit isn't it? not to mention time.
thanks for posting those pics, I'm inspired to do better. post more pics when you can, so I can see what else I can do better than I've been doing.

thanks Buckey

Hey there Friend,
As far as investments go, I won't be spending much more on this thing LOL! About the wash on this in particular, I used "Ammo of Migs panel line wash - Blue Dirt". Primer coat is Vallejo Surface Primer Black and Base coat is Tamyia AS-20 Insignia White (spray Can). For the various hull paint colors I've used various Tamyia colors (so far). Next I'll do the paint chipping effects. I've got a bottle of Valllejo's "Chipping Medium" that I'm dying to try out.
Youtube, Heck Yeah! I've watched Steve demzo's "Paint the Millennium Falcon" from Model-Space and Fitchenfoo's paint tutorials I don't know how many times.
Thanks for the kind words, have a great afternoon and Happy model building!
 
Last edited:
This thread is more than 6 years old.

Your message may be considered spam for the following reasons:

  1. This thread hasn't been active in some time. A new post in this thread might not contribute constructively to this discussion after so long.
If you wish to reply despite these issues, check the box below before replying.
Be aware that malicious compliance may result in more severe penalties.
Back
Top