SaltySandals
New Member
Hello, esteemed RPF members!
I am a new member, not only to the forums, but to the prop building scene in general. I, like any other fan, have always wanted a DL-44 of my own to have, to hold, and to love. A few months ago, I watched the infamous Tested "One Day Build" video where they assemble the kit and I knew I wanted to do the same (or, as close as I can with my limited resources and connections). I recently purchased both a DL-44 ANH kit and a Denix Replica base gun for it from the lovely Dark Energy Creations website/supplier. The kit itself arrived just yesterday and the pieces look great (I was told by the seller that the Denix is shipping some time later this week). However, before I start assembling my long-sought blaster, I have a few questions I want to ask so that I get the most out of my purchase. As I am incredibly novice at this, I appreciate any and all help I can get with this! So, thank you in advance!
1) Now, let's begin. The first thing that is listed on the instructions is to file/sand all parts. I already started mildly yesterday, but there are some protruding pieces of metal too big to pick off or file, and too small to use some sort of pliers on. Do I just keep sanding until it slowly goes away, or is there a faster, more efficient method?


2) Next is a rather puzzling question, for me at least. Whenever I look at old pictures of the prop, I'm pressed to see in great detail where the track and antenna(e) go. I know they belong on top of the barrel next to the flash hider. I've seen it on other peoples' builds, but it varies. On one build, there was only one antenna and it looked as if it were soldered to the track with no stick whatsoever. Another build I saw had both antennae glued to the top of the track with the end sticks, well, sticking out. Which is the correct orientation? What is truly infuriating is that in the video with Adam Savage, he doesn't add this specific piece! He leaves it there in the corner at the end of the video, not addressing it, just to taunt me! Also, the track on all builds I've seen are much shorter and smaller than the one I received in the kit, plus it is slanted halfway through going down (i thought maybe it went under the flash hider, but its too tall to squeeze under, even on the bottom of the barrel). How/what is the best way to shape mine into this?
Links for comparison:
[HTMLhttp://i823.photobucket.com/albums/zz152/artland05/Star%20Wars-A%20New%20Hope-%20Han%20Solo%20Blaster%20Gun%20Replica/3-TheStarWars-LaserGun-TOPcolor-POST-enhanced_zpsca411fdb.jpg][/HTML]


Also, I just found this in the guy's photo album. What does it mean?
Link:
3) On a few pieces of the kit (lenses for the scope, track and antenna, mount studs, grill, and the barrel base frame), the instructions say to glue them into place. What sort of glue is typically used for prop building? I can't imagine it's just generic Elmer's or the super glue you find at the counter of dollar stores. And, do I use primer before I paint the parts with flat matte black? Plus, should I paint the scope dial bronze, and if so, how do I go about that? I'm not too eager to weather the parts, as I'm anxious I'll do it wrong, and I kind of like the "factory-setting" aesthetic of the gun. If i change my mind, I'll definitely let you all know, though!
4) Finally, I'm not sure where all of the pieces to the mount go. I've put most of the parts where they belong which I've seen in pictures, but I still have some pieces that I'm not sure about. Do they go on something on the gun? I'm having it shipped later, so I won't know for sure for about a week at least. For starters, I'm correct in assuming that these go together, right?


So, where do these go? And this nut? Shouldn't there be two of these? They're all big enough to go together, but I thought that my gun was coming with the already pre-exisitng screws drilled in.


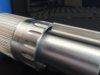
Are these little sticks supposed to be there? Or is that something the machine did that needs to be sanded off?

Here's a link to the gun. Do those screws cancel out the ones I got in my kit? Or are they for something else entirely?
Link:
Plus, does this make sense to anyone?
"drill 13/64 inch holes and tap for 1/4-20 thread, reinforce stud in magwell with 1/4-20 nut, glue studs in place"
I'm not sure what it means, could someone explain it in simpler terms?

Anyways, let me know if you can answer any of these questions,as they're bugging me and I don't want to/can't start without clearing them up first. Thanks again for your help!
Sincerely, SaltySandals
P.S. Here are the links to the forums and album that I was using for comparison in this post.
Links:
I am a new member, not only to the forums, but to the prop building scene in general. I, like any other fan, have always wanted a DL-44 of my own to have, to hold, and to love. A few months ago, I watched the infamous Tested "One Day Build" video where they assemble the kit and I knew I wanted to do the same (or, as close as I can with my limited resources and connections). I recently purchased both a DL-44 ANH kit and a Denix Replica base gun for it from the lovely Dark Energy Creations website/supplier. The kit itself arrived just yesterday and the pieces look great (I was told by the seller that the Denix is shipping some time later this week). However, before I start assembling my long-sought blaster, I have a few questions I want to ask so that I get the most out of my purchase. As I am incredibly novice at this, I appreciate any and all help I can get with this! So, thank you in advance!
1) Now, let's begin. The first thing that is listed on the instructions is to file/sand all parts. I already started mildly yesterday, but there are some protruding pieces of metal too big to pick off or file, and too small to use some sort of pliers on. Do I just keep sanding until it slowly goes away, or is there a faster, more efficient method?
2) Next is a rather puzzling question, for me at least. Whenever I look at old pictures of the prop, I'm pressed to see in great detail where the track and antenna(e) go. I know they belong on top of the barrel next to the flash hider. I've seen it on other peoples' builds, but it varies. On one build, there was only one antenna and it looked as if it were soldered to the track with no stick whatsoever. Another build I saw had both antennae glued to the top of the track with the end sticks, well, sticking out. Which is the correct orientation? What is truly infuriating is that in the video with Adam Savage, he doesn't add this specific piece! He leaves it there in the corner at the end of the video, not addressing it, just to taunt me! Also, the track on all builds I've seen are much shorter and smaller than the one I received in the kit, plus it is slanted halfway through going down (i thought maybe it went under the flash hider, but its too tall to squeeze under, even on the bottom of the barrel). How/what is the best way to shape mine into this?
Links for comparison:
HTML:
http://scottandtemphotography.com/graflexSaber/dl44_v2/IMG_5572.jpg
HTML:
http://i823.photobucket.com/albums/zz152/artland05/Star%20Wars-A%20New%20Hope-%20Han%20Solo%20Blaster%20Gun%20Replica/blaster%20left%20hero%20vs%20replica%20BampW%20best_zpsgsoiezgo.jpgAlso, I just found this in the guy's photo album. What does it mean?
Link:
HTML:
http://i823.photobucket.com/albums/zz152/artland05/Star%20Wars-A%20New%20Hope-%20Han%20Solo%20Blaster%20Gun%20Replica/blasterfrontsightphotoproof-caseclosedcopy_zpsfb855dc3.jpg3) On a few pieces of the kit (lenses for the scope, track and antenna, mount studs, grill, and the barrel base frame), the instructions say to glue them into place. What sort of glue is typically used for prop building? I can't imagine it's just generic Elmer's or the super glue you find at the counter of dollar stores. And, do I use primer before I paint the parts with flat matte black? Plus, should I paint the scope dial bronze, and if so, how do I go about that? I'm not too eager to weather the parts, as I'm anxious I'll do it wrong, and I kind of like the "factory-setting" aesthetic of the gun. If i change my mind, I'll definitely let you all know, though!
4) Finally, I'm not sure where all of the pieces to the mount go. I've put most of the parts where they belong which I've seen in pictures, but I still have some pieces that I'm not sure about. Do they go on something on the gun? I'm having it shipped later, so I won't know for sure for about a week at least. For starters, I'm correct in assuming that these go together, right?
So, where do these go? And this nut? Shouldn't there be two of these? They're all big enough to go together, but I thought that my gun was coming with the already pre-exisitng screws drilled in.
Are these little sticks supposed to be there? Or is that something the machine did that needs to be sanded off?
Here's a link to the gun. Do those screws cancel out the ones I got in my kit? Or are they for something else entirely?
Link:
HTML:
http://darkenergycreations.com/denix1896.aspxPlus, does this make sense to anyone?
"drill 13/64 inch holes and tap for 1/4-20 thread, reinforce stud in magwell with 1/4-20 nut, glue studs in place"
I'm not sure what it means, could someone explain it in simpler terms?
Anyways, let me know if you can answer any of these questions,as they're bugging me and I don't want to/can't start without clearing them up first. Thanks again for your help!
Sincerely, SaltySandals
P.S. Here are the links to the forums and album that I was using for comparison in this post.
Links:
HTML:
http://imperialroyalarms.com/thread/3412/solo-blaster-sound-solos-hold
HTML:
http://www.therpf.com/showthread.php?t=245243&highlight=dark+energy+creations
HTML:
http://s823.photobucket.com/user/artland05/media/Star%20Wars-A%20New%20Hope-%20Han%20Solo%20Blaster%20Gun%20Replica/blasterfrontsightphotoproof-caseclosedcopy_zpsfb855dc3.jpg.html