Walking Dead - Daryl Dixon's New Bike Replica Build

Few updates.

Last night I start the electrolysis to remove the rust from inside the tank. I'll let it run for a few days to see where I sit.

20160613_204343.jpg


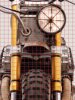
After some back and forth with Cory, we came to the conclusion that 2 different kickstarters were used. Bike 2 uses the TT500 one, and Bike 1 uses the XS650 one. So both appear to be correct. The bike numbering comes from the keychain, each are labeled with a 1 and 2. I think this is where alot of the confusion comes from on some of the parts.

dbikecomp.png


The bike in this shoot is #2

dbike2.png


The close up shots are of bike #1

Bike7.png


Also, there is a 3rd bike out there. The "Pre-apocalypse" bike. This one was made for Normal Reedus and appears to be a version of the bike before TSHTF. Some confusion may come from shots of this bike floating around the web.

preapoc.png
 
Last edited:
:thumbsup :thumbsup never tried cleaning with electrolysis . How'd you do it?
trying to figure out exhaust brass mesh so I finish that up. Not sure if it's woven cloth or a 1 piece sheet
image.jpegimage.jpeg

Took a long ride o the trails today :D
image.jpeg
 
Pretty simple on the electrolysis. Just need a battery charger, one with a 10-20 amp setting.

- Remove the petcocks and replace with a block plate.
- Fill the tank with water and soda crystals
- Clamp the negative lead to the outside of the tank
- Clip the positive lead to a "sacrificial" piece of steel and suspend in the water (not touching the tank)
- Plug in the charger and let sit for a few days.

Ill be checking it today to see how much is gone. If its removed after washing out, then you need to seal the tank with POR15 or something similar. Im just hoping that the inside isnt too far gone.

The #40 brass mesh I ordered should be here on Monday, so I can hold it up to the exhaust and compare shots.
 
Yeah I thought about the electrolysis but don't think my tank is that bad on the inside, I'm gonna just do the bb's and a bit of gas with everything blocked off.. shake and bake bobby! lol

Did they use 1" or 2" on the exhaust wrap? I bought 2" but then looking at it again I was like hmmmm

Getting the kick start wrapped up today with any luck, don't think I'm going to mess with the momentary switch just yet as I'm already behind on getting the frame down for powder.

Got the leather jacket tore apart for the seat need to wrap up the seat pan too.. jeez this is a lot of work!

If that tank is too far gone I've got a 79 that'll need plates welded in the side if you need it let me know!
 
Going to look at using some of the empty area under the tank for the relays and rectifier and such, I really want to be able to utilize the canvas bag through the seat. Decided to save the momentary switch on the kickstart to the very last thing.. If I've got time to do it, I will but I don't want it to hold up getting the frame to the powder coaters.

Worked on the kickstart some and made some progress, gotta design in a stop front and rear and get it finish welded, then on to figuring out the gas tank...
Photo Jun 15, 3 53 19 PM.jpgPhoto Jun 15, 3 53 04 PM.jpg

The shorai batteries are impressive in the size and light weight, kinda mind boggling what they've done with that creation.. Am going to go ahead and use the tray I'd made for under seat battery tray as it will actually fit in the swing arm with very little modification..
Photo Jun 15, 3 52 56 PM.jpgPhoto Jun 15, 3 53 11 PM.jpg
 
Last edited:
Fun fact...MikeXS and Dime City Cycles are located in my area. :D

Literally did not know that until Russ at MikeXS pointed that out earlier today.


So the used tank I had was a total bust. The electrolysis managed to get alot of rust out, but there was more in there. Much more than I was prepared to invest time in. So I went back to MikeXS.....and all the new tanks were sold out. I emailed them to find out when they are coming back in stock.....they aren't. So for those of you looking for the $300 black and gold tanks, they dont exist anymore.

He did mention that he had one that was dented and could let go for much less. But that was THE last tank. This is when I found out they were in Tampa, so I drove down there immediately to take a look. Needless to say, Russ at MikeXS is a pretty cool guy. Gave me a tour of the warehouse and got me the parts I needed personally. I highly recommend these guys.

Now before you guys lose it and get depressed that you cant build the bike now, Russ indicated that a new model tank is coming. They will run $349 but will not include the gas cap like the old one did.

When I got home, my battery and weld on hoop was waiting for me. AWESOME day.

20160616_172704.jpg
 
Last edited:
Niceeee guys! Lots of progress today :D
crazy how light those batteries are.
Kickstarter is lookin good ragtop. You said you got 2" wrap for the exhaust. Looks right. That's what I got as well.
Nathan is that tank on yet! Lol
Today I dropped off my mock up rear fender to get cut out on my friends metal shear. Didn't want sloppy edges.
image.jpeg
 
Yeah I'd seen a couple of those tanks on ebay, I thought for some reason the ones MikeXS was selling were bare metal ones.. The 78-79 tanks are available pretty often, one thing good is they have the right 46mm spacing for the correct petcock, only downside is having to plate over the Yamaha nameplate area as it was a screw in on the sides of the tank.

That battery still trips me out on how lightweight and compact it is!

Been looking around for the brass screen/mesh.. apparently it's easier to get crack than that stuff lol
Hate to order it online as it may not be the same material.. the local head shop actually had some that looked right for hookah pipes but was in an 8"x8" piece and I want to get a larger section for the tail pipes...

Do you guys have any idea how they clear coated or what they coated the brash mesh pieces on the sides of the engine? It looks glossy in the images.
 
Hmmm... have any idea if this is the same fender they used on the front of the bike at classified? I'll go halfies with someone (only need half lol)
front.PNG
 
Last edited:
That one looks much to wide and squarish. The next time I head over the bridge, ill stop in Dime City and check out the fender situation.

I did see one at Mikexs that looked pretty damn close if you cut it up. It is thier black xs650 fender.

fender.png


Although, Cory brought up a good point in earlier convos. He mentioned a bike graveyard that was around the shop and it could have been from pretty much anything. The search continues!

Sent from my SM-N920P using Tapatalk
 
Last edited:
Yeah was looking at it last night, the one one the bike appears to be every bit of 6 1/2" in wide and about 8" long, don't know dimensions on the xs650 but I'd think they would just shape a stock metal one vice splitting and widening a stocker but I guess they could have! Figured one fender like that would be enough metal for both bikes using the ends for the fronts and the remains for the rear.
image.jpg
image.jpeg
 

Attachments

  • image.jpg
    image.jpg
    238.1 KB · Views: 280
  • image.jpeg
    image.jpeg
    135.4 KB · Views: 297
Last edited:
Finally got the kickstart finished up! Was difficult to get get it exactly where I wanted but finally got her done, definitely want to install the swing arm and allow for suspension travel when your doing this.. I wante to put the tab down low but was happy enough to use a single mounting tab for both the spring keeper and the hold stop for the gear. on mine the hole where the tension spring inserts into the shaft is just about where the keeper arm should align with.
Photo Jun 19, 10 06 13 AM.jpgPhoto Jun 18, 12 25 41 PM.jpgPhoto Jun 19, 10 06 34 AM.jpg

Ended up scrapping the original battery tray and made another one from scratch to fit into swingarm... definitely want to put it all together for this one too! Need to have the batter as far to the pass side and back to clear the chain guide, probably could have come down lower in the frame but I was okay with a balance as it ended up cause it clears everything.
Photo Jun 19, 10 04 19 AM.jpgPhoto Jun 19, 10 04 58 AM.jpgPhoto Jun 19, 10 05 11 AM.jpg

Starting on the tank this a.m. Don't have the triple trees back yet but plan on making it slightly adjustable with the mounting point at rear being a bit adjustable to get it right, and see what I can do for the getting most of the harness and such up under the tank, hopefully get that knocked out today and drop for powder tomorrow!
 
Last edited:
If im not mistaken, the battery should be flush with the top of the swingarm, for more concealment.

For the kickstarter mount, have you gotten on it with your body weight? Pretty nifty design for the backside of the mount.

I got the #40 brass mesh in this weekend, I think it works well, but I will have to actually get it on the locations and see how close of a match it is. From the images, it looks like they fold it over and double up the layers.

mesh.png


I was also playing around with some textures this weekend using bedliner spray. I think it is pretty close.

texture.png
 
Last edited:
Haven't tried full weight on the kickstart, big thing I think is to just make sure it stays up... a half turn on that spring (using the same mounting point seems to not bind it up that bad..

Yah, I'd made the bottom rails a little too short to take it down and lower and I was looking at it and was trying to determine what looked right and kinda went with it... I have to cruise to Texas for a week with a family problems but my neighbor offered to drop the frame off for powder coating for me tomorrow..

Got in the covers and the new triple trees today, they are pretty neato.. didn't get to play with them though..

Going to look into the textures and see what they have that is pretty close to that.. if not i'll just go flat black and call it good.. I can drop that battery down later and probably will.. I was just glad to be done with all the cutting and welding to be honest.. that was a lot of work!

Photo Jun 20, 1 27 54 PM.jpgPhoto Jun 20, 1 30 40 PM.jpg
 
My tree came yesterday too....albeit without the shirt I ordered. They must have shipped it separately.

1466460069027.jpg


Now that I have the front end, I can finish up the welding on the tank brackets and start working on the other welds. You are right, LOTS of welding and grinding.....seems like it is never done.
 
Well the powder coating guys have recommended an exterior coating that is emi gloss and has texture roughly like 140 grit sandpaper, should do the trick! Looked all over south Texas for the brass mesh and came up empty handed.. Going with the BK01
image.png
 
You are doing a fantastic job so far. I only know how to put gas into my bike so im blown away by your knowledge and dedication. On another note, why must people always steal other members hard work? Ive trolled around this site for years while researching projects and finally was able to join a week or so ago. I cant tell you how many posts/threads i read about people stealing other members work for profit or personal gain. Even a motorcycle build you have people grabbing parts that you researched and talked about under your nose. I just dont get what is wrong with people? (I would insert the scratchy yellow head here if i knew how to)
 

Your message may be considered spam for the following reasons:

If you wish to reply despite these issues, check the box below before replying.
Be aware that malicious compliance may result in more severe penalties.
Back
Top