You are using an out of date browser. It may not display this or other websites correctly.
You should upgrade or use an alternative browser.
You should upgrade or use an alternative browser.
Walking Dead - Daryl Dixon's New Bike Replica Build
- Thread starter nstevic01
- Start date
I gotta say as a motor head, that bike is not my cup of tea. But they did make one sexy gritty beast and it works! You guys are knocking it out of the park and your dedication to finding the correct parts is amazing.
Thank you for sharing your work with everyone.
Thank you for sharing your work with everyone.
63SSRagtop
Jr Member
I'll say thanks for Nstevic01 as well, I mean it his thread lol... I personally have a higher level of respect for those that build bikes full time.. So far everything has been lining up but it's been an interesting trip! I decided to build this bike just to have something cool to ride with my buddies whacked out BMWS1000R.. This thing is 200hp BMW flagship crotch rocket wrapped in a custom rat rod skin, I'm a photographer so I shot his bike a year or two ago.. He built it to run balls out at Bonneville so we plan on cruising there in August, then I got to thinking, "what the heck could I build that's cool?" BANG! Daryl's bike!
Here's my buddies S1000RR:


We'll definitely be pimping alright at Bonneville this year!
Wanted to mention on the rear hoop, I used the rear lower shock mount as the 'guide' to where the hoop would end, may be really hard to find the right loop but I bought one from this guy and it worked out okay.. I did have to split the loop in the very back center and make another connector as it didn't quite line up, was off about an 1/8 to 1/4 but was easy to do as there was plenty of left over material from the legs.... If you get one from this guy ask him to send another connector (total of 3) will make it a lot easier.. one thing to note, where you end up whacking it to fit it to the frame is right at the point of the radius on both legs so I had to strip cut the spacers and play with them in a vice to make them slight smaller.. just something to be aware of!

Here's my buddies S1000RR:
We'll definitely be pimping alright at Bonneville this year!
Wanted to mention on the rear hoop, I used the rear lower shock mount as the 'guide' to where the hoop would end, may be really hard to find the right loop but I bought one from this guy and it worked out okay.. I did have to split the loop in the very back center and make another connector as it didn't quite line up, was off about an 1/8 to 1/4 but was easy to do as there was plenty of left over material from the legs.... If you get one from this guy ask him to send another connector (total of 3) will make it a lot easier.. one thing to note, where you end up whacking it to fit it to the frame is right at the point of the radius on both legs so I had to strip cut the spacers and play with them in a vice to make them slight smaller.. just something to be aware of!
Last edited:
nstevic01
Well-Known Member
Good info on the hoop. Ive got a local guy I was gonna check to see what he would charge, but $50 isnt bad.
Got more info on the petcocks. The screen accurate ones are the 46mm one that is revesible from mikexs. It has the gold fittings on both sides. Mikexs said they have the smaller 42mm ones for our tanks, but they are one sided. So to get around that I will find a brass bolt to put in the other side. At least visually it will be the same. But if I do manage to get an extra $400 for the right tank and petcocks, Ill go for it.
I will say, I had no idea how many people were building these bikes. I only knew of the 2 from youtube. But the guys over at Progessive said they get calls every day about it. That and the guys here and on the Nighthawk forums. There will be alot of us if everyone is as serious as we are.")
Sent from my SM-N920P using Tapatalk
Got more info on the petcocks. The screen accurate ones are the 46mm one that is revesible from mikexs. It has the gold fittings on both sides. Mikexs said they have the smaller 42mm ones for our tanks, but they are one sided. So to get around that I will find a brass bolt to put in the other side. At least visually it will be the same. But if I do manage to get an extra $400 for the right tank and petcocks, Ill go for it.
I will say, I had no idea how many people were building these bikes. I only knew of the 2 from youtube. But the guys over at Progessive said they get calls every day about it. That and the guys here and on the Nighthawk forums. There will be alot of us if everyone is as serious as we are.
Sent from my SM-N920P using Tapatalk
Last edited:
nstevic01
Well-Known Member
Im still sourcing some more accurate parts, that is why it is on hold.
http://www.therpf.com/showthread.php?t=257497
Sent from my SM-N920P using Tapatalk
http://www.therpf.com/showthread.php?t=257497
Sent from my SM-N920P using Tapatalk
63SSRagtop
Jr Member
Well damn that makes a lot of sense!
It'd slipped my mind that they used a reproduction tank as I couldn't find who or where they were made before I came upon a 78 thank that had the bungs for the Yamaha tank plates, bought it and was gonna fill it in but noticed the 78 didn't have the little shelf thing right where the petcocks mounted so looked again and found the 74 did and used stickers or vinyl for the side plates.. The repop tanks (know where they get them?) are modeled after the 74 but have the 78 46mm petcocks.. damnit.
Going to have to look at them closer, sounds like I may be cutting out some 46mm tank pieces and welding on the tank or looking at possilbly swapping bases on the petcocks themselves, great! more cutting and welding to do! lol That center stand bracket removal was/is a total pain in the buttocks!
63SSRagtop
Jr Member
Good timing! Just got my kickstart arm and the master cylinder cup! Good news is it fits the jackshaft spindle, it doesn't look to be the exact one as there isn't a slight arch but hey, its going on the bike!


Thought these grid snaps might help with your build for orientation/placement, the side profile is about spot on to scale in inch increments, used the 2" downtube for reference, haven't scaled the front and rear but still should be useful!


Thought these grid snaps might help with your build for orientation/placement, the side profile is about spot on to scale in inch increments, used the 2" downtube for reference, haven't scaled the front and rear but still should be useful!
63SSRagtop
Jr Member
The cone portion of the mount is already a part of the clutch housing, it's the old mirror mount.. just need a metric bolt and your good to go!
CoryWinant
New Member
Hey Everyone!
This is one of the best threads I've seen in a while. People sharing information with an open mind and no haters lol. Thanks for all the info you are sharing Nstevic01 and 63SSRagtop. Got to chat with Nathan today and exchange some ideas. Really awesome guy, can't wait to see how the project goes!
-Cory
63SSRagtop
Jr Member
No worries Cory! Looks like you've already built the beast! Have any more pics?
I messed around with building the battery box and getting the tank mounts mocked up today.. sooo didn't realize how much metal work
would need to be done before powder coating, very time consuming! Of course I'm a better grinder than I am a welder lol


I messed around with building the battery box and getting the tank mounts mocked up today.. sooo didn't realize how much metal work
would need to be done before powder coating, very time consuming! Of course I'm a better grinder than I am a welder lol
nstevic01
Well-Known Member
Made some decent progress this weekend thanks to Cory. He was able to correct some of my inaccurate deductions, such as the location of the battery and how the tank mounts. He also sent me a vid of his bike running....it sounds so nice.
First things first, Cory was kind enough to share some of the instagram photos from the walking dead build that I had no idea existed. This actually shows how the tank is mounted. The stock tab is cut off and a new bracket is welded on.

So I welded on some flat stock, you can see there is a big difference in height. According to Cory, the stock tab interferes with the seat being mounted, so it has to go.

New tank bracket welded on

This shot shows you about where the tank tabs in the front lay. I have to wait until my front end is done before welding in the support cups. I need to make sure that the forks clear the tank.

I also got the rear end welded up.


So it looks like I misidentified the location of the battery. What I thought was the battery in the reference photos turned out to be the CDI box. So here is the correct location, the back side of the swing arm.

First things first, Cory was kind enough to share some of the instagram photos from the walking dead build that I had no idea existed. This actually shows how the tank is mounted. The stock tab is cut off and a new bracket is welded on.
So I welded on some flat stock, you can see there is a big difference in height. According to Cory, the stock tab interferes with the seat being mounted, so it has to go.
New tank bracket welded on
This shot shows you about where the tank tabs in the front lay. I have to wait until my front end is done before welding in the support cups. I need to make sure that the forks clear the tank.
I also got the rear end welded up.
So it looks like I misidentified the location of the battery. What I thought was the battery in the reference photos turned out to be the CDI box. So here is the correct location, the back side of the swing arm.
Last edited:
CoryWinant
New Member
It's cool to work together with you guys on this. Ragtop(not sure of your name lol) I couldn't agree more, the metal work is very time consuming! Especially if you're not a professional welder like me. Just have to be good at grinding welds down lol.
Looking good Nathan! you don't waste any time Hope you're triples get in soon so you can finish up that tank mount.
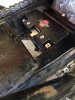
here is the battery mount for in-between the swingarm. I going to take it off and get some better pics of how it's bolted up to the bike.

Looking good Nathan! you don't waste any time
Hope you're triples get in soon so you can finish up that tank mount.here is the battery mount for in-between the swingarm. I going to take it off and get some better pics of how it's bolted up to the bike.
Attachments
63SSRagtop
Jr Member
Yeah I deduced that mounting tab was adios and plated up in the neck, didn't realize the battery was in in the swingarm, I'm not a fan of that location though to be honest.. Spent today wrapping up the under seat mount.. I hope I got the dimensions right for the battery! Kickstart and gas tank tomorrow THEN maybe powdercoating Wednesday!


CoryWinant
New Member
Nice fabrication work man. Looks nice. Did you decide what finish you are going to powder coat it? I've been grinding welds down for the past hour lol
63SSRagtop
Jr Member
Think the guy that does the powder was suggesting a 30% which really is just a flat black.. I've got some rattle cans in bronze and brown and of course the white for the pettina on the frame.. think when I drop that frame off I'm going to practice a bit on my parts bike and see how hard it is to do..
63SSRagtop
Jr Member
Damn now I'm wondering if I shouldn't do the swing arm thing.. What specific battery is that? I ended up ordering this one but don't have it in my hands just yet

Similar threads
- Replies
- 2
- Views
- 322
- Replies
- 24
- Views
- 1,477
- Replies
- 7
- Views
- 375