Hi, I have been looking at the progress of your bike for a while and it is awesome. It has inspired me to build my own, a pre-apocalypse painted version and you have definitely given me some great tips. I think I have also just bought the last xs650 tank in the world!! I have a couple of questions though if you would be good enough to answer for me please? In the last post you mentioned about the breather tube, do you have a picture at all and is it still connected from rocker cover to crank case? Also did you have to remount the coils in another position under the tank as I am finding it difficult to seat it properly?. Many thanks and again great work!
You are using an out of date browser. It may not display this or other websites correctly.
You should upgrade or use an alternative browser.
You should upgrade or use an alternative browser.
Walking Dead - Daryl Dixon's New Bike Replica Build
- Thread starter nstevic01
- Start date
63SSRagtop
Jr Member
The coils should mount in the stock location, it's critical to get the tank positioned properly or rather getting the cups welded in the right place.. depending on where it is your hitting it did look like the mounting tubes on the frame could be shortened a tad to bring them closer together but moving them would be a pita.. if I had to I'd probably fab up a mount that would mount in original holes to relocate mounting points for the coils but you should be able to use the stock mounts.. Is the tank sitting too low in the front??
In regards to the breather, in stock configuration on the bike there is a three line that junction at a T .. a leg from the head, one from the lower crank case and the last one used to go to the stock airbox on the bike.. all you need to do is either fashion a small screened breather or buy one online.. but the system definitely needs to breathe.. the pistons pumping displace too much air for it to be a closed system.
This is what I ended up doing but tucked it under the carbs on the left side.. may end up doing something a little different as it seems to bind up on a little on the throttle linkage.. I think any flexible tubing that will fit the nipples with an inline T filter would work..
Last edited:
nstevic01
Well-Known Member
Seany1973, I did in fact end up with THE last of the old model MikeXS repro tanks. When I was down there picking it up they said they were bringing in a new model of tank to replace them albeit with a few subtle changes. I will say, having bought a real XS650 tank as well, the fitment is a little different, but not by much. So between the new model repro tank or a stock tank, there may be some differences between the older repro tank and that could be what you are seeing. Here are a few shots of what the tank cups look like and with the tank and coils mounted in the stock location. They do fit, you just have to play with tank placement before tacking in the cups. Just eyeball it in comparison to the reference shots. I did end up having to grind down the original tank pegs and the bases quite a bit to make the tank sit just right though. The lower line of the tank does not sit even with the frame under the seat. It angles down ever so slightly.


Last edited:
Thanks for getting back to me, this is great. I just need that old thing called patience haha. So it looks like I will be busy this weekend grinding and welding then. Have you both used stock rubber mounts under the tank? Also the breather look easy enough too, I will do the same and add a small filter. Cheers guys!
Just by accident earlier I happened to find two ends that I cut off a pair of mountain bike grips and they fit perfectly. Tank sits much better now. Got to get those cups mounted now. Thanks, also just got my rear shocks today.... I'm all excited. Sad I know but they are beautiful. Lol
nstevic01
Well-Known Member
So finding a Strykezone 380 at a good price is a fairly hard task, let alone getting the screen accurate Strykezone 380 in Optifade. I've come to the conclusion that it's impossible. I have eBay set to alert me to any Strykezone 380s that pop up, and there has only been 2 in the last 5 months. So in order to get the crossbow rack built, I opted for another option. Just buy the frame. I managed to pick up a damaged frame on eBay for $40. At least now I can continue with fabrication.

Also started getting the base coats on the engine covers. Once those have cured, I can get into the weathering and detail work.

Also started getting the base coats on the engine covers. Once those have cured, I can get into the weathering and detail work.
Last edited by a moderator:
63SSRagtop
Jr Member
I had the same issue with the woodlands camo, I'm going to get a hydrodip setup to get the stock done correct.. apparently they only issued that particular one for a certain year.. Hydro dip stuff looks very interesting! Going to do the other Yamaha tank with a pattern for the trike..
nstevic01
Well-Known Member
I was worried about the overall look as well. I wanted to go with something that was sleek, yet removable. I found a company call Slip Grip Car Mounts that makes every combination of phone holder you can think of. I picked up a mount that works specifically with motorcycles and has a molded clip for my Note 5 in a Otterbox. I downloaded an app called Ulysses Speedometer that takes care of all gauges. I have plans to write an app that is basically a full replacement for the cluster, including the indicator lights. But that will take some time.


63SSRagtop
Jr Member
Dime city cycles has some interesting instrument swag.. I was looking at the 2.5 speedo then decided to simply go au natural... Was going to just put a small row of the idiot lights and blinkers with the small radio shack led's but then figured hey, each gear is good for about 10 mph so other than just wide open I have a pretty good idea of my speed..
http://www.dimecitycycles.com/motorcycle-parts.html?cat=1853&limit=all
http://www.dimecitycycles.com/motorcycle-parts.html?cat=1853&limit=all
63SSRagtop
Jr Member
Hmm dunno about that one, could probably ping the manufacturer or possibly a CB tech manual?
heisenbucks
New Member
Ragtop, what'd you do with all the hoses coming out of the carb? I'm in the process of installing these custom boxes. I have all these hoses that go nowhere now... can I just remove them?

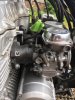
I have one small breather pipe coming out of the 2nd rubber air intake and the petrol supply hose. If you are putting aftermarket air boxes on this should be ok to cap off, that's what I was planning to do 

- - - Updated - - -
The one with green tape is the breather
- - - Updated - - -
The one with green tape is the breather
Attachments
heisenbucks
New Member
I got hoses coming out of everywhere lol!
Hi Guys
This is an awesome thread, you have done an amazing job. I am working on a similiar build but since a lot of parts are not available around me i had to make some mods. Can any of you tell me what is your turn radius after the front swap? By that I mean how much can you turn your wheel before hitting the tank? My set up has a significantly smaller radius then on the original nighthawk. I am wondering if that is normal?
You have already been a lot of help but i would really appriciate if one of you could make a measurement.
Thnx in advance
Z
Similar threads
- Replies
- 2
- Views
- 338
- Replies
- 24
- Views
- 1,525
- Replies
- 7
- Views
- 377